 Mower Operator Manual EN 1")
 Mower Operator Manual EN 2")
 Mower Operator Manual EN 3")
 Mower Operator Manual EN 4")
 Mower Operator Manual EN 5")
 Mower Operator Manual EN 6")
 Mower Operator Manual EN 7")
%20Mower%20Operator%20Manual%20EN&url=https://automanual.net/doc/claas-disco-9200-f65-mower-operator-manual-en/&media=https://automanual.net/wp-content/uploads/2024/04/claas-disco-9200-f65-mower-operator-manual-en-1.jpg)
Claas Disco 9200 (F65) Mower Operator Manual EN
$50.00
- Model: Disco 9200 (F65) Mower
- Type Of Manual: Operator Manual
- Language: EN
- Format: PDF(s)
- Size: 185 MB
File List:
00 0288 014 3.pdf
00 0292 625 4.pdf
00 0297 068 5.pdf
00 1329 399 0.pdf
00 2348 408 0.pdf
00 2348 427 0.pdf
00 0288 014 3.pdf:
EASY on board app
Table of contents
1 Introduction
1.1 General information
1.1.1 Validity of the manual
1.1.2 Information about this Operator’s Manual
1.1.3 Symbols and notes
1.1.4 Qualified specialist workshop
1.1.5 Maintenance notes
1.1.6 Notes on warranty
1.1.7 Spare parts and technical questions
1.1.8 Technical requirements
1.2 Intended use
1.2.1 Intended use
1.2.2 Reasonably foreseeable misuse
2 Safety
2.1 Identifying warnings
2.1.1 Hazard signs
2.1.2 Signal word
2.2 Safety rules
2.2.1 Meaning of Operator’s Manual
2.2.2 Requirements made on all persons working with the product
2.2.3 Hazard areas
2.2.4 Check interactions with self-propelled machines / tractors and implements
2.2.5 Structural changes
2.2.6 Optional equipment and spare parts
2.2.7 Technical status
2.2.8 Hazard caused by damage to the product
2.2.9 Visibility of work area
2.2.10 Glare and reflections
2.2.11 Unintentional triggering of functions
2.2.12 Hazards caused by signal tones
2.2.13 Unauthorised use
2.2.14 Use of mobile terminal outside the cab
2.2.15 Follow the safety instructions
2.2.16 Respecting technical limit values
2.2.17 Preparing the product for road travel
2.2.18 Hazards when driving on the road and on the field
2.2.19 Hazards when driving on the road with an ISOBUS implement
2.2.20 Switching off the mobile terminal while driving
2.2.21 Hazards from disturbance of WLAN environment
2.2.22 Hazards from covering up the App
2.2.23 Hazards caused by malfunctions of the app
2.2.24 Raised machine parts and loads
3 Product description
3.1 Overview and method of operation
3.1.1 Overview of CWI
3.1.2 Functions of CWI
3.2 Identification plates and identification numbers
3.2.1 CWI identification plate
3.3 Information on the product
3.3.1 Factory settings
3.3.2 Software and hardware version
3.3.3 Seal on the CWI
4 Operating and display elements
4.1 CLAAS Wireless Interface (CWI)
4.1.1 CWI operating elements
4.2 CWI Setup App
4.2.1 Overview of screen
4.2.2 Buttons
4.2.3
4.2.4
4.2.5
5 Technical specifications
5.1 CLAAS Wireless Interface (CWI)
5.1.1 Specification
6 Preparing the product
6.1 Installing the product
6.1.1 Installing the CWI Setup app
6.1.2 Installing the EASY on board app
6.1.3 Connecting the tablet
7 Operation
7.1 Initial operation
7.1.1 Establishing the WLAN connection for the first time
7.1.2 Changing factory settings
7.1.3 Establishing the WLAN connection
7.2 CWI Setup App
7.2.1 Calling up menus
7.2.2 Establishing a secure data connection
7.2.3 Deleting a secure data connection
7.2.4 Displaying the software version
7.3 CWI Setup – Settings
7.3.1 Changing settings
7.3.2 Switching LEDs on and off
7.4 CWI setup – Advanced settings
7.4.1 Deleting the connection partner in CWI
7.4.2 Deleting the connection partner on the tablet
7.4.3 Resetting the CWI to factory settings
7.4.4 Resetting the tablet to factory settings
7.4.5 Switching the CAN filter on and off
7.5 EASY on board App
7.5.1 Launching Operator’s Manual
8 Faults and remedies
8.1 Overview of problems
8.1.1 CWI faults
8.1.2 Fault message: USB charging connection was disconnected
8.1.3 Fault message: Tablet outside WLAN reception area
8.1.4 Fault message: Screen locked
9 Maintenance
9.1 Maintenance schedules
9.1.1 Daily
9.2 Tablet
9.2.1 Cleaning the tablet
9.2.2 Downloading software updates
9.2.3 Updating the operating system
10 Putting out of operation and disposal
10.1 General information
10.1.1 Decommissioning and disposal
11 EC declaration of conformity
11.1 CLAAS Wireless Interface (CWI)
11.1.1 EU Declaration of conformity
12 Technical terms and abbreviations
12.1 Terms and explanations
12.1.1 Abbreviations
12.1.2 Technical terms
00 0292 625 4.pdf:
COMMUNICATOR II
Table of contents
1 Introduction
1.1 Notes on the manual
1.1.1 Validity of manual
1.1.2 Information about this Operator’s Manual
1.1.3 Symbols and notes
1.1.4 Optional equipment
1.1.5 Qualified specialist workshop
1.1.6 Maintenance notes
1.1.7 Notes on warranty
1.1.8 Spare parts and technical questions
1.2 Intended use
1.2.1 Intended use
1.2.2 Reasonably foreseeable misuse
2 Safety
2.1 Identifying warnings
2.1.1 Hazard signs
2.1.2 Signal word
2.2 Safety rules
2.2.1 Meaning of Operator’s Manual
2.2.2 Requirements made on all persons working with the product
2.2.3 Hazard areas
Hazard areas
2.2.4 Interaction between the control terminal and the machine or tractor
2.2.5 Structural changes
2.2.6 Optional equipment and spare parts
2.2.7 Technical status
2.2.8 Danger from damage to the machine
2.2.9 Complying with technical limit values
2.2.10 Preparing the product for road travel
2.2.11 Hazards when driving on the road and in the field
2.2.12 Hazards when driving on the road with an ISOBUS implement
2.2.13 Switching off the terminal while driving
2.2.14 Electrocution by electrical system
2.2.15 Only carry out work on the machine when it is stopped
2.2.16 Maintenance operations and repair work
2.2.17 Raised machine parts and loads
2.2.18 Welding work prohibited
3 Product description
3.1 Overview and method of operation
3.1.1 Overview of COMMUNICATOR II
3.1.2 Function of COMMUNICATOR II
3.2 Identification plates and identification numbers
3.2.1 Identification plate of COMMUNICATOR II
4 Operating and display elements
4.1 COMMUNICATOR II
4.1.1 Terminal
4.1.2 Terminal program
4.2 Universal terminal menu structure (service)
4.2.1 Main menu of universal terminal
4.2.2
4.2.3
4.2.4
4.2.5
4.3 Job processing (task) menu structure
4.3.1 Job processing main menu
4.3.2
4.3.3
4.3.4
4.3.5
4.3.6
5 Technical specifications
5.1 COMMUNICATOR II
5.1.1 Specification
6 Preparing the product
6.1 Switching off and securing the machine
6.1.1 Shut down and secure the machine
7 Operation
7.1 Switching COMMUNICATOR II on/off
7.1.1 Switching COMMUNICATOR II on
7.1.2 Selecting the application
7.1.3 Switching off COMMUNICATOR II
7.2 Programmable keys
7.2.1 Displaying the key assignment
7.2.2 Creating a key assignment
Step 1: Selecting the control and the key
00 0297 068 5.pdf:
DISCO 9200 C AUTOSWATHER
Table of contents
1 Introduction
1.1 Notes on the manual
1.1.1 Validity of manual
1.1.2 Information about this Operator’s Manual
1.1.3 Symbols and notes
1.1.4 Optional equipment
1.1.5 Qualified specialist workshop
1.1.6 Maintenance notes
1.1.7 Warranty notes
1.1.8 Spare parts and technical questions
1.2 Intended use
1.2.1 Intended use
1.2.2 Reasonably foreseeable misuse
2 Safety
2.1 Identifying warnings
2.1.1 Hazard signs
2.1.2 Signal word
2.2 Safety rules
2.2.1 Importance of Operator’s Manual
2.2.2 Observe the safety decals and warnings
2.2.3 Requirements for all persons working with the machine
2.2.4 Children in danger
2.2.5 Hazard areas
2.2.6 Staying between the tractor and the machine
2.2.7 Hitching the tractor to the machine
2.2.8 Risk of injury from rotating shafts
2.2.9 Structural changes
2.2.10 Optional equipment and spare parts
2.2.11 Control of the machine while it is running
2.2.12 Operation only after proper putting into operation
2.2.13 Technical condition
2.2.14 Danger from damage to the machine
2.2.15 Respecting technical limit values
2.2.16 Danger from machine parts running on
2.2.17 Keeping the safety devices functional
2.2.18 Personal protective equipment
2.2.19 Wearing suitable clothing
2.2.20 Removing dirt and loose objects
2.2.21 Preparing the machine for road travel
2.2.22 Hazards when driving on the road and in the field
2.2.23 Parking the machine safely
2.2.24 Unsupervised parking
2.2.25 Unsuitable operating utilities
2.2.26 Safe handling of operating materials and auxiliary materials
2.2.27 Environmental protection and disposal
2.2.28 Fire prevention
2.2.29 Lethal electrocution from overhead lines
2.2.30 Behaviour in case of voltage flash-over from overhead lines and when lightning strikes
2.2.31 Noise may cause health damage
2.2.32 Pressurised fluids
2.2.33 Hot surfaces
2.2.34 Only carry out work on the machine when it is stopped
2.2.35 Maintenance work and repairs
2.2.36 Raised machine parts and loads
2.2.37 Danger from welding work
2.3 Safety marking
2.3.1 Layout of safety decals
2.3.2 Safety decals on the machine
3 Machine description
3.1 Overview and method of operation
3.1.1 Overview of machine
3.1.2 Overview of cross conveyors
3.1.3 Overview of hydraulic valves
Hydraulic valves for mowers
3.1.4 Overview of the sensors on the machine
3.1.5 Overview of the cutting disc direction of rotation
3.1.6 Functions of the machine
3.2 Optional equipment
3.2.1 High-cut skids*
3.2.2 Double high-cut skids*
3.2.3 Wear skids*
3.2.4 Bar protection*
3.2.5 High-cut skid box*
3.2.6 EASY on board App*
Requirements made on the tablet (not included in the shipping package)
3.2.7 ISOBUS connecting cable*
3.2.8 Speed signal cable*
3.2.9 Order printer for ISOBUS*
3.2.10 Battery cable*
3.2.11 Slip-on yoke for 8-piece universal drive shaft*
3.2.12 TOPLINK adapter*
3.2.13 Adapter balls, category IV*
3.2.14 Hydraulically folding safety guards*
3.2.15 On-board hydraulics*
3.2.16 Hydraulic connection for AXION 900*
3.2.17 Slope control*
3.2.18 ACTIVE FLOAT adjustment, front*
3.2.19 Front lift actuation*
3.2.20 Front speed monitoring* and digital pressure indicator*
3.2.21 Actuation of the hydraulically folding front safety guards*
3.2.22 Worklights*
3.2.23 Cross conveyor cover cloth*
3.2.24 Legal equipment for France*
3.2.25 Lighting adapter for USA*
3.3 Identification plates and vehicle identification number
3.3.1 Machine identification plate
3.4 Information on the machine
3.4.1 Program version
3.4.2 Stickers on the machine
4 Operating and display elements
4.1 Controls
4.1.1 Star handles
4.1.2 Rear stand
4.1.3 Front stand
4.1.4 Lever
4.2 Display elements
4.2.1 Pressure gauges
4.2.2 Adjusting aid
4.3 COMMUNICATOR II
4.3.1 Overview of COMMUNICATOR II*
4.4 Monitor
4.4.1 Overview of monitor
4.4.2 Menu bar
4.4.3 ISOBUS status bar
4.5
4.5.1 Mowers in transport position
4.5.2 Mower in working position
4.5.3
4.6
4.6.1
4.6.2
4.6.3
4.6.4
4.7
4.7.1
4.7.2
4.7.3
4.8
4.8.1 Overview of
4.8.2
4.9
4.9.1 Overview of
4.9.2
4.9.3
4.9.4 Machine performance recorder summaries
4.10
4.10.1 Overview of
4.10.2 Overview of
4.10.3 Basic setting (Initialise)
4.10.4
5 Technical specifications
5.1 DISCO 9200 C AUTOSWATHER
5.1.1 Dimensions
5.1.2 Weights
5.1.3 Requirements on the tractor
5.1.4 Version
5.1.5 Sound pressure level
5.1.6 Lubricants
6 Machine preparation
6.1 Switching off and securing the machine
6.1.1 Switching off and securing the tractor and machine
6.1.2 Securing the raised machine
6.2 Adapting the tractor
6.2.1 Checking the ballasting of the tractor
Calculating the minimum front ballast
Calculating the minimum rear ballast
Calculating the actual front axle load
Calculating the actual total weight
Calculating the actual rear axle load
Calculation table
6.2.2 Adapting power supply
6.2.3 Converting the Walterscheid upper link
6.2.4 Installing the COMMUNICATOR II*
6.3 Adapting the machine
6.3.1 Universal drive shaft – checking the length
6.3.2 Adapting the universal drive shaft length
6.3.3 Fitting the universal drive shaft to the machine
6.3.4 Adapting the lower link category
6.3.5 Adjust the position of the lower link pin
6.3.6 Adapting the upper link category
6.3.7 Adjust the position of the upper link pin
6.3.8 Adapting the hydraulic system
6.3.9 Adapting the hydraulic system of the on-board hydraulics*
6.3.10 Installing the high-cut skids*
6.3.11 Attaching the double high-cut skids*
6.3.12 Removing the high-cut skids*
6.3.13 Installing wear skids*
6.3.14 Adjusting the conditioner speed
6.3.15 Adapting the overlap
Relocating mower units
Greasing the pin
Relocating marking arrow and stop buffer
Screwing on shock absorber and adjusting aid
Attach load relief spring
Adjusting the load relief spring
Adjusting the load relief of the mower units
6.3.16 Relocating the cross conveyors
6.3.17 Removing the cross conveyors
6.3.18 Installing the cross conveyors
6.4 Hitching the machine
6.4.1 Fitting the lower link
6.4.2 Fitting the upper link
6.4.3 Installing the universal drive shaft
6.4.4 Connecting the hydraulic hose lines
6.4.5 Working without tractor hydraulics (P2)
6.4.6 Connecting the lighting cable
6.4.7 Connecting front mower speed monitoring*
6.4.8 Compensating for internal leakage
6.4.9 Connecting COMMUNICATOR II*
6.4.10 Connecting the tablet*
6.4.11 Raising the stands
Front stand
Rear stands
6.5 Unhitching the machine
6.5.1 Disconnecting front mower speed monitoring*
6.5.2 Unhitching the front mower unit
6.5.3 Lowering the stands
Front stand
Rear stands
6.5.4 Disconnecting the COMMUNICATOR II*
6.5.5 Storing the control terminal
6.5.6 Disconnecting the tablet*
6.5.7 Disconnecting the lighting cable
6.5.8 Disconnecting the hydraulic hoses
6.5.9 Removing the universal drive shaft
Safety fastening
QS fastening
6.5.10 Unhooking the upper link
6.5.11 Unhooking the lower link
6.6 Prepare road travel
6.6.1 Lifting to transport position
6.7 Preparing the working position
6.7.1 Lowering to working position
6.8 Loading the machine
6.8.1 Loading and unloading the machine
7 Operation
7.1 Driving on the road
7.1.1 Driving on public roads
7.1.2 Transport width with double high-cut skids* fitted
7.2 Fieldwork settings
7.2.1 Adjusting the mounting frame
7.2.2 Adjusting the load relief of the mower units
7.2.3 Adjusting the cutting height
7.2.4 Adjusting the tine conditioner
7.2.5 Adjusting the swathing plates
7.2.6 Adjusting the guide flap and safety cover
7.2.7 Tensioning the collision protection
7.3 Fieldwork
7.3.1 To be observed during fieldwork
7.3.2 Machine use
7.3.3 Adapting the PTO shaft speed
7.3.4 Mowing methods
7.3.5 Mowing with and without cross conveyors
Mowing with both cross conveyors
Mowing with one cross conveyor
Mowing without cross conveyors
7.3.6 Headland position
7.3.7 Lifting and lowering cross conveyors
7.3.8 Switching the conveyor belts on and off
7.3.9 Instructions for mowing
7.3.10 Recommendations for difficult operating conditions
7.3.11 Recommendations for heavy forage quantities
7.3.12 Recommendation for environmental protection
7.4 ISOBUS control unit
7.4.1 Description
7.4.2 Explanations of ISOBUS terminology
7.4.3 Operating modes
Main operating mode
Main operating mode
Additional operating mode
Additional operating mode
7.5 COMMUNICATOR II
7.5.1 COMMUNICATOR II* recommendations
7.5.2 Operating the COMMUNICATOR II*
7.6 EASY on board app
7.6.1 EASY on board App* recommendations
7.6.2 Operation of the EASY on board App*
7.7 Switching the terminal on and off
7.7.1 Before switching on the terminals
7.7.2 Switching on the terminal
7.7.3 Starting the control program
7.7.4 Pressing keys
7.7.5 Switching off the terminal
7.7.6 Switching off the control program automatically
7.8 Calling up the menus
7.8.1 Changing the menu
7.8.2 Calling up the
7.8.3 Calling up the
7.8.4 Calling up the
7.9 Control unit transport position
7.9.1 Lifting mowers to transport position
7.9.2 Lowering mowers from transport position
7.10 Control unit working position
7.10.1 Raising the mowers to the headland position in
7.10.2 Lowering the mowers in
7.10.3 Raising and lowering mowers using the
7.10.4 Raising and lowering the mowers individually in automatic mode
7.10.5 Manually lifting mowers above an obstacle in automatic mode
7.10.6 Manually raising and lowering mowers
7.10.7 Manually activating float position
7.10.8 Saving the height settings of the mounting frame
7.11 Safety guard control
7.11.1 Folding the safety guards up
7.11.2 Folding the safety guards down
7.12 Cross conveyor control
7.12.1 Raising and lowering cross conveyors in automatic mode
7.12.2 Manually raising and lowering cross conveyors
7.12.3 Switching cross conveyors off and on
7.12.4 Changing the speed of the cross conveyors
7.12.5 Swapping right and left belt speeds and balancing pressure
7.12.6 Adjusting slope control*
Activating slope control
Calling up the adjustment menu for slope control
Adjusting correction values for the speed of the cross conveyors
Adjusting correction values for balancing pressures of the mowers
Adjusting the maximum balancing pressure
Restoring the basic setting values for slope control
Example adjustment of slope control
7.13 Control unit, settings
7.13.1 Adjusting the headland height
7.13.2 Adjusting the overlap when driving along a crop edge
7.13.3 Setting the reduction of belt speed with individual lifting function
7.13.4 Setting the increase of belt speed during lifting (Belt Boost)
7.13.5 Activating
7.13.6 Deactivating the
7.13.7 Activating the
7.13.8 Deactivating the
7.13.9 Manually switching work lights on and off
7.14 Balancing pressure control
7.14.1 Adjusting the balancing pressure
7.14.2 Briefly setting the balancing pressure to zero
7.14.3 Manually increasing the balancing pressure
7.14.4 Swapping the balancing pressure on the left and right when moving across the slope
7.14.5 Select the front mower unit type
7.14.6 Adjusting the front balancing pressure switching threshold
7.15 Control unit, drive monitoring
7.15.1 Drive monitoring
7.15.2 Setting the maximum speed difference
7.15.3 Listening to the signal tone
7.16 Control unit, maintenance counter
7.16.1 Maintenance alarm
7.16.2 Clearing the maintenance alert
7.16.3 Manually activating central lubrication*
7.16.4 Adjusting the pause between the lubrication cycles*
7.17 Control unit, order management
7.17.1 ISOBUS task management
7.17.2 Displaying order data
Order-dependent counters
Non-order-dependent counter
Selecting an order
Printing an order
7.17.3 Creating a job
7.17.4 Switching data entry on and off
7.17.5 Activating and deactivating the area counter for the front mower
7.17.6 Displaying the machine performance recorder summaries
Printing the data from the
7.18 Control unit, fault messages
7.18.1 Hydraulic oil temperature too high
7.18.2 Alarm screen sensor faults
7.18.3 Alarm screen front mower connecting cable
7.18.4 Sensor fault
7.19 Control unit, basic settings (initialisation)
7.19.1 Learning the end stop
7.19.2 Restoring the factory settings
Factory settings
7.19.3 Reloading the control programme
7.20 ISOBUS Auxiliary function (AUX)
7.20.1 Available functions
7.20.2 Programmable keys for the CLAAS tractor
COMMUNICATOR II*
CEBIS version of CLAAS AXION 900 / AXION 800 / ARION 600
7.20.3 Converting the FENDT Vario tractor terminal
7.20.4 Programmable keys of the Fendt VARIO tractor
Fendt VARIO 900 SCR / 900 S4 / 800 SCR / 800 S4 / 700 SCR / 700 S4
Suggestion 1
Fendt VARIO 900 SCR / 900 S4 / 800 SCR / 800 S4 / 700 SCR / 700 S4
Suggestion 2
Fendt Vario 820 / 818 / 817 / 815 / 718 / 716 / 714 / 712 / 711
COMMUNICATOR II*
7.21 ISOBUS operation option – Fendt
7.21.1 Using the tractor terminal
7.21.2 Tractor terminal and joystick
7.21.3 Using the COMMUNICATOR II* and joystick
7.22 Front lift actuation*
7.22.1 Front lift actuation*
Lifting delay
Setting the lifting delay
8 Faults and remedies
8.1 Overview of problems
8.1.1 Overview of problems on the machine
8.1.2 Fault code table
8.2 Emergency operation
8.2.1 Notes on emergency operation
8.2.2 Procedures prior to emergency operation
8.2.3 Actuating hydraulic valves manually
8.2.4 Lifting mowers to transport position using emergency operation
Lifting the left mower
Lifting the right mower
8.2.5 Lowering the mower to working position using emergency operation
Lowering the left mower
Lowering the right mower
8.2.6 Cancelling the load relief with the emergency operation
Left mower
Right mower
8.2.7 Lowering the cross conveyors to working position in emergency operation
Lowering the left cross conveyor
Lowering the right cross conveyor
Securing the cross conveyors
8.3 Electric and electronic system
8.3.1 Control unit cannot be switched on
8.3.2 Checking and adjusting the angular sensors
8.3.3 Checking and adjusting the Reed contact
8.3.4 Defective incandescent lamps
Changing direction indicator lamps
Changing LED lamps
8.4 Central lubrication system
8.4.1 Overview of faults in the central lubrication system*
8.4.2 Manual lubrication of lubrication points
8.5 Mower unit
8.5.1 The cutting disc no longer turns
9 Maintenance
9.1 Maintenance interval overview
9.1.1 Before the harvest
9.1.2 After the first 10 operating hours
9.1.3 After the first 50 operating hours
9.1.4 Every 8 operating hours
9.1.5 Every 20 operating hours
9.1.6 Every 100 operating hours
9.1.7 Every 250 operating hours
9.1.8 Every 500 operating hours or annually
9.1.9 Every 5 years
9.1.10 After the harvest
9.2 Gearbox
9.2.1 Checking the gearbox for leaks
9.2.2 Checking the oil level in the main gearbox
9.2.3 Change the oil in the main gearbox
Draining oil
Topping up oil
9.2.4 Check the oil level of the gearbox for on-board hydraulics*
9.2.5 Changing the oil in the on-board hydraulics* gearbox
Draining oil
Topping up oil
9.2.6 Checking the angle drive oil level
9.2.7 Changing the angle drive oil
Draining oil
Topping up oil
9.3 Clutch
9.3.1 Checking the overload clutch
9.3.2 Removing the friction clutch
9.3.3 Attaching the friction clutch
9.3.4 Venting the friction clutch
9.3.5 Checking the friction discs
9.3.6 Clean the friction clutches for the universal drive shafts
9.4 Universal drive shaft
9.4.1 Servicing the universal drive shafts
9.5 Hydraulic system
9.5.1 Reducing the pressure in the hydraulic system
9.5.2 Checking the hydraulic hoses
9.5.3 Replacing the hydraulic oil filter
9.5.4 Checking the oil level in the hydraulic oil tank*
9.5.5 Changing the oil in the hydraulic oil tank*
Draining oil
Topping up oil
9.5.6 Changing the hydraulic oil filter in the hydraulic oil tank*
9.5.7 Cleaning the cooler of the hydraulic oil tank*
9.5.8 Checking the accumulator
9.5.9 Removing the load relief cylinders
9.5.10 Attaching the load relief cylinder
9.5.11 Checking the break back device
Adjusting the pressure relief valve
9.6 Mower unit
9.6.1 Checking the oil level in the mower heads
9.6.2 Changing the mower head oil
Draining oil on the right and left
Filling in oil on the right and left
9.6.3 Check the mower knives
9.6.4 Replacing the mower knives
9.6.5 Check the mower knife holder
9.6.6 Check the adapters
9.6.7 Clean the drain opening of the feed drum
9.6.8 Check the feed drum wear bars
9.6.9 Check the cover plate on the feed drum
9.6.10 Check the sealing washer of the feed drum
9.6.11 Check the cutting discs
9.6.12 Replacing the cutting discs
9.6.13 Adjust the anti-wrap guard
9.6.14 Adjusting the plates of the outer feed drum
9.7 Crop processing unit
9.7.1 Check drive belt
9.7.2 Tensioning the drive belt
9.7.3 Changing the drive belts
9.7.4 Fitting and removing tines
9.8 Fodder discharge / swath discharge
9.8.1 Overview of maintenance work
Re-tensioning the conveyor belts
After the harvest
When replacing the conveyor belts
As needed
9.8.2 Checking the conveyor belt tension
9.8.3 Tensioning the conveyor belts
9.8.4 Adjusting conveyor belt run
Carrying out a test run
Removing the universal drive shafts
Checking the run on the drive roller
Adjustment instructions
Adjust the run on the drive roller.
Checking the run on the guide roller
Fitting the universal drive shafts
9.8.5 Removing and cleaning conveyor belts
Cleaning the conveyor belts
9.8.6 Adjusting the scraper
9.8.7 Adjusting the guide roller basic setting
9.8.8 Laying the conveyor belts
Pre-tensioning conveyor belts
Using gauge (1):
Using a measuring tape:
9.8.9 Assembling the cross conveyors
9.8.10 Adjusting the conveyor belt inclination
9.8.11 Adjusting the hydraulic cylinders
9.8.12 Checking the hydraulic motor for the coupler packing
9.8.13 Replacing the hydraulic motor for the coupler packing
9.9 Central lubrication system
9.9.1 Central lubrication system*
9.9.2 Checking the central lubrication system*
9.9.3 Filling the central lubrication system’s* lubricant reservoir
9.9.4 Lubricating the central lubrication system* manually
9.10 Assembly parts and machine body
9.10.1 Removing crop residues
9.10.2 Clean the machine
9.10.3 Preserve the machine
9.10.4 Check the fittings
9.10.5 Check the safety guard holder
Tightening torques for the hex. nuts (3)
9.10.6 Adjusting the locking device
9.11 Lubrication plan
9.11.1 Greasing points to be greased every 8 operating hours
9.11.2 Lubricating the grease points every 20 operating hours
9.11.3 Lubricating the grease points every 20 operating hours
9.11.4 Lubricating grease points every 100 operating hours
9.11.5 Lubricating grease points every 100 operating hours
9.11.6 Lubricating grease points every 250 operating hours
10 Putting out of operation and disposal
10.1 General information
10.1.1 Putting out of operation and disposal
11 EC declaration of conformity
11.1 DISCO 9200 C AUTOSWATHER
11.1.1 EC Declaration of Conformity
12 Technical terms and abbreviations
12.1 Terms and explanations
12.1.1 Technical terms
12.1.2 Abbreviations
00 2348 408 0.pdf:
CEMIS 100
Table of contents
1 Introduction
1.1 General information
1.1.1 Validity of the manual
1.1.2 Information about this Operator’s Manual
1.1.3 Symbols and notes
1.2 Intended use
1.2.1 Intended use
1.2.2 Reasonably foreseeable misuse
2 Safety
2.1 Safety rules
2.1.1 General safety and accident prevention regulations
2.1.2 Interaction between terminal and machine or tractor


John Deere Repair Technical Manual PDF
John Deere Parts Catalog PDF
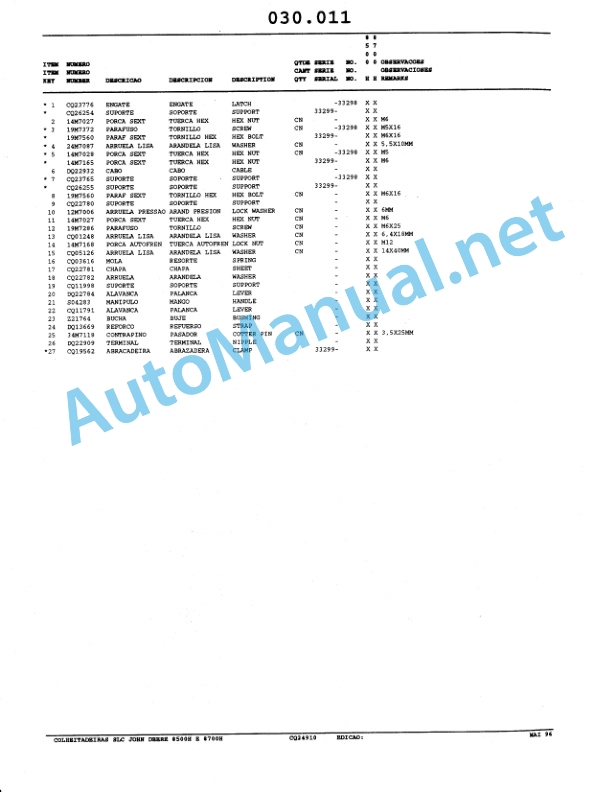
John Deere Harvesters 8500 and 8700 Parts Catalog CPCQ24910 Spanish


%20Portuguese&url=https://automanual.net/doc/john-deere-tractors-6300-6500-and-6600-parts-catalog-cq26564-29set05/&media=https://automanual.net/wp-content/uploads/2023/08/john-deere-tractors-6300-6500-and-6600-parts-catalog-cq26564-29set05-portuguese-1.jpg)


John Deere Parts Catalog PDF
John Deere Tractors 6300, 6500, and 6600 Parts Catalog CQ26564 (29SET05) Portuguese

John Deere Repair Technical Manual PDF
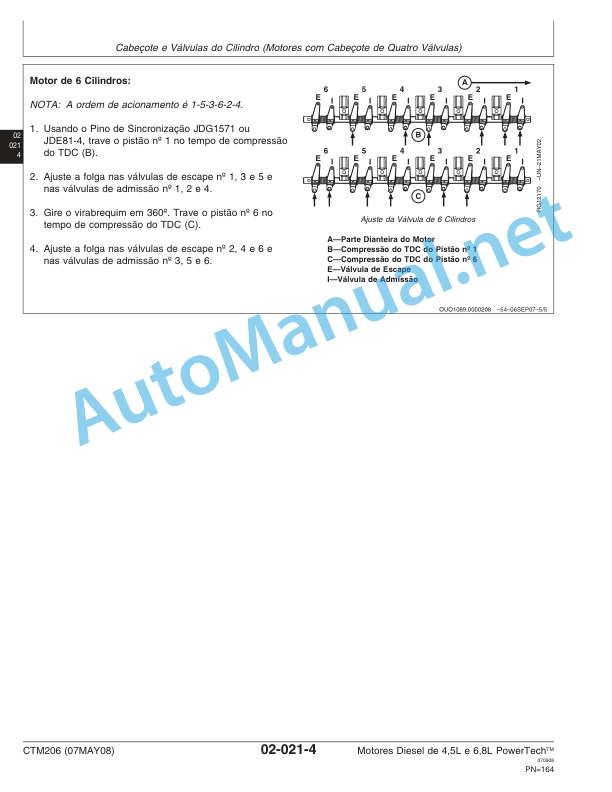
John Deere Diesel Engines PowerTech 4.5L and 6.8L – Motor Base Technical Manual 07MAY08 Portuguese


John Deere Repair Technical Manual PDF


John Deere Repair Technical Manual PDF


John Deere Parts Catalog PDF
John Deere Tractors 7500 Parts Catalog CPCQ26568 30 Jan 02 Portuguese


John Deere Repair Technical Manual PDF
John Deere Application List Component Technical Manual CTM106819 24AUG20


John Deere Repair Technical Manual PDF