 Tractors Operator Manual EN 1")
 Tractors Operator Manual EN 2")
 Tractors Operator Manual EN 3")
 Tractors Operator Manual EN 4")
 Tractors Operator Manual EN 5")
 Tractors Operator Manual EN 6")
 Tractors Operator Manual EN 7")
 Tractors Operator Manual EN 8")
 Tractors Operator Manual EN 9")
 Tractors Operator Manual EN 10")
 Tractors Operator Manual EN 11")
 Tractors Operator Manual EN 12")
 Tractors Operator Manual EN 13")
 Tractors Operator Manual EN 14")
%20Tractors%20Operator%20Manual%20EN&url=https://automanual.net/doc/claas-axion-840-810-cmatic-a31-tractors-operator-manual-en/&media=https://automanual.net/wp-content/uploads/2024/04/claas-axion-840-810-cmatic-a31-tractors-operator-manual-en-1.jpg)
Claas Axion 840-810 Cmatic (A31) Tractors Operator Manual EN
$50.00
- Model: Axion 840-810 Cmatic (A31) Tractors
- Type Of Manual: Operator Manual
- Language: EN
- Format: PDF(s)
- Size: 259 MB
File List:
00 0018 552 1.pdf
00 0289 108 1.pdf
00 0301 051 0.pdf
00 0303 482 0.pdf
00 1121 057 5.pdf
00 1140 877 0.pdf
00 1169 984 0.pdf
00 1170 296 2.pdf
00 1171 315 0.pdf
00 1405 184 7.pdf
00 1420 028 4.pdf
00 1420 056 2.pdf
00 2182 364 0.pdf
00 0018 552 1.pdf:
TELEMATICS Website
Table of contents
1 About this Concise Operator’s Manual
1.1 Notes on the manual
1.1.1 Validity of manual
1.1.2 Notes regarding the Concise Operator’s Manual
1.1.3 Notes on warranty
2 Safety
2.1 Intended use
2.1.1 Proper use
3 Product description
3.1 Overview and method of operation
3.1.1 TELEMATICS product variants
3.1.2 TONI (TELEMATICS on implements)
3.1.3 Fleet View
3.1.4 TELEMATICS basic
3.1.5 TELEMATICS advanced
3.1.6 TELEMATICS professional
3.1.7 TELEMATICS app
4 Operating and control elements
4.1 TELEMATICS overview
4.1.1 Illustration conventions of buttons and navigation elements
4.1.2 Symbols and colours
4.2 Menu structure
4.2.1 Start screen
4.2.2 TELEMATICS website site map
4.2.3 Main menu overview
4.2.4
4.2.5
4.2.6
00 0289 108 1.pdf:
CTIC 2800 2.0CTIC 2.0
Table of contents
1 Introduction
1.1 General information
1.1.1 Validity of manual
1.1.2 Information about this Operator’s Manual
1.1.3 Symbols and notes
1.1.4 Optional equipment
1.1.5 Maintenance information
1.1.6 Warranty information
1.1.7 Qualified specialist workshop
1.1.8 Spare parts and technical questions
1.2 Intended use
1.2.1 Intended use
1.2.2 Reasonably foreseeable misuse
2 Safety
2.1 Identifying warnings
2.1.1 Hazard signs
2.1.2 Signal word
2.2 Safety rules
2.2.1 Importance of Operator’s Manual
2.2.2 Optional equipment and spare parts
2.2.3 Danger due to damage to the tyre pressure control system
2.2.4 Technical condition
2.2.5 Complying with technical limit values
2.2.6 Keeping protective devices functional
2.2.7 Personal protective equipment
2.2.8 Dangers when driving on the road and on the field
2.2.9 Environmental protection and disposal
2.2.10 Noise can damage your health
2.2.11 Pressurised fluids
2.2.12 Compressed air
2.2.13 Hot surfaces
2.2.14 Maintenance work and repair work
2.2.15 Welding work prohibited
3 Product description
3.1 Package list
3.1.1 Delivery state
3.2 Overview and method of operation
3.2.1 Tyre pressure control system
3.2.2 Tyre pressure control system
3.3 Safety devices
3.3.1 Mechanical and electronic safety features
Pressure limitation
System behaviour when an air line is torn off
Manual operation
3.4 Identification plates and identification numbers
3.4.1 Identification plate of tyre pressure control system
4 Operating and display elements
4.1 Monitor
4.1.1 Overview of operating screen
4.2
4.2.1
4.2.2
4.3
4.3.1
4.3.2
4.3.3
4.3.4
4.4
4.4.1
5 Technical specifications
5.1 Tyre pressure control system
5.1.1 Properties
5.1.2 Lubricants
6 Handling
6.1 Transport and storage
6.1.1 Transport
Compressor
6.1.2 Storage
7 Preparing the product
7.1 Putting into operation
7.1.1 Carry out prior to operation
Installing the tyre pressure control system
Workplace description
8 Operation
8.1 Tyre pressure control system
8.1.1 Observe prior to operating the system
8.1.2 Parking position
Removing the rotary transmission leadthrough cover
Removing the rotary transmission leadthrough cover
Moving the hose packages of front wheels to the parking position
Moving the hose package of the rear right wheel to the parking position
Moving the hose package of the rear left wheel to the parking position
Installing the cover on the rotary transmission leadthrough
Installing the cover on the rotary transmission leadthrough
Removing the rotary transmission leadthroughs
8.1.3 Parking position
Removing the rotary transmission leadthrough cover
Removing the rotary transmission leadthrough cover
Moving the hose packages of front wheels to the parking position
Moving the hose package of the rear right wheel to the parking position
Moving the hose package of the rear left wheel to the parking position
Installing the cover on the rotary transmission leadthrough
Installing the cover on the rotary transmission leadthrough
Removing the rotary transmission leadthroughs
8.1.4 Working position
Installing the rotary couplings
Moving the hose packages of front wheels to the working position
Moving the hose package of the rear right wheel to the working position
Moving the hose package of the rear left wheel to the working position
Installing the cover on the rotary transmission leadthrough
Installing the cover on the rotary transmission leadthrough
8.1.5 Working position
Installing the rotary couplings
Moving the hose packages of front wheels to the working position
Moving the hose package of the rear right wheel to the working position
Moving the hose package of the rear left wheel to the working position
Installing the cover on the rotary transmission leadthrough
Installing the cover on the rotary transmission leadthrough
8.1.6 Determining the wheel loads
Fundamentals for determining wheel loads
Determining the wheel load on the front axle
Determining the wheel load on the rear axle
Determining the wheel load of the hitched implement
Example of how to calculate the wheel loads
8.1.7 Activating the tyre pressure control system
8.1.8 Deactivating the tyre pressure control system
8.1.9 Creating a profile
Entering the profile name
Setting the tyre pressure values for the towing vehicle
Enabling the trailer
Trailer priority circuit
Setting the tyre pressure values for the trailer
Selecting the tyre size
8.1.10 Changing the profile
8.1.11 Deleting the profile
8.1.12 Activating the profile
Operating the profile in
Changing set values in
Operating the profile in
9 Faults and remedies
9.1 Tyre pressure control system
9.1.1 Overview of possible problems with the tyre pressure control system
10 Maintenance
10.1 Maintenance interval overview
10.1.1 Operating hours
10.1.2 Every 10 operating hours or daily
10.1.3 Every 600 operating hours
10.1.4 Every 1200 operating hours or annually
10.1.5 Maintenance work every 2400 operating hours
10.2 Tyre pressure control system
10.2.1 Cleaning and preserving the tyre pressure control system
10.2.2 Checking and cleaning the compressor air filter
Checking the air filter
Cleaning the air filter
10.2.3 Changing the air filter element
10.2.4 Cap
Removing
Installing
10.2.5 Checking the compressor oil level
10.2.6 Checking the compressor oil level
10.2.7 Changing the compressor oil and oil filter
Changing the oil filter
Topping up oil
10.2.8 Replacing the compressor oil separator
11 Putting out of operation and disposal
11.1 General information
11.1.1 Putting out of operation and disposal
00 0301 051 0.pdf:
PROFI CAM 3
Table of contents
1 Introduction
1.1 Notes on the manual
1.1.1 Validity of manual
1.1.2 Information about this Operator’s Manual
1.1.3 Symbols and notes
1.1.4 Optional equipment
1.1.5 Qualified specialist workshop
1.1.6 Maintenance information
1.1.7 Warranty notes
1.1.8 Spare parts and technical questions
1.2 Intended use
1.2.1 Intended use
1.2.2 Reasonably foreseeable misuse
2 Safety
2.1 Identifying warnings
2.1.1 Hazard signs
2.1.2 Signal word
2.2 Safety rules
2.2.1 Meaning of Operator’s Manual
2.2.2 Observing safety decals and warnings
2.2.3 Optional equipment and spare parts
3 Product description
3.1 Overview and method of operation
3.1.1 How the PROFI CAM works
3.2 Identification plates and identification number
3.2.1 Position of identification plates
3.2.2 Explanation of PROFI CAM identification plate
3.3 Information on the product
3.3.1 CE marking
4 Operating and control elements
4.1 Camera system
4.1.1 Camera system monitor
4.2 Menu structure
4.2.1 Main menu
4.2.2
4.2.3
4.2.4
4.2.5
4.2.6
5 Technical specifications
5.1 PROFI CAM
5.1.1 Monitor
5.1.2 Camera
5.1.3 Switch box
5.1.4 Degree of protection against foreign bodies and water
6 Preparing the product
6.1 Shutting down and securing the machine
6.1.1 Switching off and securing the machine
6.2 Prior to operation
6.2.1 Carry out prior to operation
6.2.2 Installing the sun protection
6.2.3 Aligning the camera
6.2.4 Connecting the camera electrics
7 Operation
7.1 Monitor
7.1.1 Switching on the monitor
7.1.2 Calling up the menu
7.1.3 Setting a menu item
7.1.4 Setting the image orientation
7.1.5 Setting automatic screen darkening
7.1.6 Image mirroring
7.1.7 Setting the trigger view
7.1.8 Setting the follow-up time for trigger view
7.1.9 Setting the display mode
7.1.10 Activating/deactivating a display mode
8 Faults and remedies
8.1 Electrical and electronic system
8.1.1 Overview of problems on PROFI CAM camera system
8.1.2 Replacing the switch box fuse
9 Maintenance
9.1 Maintenance intervals
9.1.1 Every 10 operating hours or daily
9.2 Camera system
9.2.1 Checking the camera system for dirt
9.2.2 Cleaning the camera
9.2.3 Cleaning the switch box
9.2.4 Cleaning the monitor
10 Placing out of operation and disposal
10.1 General Information
10.1.1 Putting out of operation and disposal
11 Technical terms and abbreviations
11.1 Abbreviations
11.1.1 Units
11.1.2 Abbreviations
11.1.3 Technical terms
00 0303 482 0.pdf:
PROFI CAM 4
Table of contents
1 Introduction
1.1 Notes on the manual
1.1.1 Validity of manual
1.1.2 Information about this Operator’s Manual
1.1.3 Symbols and notes
1.1.4 Optional equipment
1.1.5 Qualified specialist workshop
1.1.6 Maintenance information
1.1.7 Notes on warranty
1.1.8 Spare parts and technical questions
1.2 Intended use
1.2.1 Intended use
1.2.2 Reasonably foreseeable misuse
2 Safety
2.1 Identifying warnings
2.1.1 Hazard signs
2.1.2 Signal word
2.2 Safety rules
2.2.1 Meaning of Operator’s Manual
2.2.2 Structural changes
2.2.3 Optional equipment and spare parts
2.2.4 Operation only following proper putting into operation
2.2.5 Technical status
2.2.6 Respecting technical limit values
Respecting technical limit values
2.2.7 Hazards when driving on roads and fields
3 Product description
3.1 Overview and method of operation
3.1.1 How the PROFI CAM works
3.2 Identification plates and identification number
3.2.1 Identification plates
3.3 Information on the product
3.3.1 CE marking
4 Operating and display elements
4.1 Camera system
4.1.1 Camera system monitor
4.1.2 CEBIS
4.2 Menu structure
4.2.1 Main menu
4.2.2
4.2.3
4.2.4
4.2.5
4.2.6
5 Technical specifications
5.1 PROFI CAM
5.1.1 Monitor
5.1.2 Camera
5.1.3 Switch box
6 Preparing the product
6.1 Switching off and securing the machine
6.1.1 Switching off and securing the machine
6.2 Prior to putting into operation
6.2.1 Carry out prior to operation
6.2.2 Installing the sun protection
6.2.3 Aligning the camera
7 Operation
7.1 Monitor
7.1.1 Switching on the monitor
7.1.2 Calling up the menu
7.1.3 Setting a menu item
7.1.4 Setting the image orientation
7.1.5 Setting automatic screen darkening
7.1.6 Image mirroring
7.1.7 Setting the trigger view
7.1.8 Setting the follow-up time for trigger view
7.1.9 Setting the display mode
7.1.10 Activating/deactivating a display mode
8 Faults and remedies
8.1 Electric and electronic system
8.1.1 Overview of problems on PROFI CAM camera system
9 Maintenance
9.1 Maintenance intervals
9.1.1 Every 10 operating hours or daily
9.2 Camera system
9.2.1 Checking the camera system for dirt
9.2.2 Cleaning the camera
9.2.3 Cleaning the switch box
9.2.4 Cleaning the monitor
10 Putting out of operation and disposal
10.1 General information
10.1.1 Putting out of operation and disposal
11 Technical terms and abbreviations
11.1 Abbreviations
11.1.1 Units
11.1.2 Abbreviations
11.1.3 Technical terms
00 1121 057 5.pdf:
. About this operator’s manual
. Validity of the instructions
. Chapter symbols
Contents
A – Identification – Certification – Safety
1. Tractor information plate
2. Tractor power label
3. Motor information plate
4. Cab identification plate
5. European regulation
6. Safety
6.1. Safety instructions
6.1.1. Appropriate use
6.1.2. Use non conformant with the purpose
6.1.3. Precautions to be taken before starting up
6.1.4. Tractor state
6.1.5. Adjustment or maintenance tasks – repairs
6.1.5.1. General rule
6.1.5.2. Use of axle standlectrical services
6.1.5.4. Fuel
6.1.5.5. Coolant
6.1.6. Circulation -transportation
6.1.7. Using the tractor
6.1.7.1. General rule
6.1.7.2. Wheel track
6.1.7.3. Hitching tools
6.1.7.4. Driving
6.1.7.5. Work in a fixWork with tools driven by the power take-off
6.1.7.7. Severe applications
6.1.8. Toxic products
6.1.9. Air conditioner
6.1.10. Cab
6.1.11. Passenger seat
6.1.12. Protecting the environment
6.1.13. Using a front loader
6.1.14. Forest applications
6.2. Safety stickers with warning pictograms
6.2.1. Recommendations
6.2.2. Placing the gear box in neutral
6.2.3. Front linkage
6.2.4. Front tow hook
6.2.5. Operator’s manual
6.2.6. Passenger seat
6.2.7. SPEED LIMITS AND 13 YEAR AGE LIMIT FOR CHILDREN
6.2.8. Air conditioning
6.2.9. 1 000 1/min power take-off
6.2.10. Hydernal controls
6.2.12. Starter
6.2.13. Battery
6.2.14. Radar
6.2.15. PTO GUARD
6.2.16. HIGH PRESSURE CLEANING
6.2.17. Accumulators
6.2.18. FOPS roof
6.2.19. Wheel nuts
6.2.20. Electrohydraulic spool valves
1. Operating and working environment
riving position)
1.2. Instruments and controls (panel)
1.3. STOWAGE AND ACCESSORIES
2. Lighting, indicators and safety
2.1. Description
2.2. Low/high beams and horn
2.3. Working lights and rotating beacon
2.4. Overhead light
2.5. Rear view mirrors
3. Starting contact
4. Multifunction armrest
5. Cab suspension
5.1. Z-Activ Cab
5.2. Z Cab
6. Seats
6.1. Driver’s seat
6.2. Passenger seat
7. Steering wheel
8. Instrument panel
8.1. Description
8.2. Operation
8.3. Operation
8.4. Calibration
9. Display
9.1. Cebis terminal
10. Hinged panels and windows
11. Sair conditioning
12.1. Description
12.2. Operation
13. Heating/ventilation/automatic climate control
13.1. Description
13.2. Operation
C – Electrical system
1. Characteristics
2. Trailer/implement light socket
3. Electric cabinet supply socket
4. Event counter socket
5. ISO socket
6. ISOBUS socket
7. Provisiin the cab
7.1. Fitting box mounting
7.2. Cable routing
8. Battery
8.1. Battery compartment
8.2. Battery master switch
9. Fuses and relays
9.1. Recommendations
9.2. Cab-mounted services fuse box
9.3. Cab top fuse box
9.4. Primary services fuse box
D – Engine
1. Characteristics
2. Displays
2.1. Instrument panel
2.2. Cebis terminal
3. Safety
3.1. Operation
3.2. Cebis terminal
3.3. Instrument panel
3.4. Recommendations
4. Engine hood
4.1. One-piece hood
4.2. Side panels
5. Engine control
5.1. Starting the engine
5.1.2. Start up
5.1.3. Heating the coolant
5.2. Using the accelerator pedal and lever
5.2.1. Operation
5.2.2. Accelerator pedal
5.2.3. Hand accelerator
5.2.4. Engine rpm memory function
5.2.4.1. Operation
5.2.4.2. Adjustment procedure by Cebis
5.2.4.3. Adjustment manual procedure
5.3. Stopping the engine
6. CLAAS Power Manions
7.2. Bleeding air from the injection system
E – Transmission
6. Advanced driving
6.1. OPERATION
6.2. Automatic mode
6.2.1. OPERATION
6.2.2. Details for driving with a trailer
6.3. Drivestick Mode
6.3.1. OPERATION
6.3.2. Details for driving with a trailer
6.4. Manual
6.4.1. OPERATION
6.4.2. Details for driving with a trailer
6.5. Speed ranges
6.6. Maximum speeds and set speeds
6.7. Acceleration
6.8. DROOP
6.9. Degraded mode
5. Baactor
4.1. Clutch
4.1.1. Recommendations
4.1.2. Clutch pedal
4.1.3. Reverser lever
4.2. Selection of movement direction
4.3. Active stop
3. Safety
3.1. Reverser neutral
3.2. Transmission neutral
3.3. Engine anti-stall
3.4. Protection of mechanical parts
3.4.1. Managing the CMatic gearbox in cold weather
3.4.2. Operation
3.4.3. Instrrminal
2. Display
1. Characteristics
Rear axle
1. Characteristics
2. Display
3. Protection of mechanical parts
3.1. Operation
3.2. Instrument panel
3.3. Cebis terminal
4. Differential lock
4.1. Recommendations
4.2. Operation
4.3. Automatic mode
4.3.1. Operation
4.3.2. Operation
4.4. Permanent mode
4.4.1. Operation
4.4.2. Operation
5. Brakes
5.1. Service brakes
5.2. Handbrake (auxiliary and parking brake 5.2.2. Handbrake
5.2.3. Automatic brake
5.2.3.1. Operation
5.2.3.2. Operation
6. Trailer brake
6.1. Hydraulic brake
6.2. Pneumatic brake
F – Front axle
1. Characteristics
2. Protection of mechanical parts
2.1. Operation
2.2. Instrument panel
2.3. Cebis terminal
3. Front axle engagement
3.1. Operation
3.2. Automatic mode
3.2.1. Operation
3.2.2. Operation
3.3. Permanent peration
4. Differential lock
4.1. Recommendations
4.2. Operation
4.3. Automatic mode
4.3.1. Operation
4.3.2. Operation
4.4. Permanent mode
4.4.1. Operation
4.4.2. Operation
5. Suspended front axle
5.1. Operation
5.2. Fixed mode
5.2.1. Operation
5.2.2. Operation
5.3. Automatic mode
5.3.1. Operation
5.3.2. Operation
G – Rear equipment
Hydraulic systems
1. Characteristics
2. Auxiliary spoolrols/rear pressure connectors
2.2. Pressure connectors
2.2.1. Recommendations
2.2.2. Operation
2.2.3. Free return to the tank
2.2.4. Oil collection can
2.3. Controls
2.4. Safety
2.4.1. Protection of mechanical parts
2.4.2. Cebis terminal
2.5. Start up
2.5.1. Operation
2.5.2. Displays on the Cebis panel
2.5.3. Operation
2.6. Linear controls
2.7. Joystick
2.8. External controls
2.9. Mlves
2.9.1. Operation
2.9.2. Display
2.9.3. Maximum flow of a pressure tap
2.9.4. Hydraulic timer
2.9.5. Activation of spool valve for the external controls
2.9.6. Locking of electro-hydraulic spool valves
3. Power beyond
3.1. Description
3.2. Operation
3.3. Operation
4. Stationary working
Rear lift
1. Characteristics
2. Controls
3. Display
4. Safety
4.2. Warning light
4.3. Cebis terminal
4.4. Road transport safety
5. Using the linkage
6. MODE SELECTION
7. Position control
8. Force control
9. Upper limit
10. Lowering speed
11. Transport damper
12. Active wheel slip management
12.1. Operation
12.2. Adjustment
12.3. Operation
13. External controls
13.1. Operation
13.2. Operation
Rear power take-off
1. Characteristics
2. Recommendations
3. Controls
4. Display
5. PTO spexternal controls
8. Operation
9. PTO Automation
9.1. Operation
9.2. Manual adjustment
9.3. Cebis panel adjustment
10. Power take-off end fitting
11. Connecting implements to the power take-off
12. Stationary working
Rear hitch
1. Characteristics
2. Recommendations
3. Adjustable links
4. Upper link
4.1. Mechanical upper rod
4.2. UPPER TOP abilisers
6.1. Operation
6.2. Mechanical stabilisers
6.3. Self-locking stabilisers
7. Draw bar couplings
8. Swinging drawbar
9. Tow hook
10. Automatic pick-up hitch
H – Front equipment
Hydraulic systems
1. Characteristics
2. Pressure connectors
2.1. Recommendations
2.2. OPERATION
2.3. Free return to the tank
3. Safety
3.1. Protection of mechanical parts
3.2. Cebis terminal
4. Front pressure taps controlled by spool valve 3
4.1. Description
4.2. Controls
4.3. Preliminary operont pressure taps controlled by spool valve 7
5.1. Description
5.2. Controls
5.3. Preliminary operations
5.4. OPERATION
6. Front pressure taps controlled by spool valves 7 and 8
6.1. Description
6.2. Controls
6.3. Preliminary operations
6.4. OPERATION
7. Management of electrohydraulic spool valves
Front linkageinkage controlled by spool valve 1
2.1. Controls
2.2. Safety
2.2.1. Special instructions
2.2.2. Protection of mechanical parts
2.2.3. Cebis terminal
2.2.4. Road transport safety
2.3. Preliminary operations
2.4. OPERATION
2.5. External controls
3. Transport damper
4. Front linkage controlled by spool valve 6
4.1. Controls
4.2. Safety
4.2.1. Special instructions
4.2.2. Protection of mechanical parts
4.2.3. Cebis terminal
4.2.4. Road transport safety
4.3. Preliminary operations
4.4. OPERATI 5. Position control
5.1. Display
5.2. Description of adjustments
5.3. Activation of position control
5.4. Upper limit adjustment
5.5. Adjustment of the bottom stop
5.6. Raising speed adjustment
5.7. Rate of descent adjustment
5.8. Using the position control
6. 3-point hitch
6.3. Hitching and unhitching the tool
Front power take-off
1. Characteristics
2. Display
3. Recommendations
4. Front power take-off engagement
5. Stop of the front power take-off
Front loader
1. Fitting a frontal loader adaptation frame
2. OPERATION
I – Cebis terminal
Using the Cebis terminal
1. Description
2. Operation
3. OPERATION
4. multifunction display
4.1. Operation
4.2. Work screen
4.3. Road screen
5. Direct Access
5.1. Operation
5.2. Operation
6. Malfunctions
6.1. Operation
6.2. Warnings
6.2.1. Description
6.3. Warning
6.3.1. Description
6.3.2. Operation
6.3.3. Operation
6.4. Information
6.4.1. Description
6.4.2. Operation
6.4.3. Operation
6.5. Icon
6.5.1. Description
6.5.2. Operation
6.5.3. Operation
7.ansmission
7.3. Lift
7.4. Hydraulics
7.5. On board computer
7.6. CLAAS Sequence Management
7.7. Previewing a CLAAS Sequence Management sequence in real time
On board computer
1. Operation
2. General performance
2.1. Operation
2.2. Selecting information for display in the programmable window
2.3. Counter resetting
3. Plot management
3.1. Operation
3.2. Computer start/shut down
3.2.1. Procedure using Cebis
3.2.2. Manual procedure
3.3. Plot management editor
3.3.1. Operation
3.3.2. Selecting a plot
3.3.3. Zeroing counters for a plot
4. Implement settings
4.1.. mode
4.3. Selecting the theoretical or actual speed
4.4. Tool management
4.4.1. Operation
4.4.2. Saving parameters of the tool being used
4.4.3. Save a new tool
4.4.4. Load a tool
4.4.5. Load a CLAAS tool
4.4.7. Remove a tool
5. Maintenance
5.1. Maintenance counter
5.1.1. Operation
5.1.2. Counter resetting
5.2. List of active defects
5.3. Gearbox oil temperature
6. F1, F2, F3 and F4 function contacts
6.1. Operation
6.2. Adjustment
6.2.1. Description
6.2.2. Count
6.2.3. CLAAS Sequence Management
6.2.4. ISOBUS
6.2.5. Front loader
6.2.6. Electrohydraulic distributor 8
7. Cebis
7.1. Brightness
7.1.1. Automatic brightness adjustment
7.1.2. Manual brightness adjustment
7.2. Languages and units
7.2.1. Language
7.2.2. Units
7.3. Date and time
CLAAS Sequence M2. Operation
3. Controls
3.1. Description
4. Safety
4.1. Protection of mechanical parts
5. Launching a sequence
5.1. Operation
5.2. Operation
6. Saving a sequence
7. Interrupting a sequenceequence, press the same contact
7.2. Cancelling a paused sequence
7.3. Cancelling an ongoing sequence
7.4. Cancelling ongoing actions
7.5. Emergency stop
8. Viewing a sequence
8.1. Viewing in the info mode
8.1.1. Operation
8.1.2. Description
8.2. Viewing in real-time mode
8.2.1. Operation
8.2.2. Description
9. Sequence modification
9.1. Operation
9.2. Modifying a stage in a sequence
9.3. Adding a stage in a sequence
9.4. Deleting a stage in a sequence
9.5. Selecting the registration mode of a sequence
J – Wheels and tyres
1. Tyres
1.1. Recommendations
1.2. Inflation pressure
1.2.1. Characteristics
1.2.2. Recommendations
2. Track widths
2.1. Setting the track
2.2. Front tracks
2.2.1. Front axle
2.2.2. Tables of front tracks
2.2.3. Front axle steering lock stops
2.3. Rear tracks
Tables of rear tracks
2.3.3. Track with smooth shaft rear axle
2.4. Tyre combinations
3. WHEELS
3.1. General
3.2. Dual wheels
3.2.1. Plate wheel shaft and smooth wheel shaft 2,5 metres
3.2.1.1. Characteristics
3.2.1.2. Description
3.2.1.3. Assembly of twin wheels
3.2.1.4. Front dualling
3.2.1.5. Rear duelling
3.2.2. Plain wheel shaft of 3 mètres
3.2.2.1. Description
3.2.2.2. Operation
K – Characteristics
1. Dimensions
2. Weight
3. Load-bearing capabilities
4. Maximum tow weight authorized
5. Capacities
6. Ballast
6.1. Ballasting available
6.2. Tractor balancing
7. Cab comfort
7.1. Sound level
7.2. Vibration level
L – Maintenance
1. Recommendations
2. . Replacing a wheel
6. Loading and stowing the tractor
7. Storage
8. Decommissioning and destruction
9. Frequency
9.1. Summary table
9.2. O.2.2. Operation n° 2
9.2.3. Operation n° 3
9.2.4. Operation n° 4
9.2.5. Operation n° 5
9.2.6. Operation n° 6
9.2.7. Operation n° 7
9.2.8. Operation n° 8
9.2.9. Operation n° 9
9.2.10. Operation n° 10
9.2.11. Operation n° 11
9.2.12. Operation n° 12
9.2.13. Operation n° 13
9.2.14. Operation n° 14
9.2.15. Operation n° 15
9.2.16. Operation n° 16
9.2.17. Operation n° 17
9.2.18. Operation n° 18
9.2.19. Operation n° 19
9.2.20. Operation n° 20
9.2.21. Operation n° 21
9.2.22. Operation n° 22
9.2.23. Operation n° 23
9.2.24. Operation n° 24
9.2.25. Operation n° 25
9.2.26. Operation n° 26
9.2.27. Operation n° 27
9.2.28. Operation n° 28
9.2.29. Operatn n° 31
9.2.32. Operation n° 32
9.2.33. Operation n° 33
9.2.34. Operatio36
9.2.37. Operation n° 37
9.2.38. Operation n° 38
9.2.39. Operation n° 39
9.2.40. Operation n° 40
9.2.41. Operation n° 41
9.2.42. Operation n° 42
9.2.43. Operation n° 43
9.2.44. Operation n° 44
9.2.45. Operation n° 45
9.2.46. Operation n° 46
9.2.47. Operation n° 47
9.2.48. Operation n° 48
9.2.49. Operation n° 49
9.2.50. Operation n° 50
9.2.51. Operation n° 51
9.2.52. Operation n° 52
9.2.53. Operation n° 53
9.2.54. Operation n° 54
9.2.55. Operation n° 55
9.2.56. Operation n° 56
9.2.57. Operation n° 57
9.2.58. Operation n° 58
9.2.59. Operation n° 59
9.2.60. Operation n° 60
9.2.61. Operation n° 61


John Deere Parts Catalog PDF
John Deere Tractors 7500 Parts Catalog CPCQ26568 30 Jan 02 Portuguese
%20Component%20Technical%20Manual%20CTM147%2005JUN98&url=https://automanual.net/doc/john-deere-df-series-150-and-250-transmissions-analog-component-technical-manual-ctm147-05jun98/&media=https://automanual.net/wp-content/uploads/2023/08/john-deere-df-series-150-and-250-transmissions-analog-component-technical-manual-ctm147-05jun98-1.jpg)

John Deere Repair Technical Manual PDF
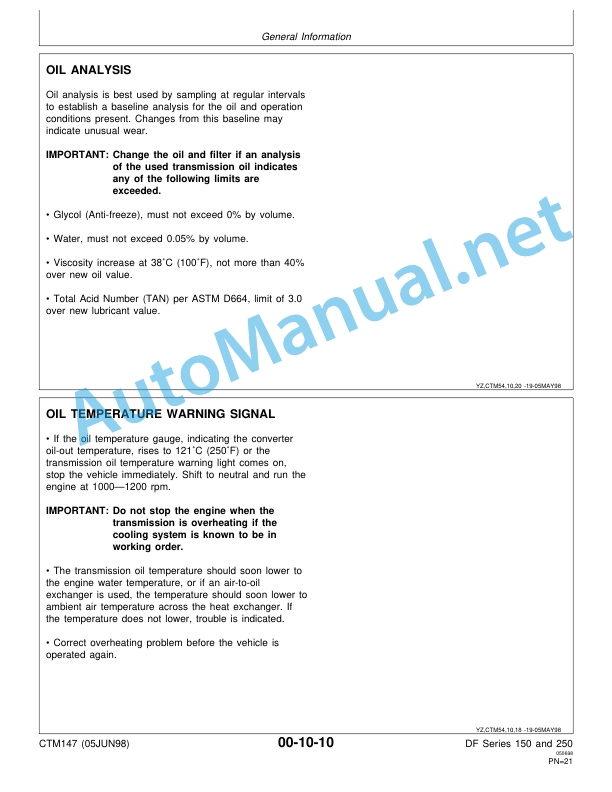
John Deere DF Series 150 and 250 Transmissions (ANALOG) Component Technical Manual CTM147 05JUN98
%20Component%20Technical%20Manual%20CTM205%20February%202015%20Russian&url=https://automanual.net/doc/john-deere-diesel-engines-4-5l-and-6-8l-component-technical-manual-ctm205-01feb15-russian/&media=https://automanual.net/wp-content/uploads/2023/08/john-deere-diesel-engines-45-l-and-68-l-primary-engine-component-technical-manual-ctm205-february-2015-russian-1.jpg)


John Deere Repair Technical Manual PDF


John Deere Repair Technical Manual PDF


John Deere Repair Technical Manual PDF
John Deere Diesel Engines POWERTECH 2.9 L Component Technical Manual CTM126 Spanish


John Deere Repair Technical Manual PDF


John Deere Repair Technical Manual PDF


John Deere Repair Technical Manual PDF


John Deere Repair Technical Manual PDF

New Holland Service Manual PDF