- Claas
- Grove
- New Holland
- Komatsu
- Kubota
- John Deere
- Linde
- Bomag
- CASE
- Clark
- JCB
- Jungheinrich
- Linde
- Yale
- Yanmar
- Manitou
- Manitowoc
- CNH
- Doosan
- Fiatagri
- Fiatallis
- Fiatallis Other Manual PDF
- Flexi Coil
- Ford New Holland
- Ford New Holland Other Manual PDF
- Huyndai
- Hypac
- Hyster
- Hyster Service Manual PDF
- Isuzu
- Kobelco
- Kohler
- Krupp
- Lombardini
- Mahindra
- Nuvera
- Perkins
- Sperry New Holland
- Utilev
- Versatile
- ZF
 Combine Assembly Instruction DE 1")
 Combine Assembly Instruction DE 2")
 Combine Assembly Instruction DE 3")
 Combine Assembly Instruction DE 4")
 Combine Assembly Instruction DE 5")
 Combine Assembly Instruction DE 6")
 Combine Assembly Instruction DE 7")
 Combine Assembly Instruction DE 8")
%20Combine%20Assembly%20Instruction%20DE&url=https://automanual.net/doc/claas-lexion-600-589-combine-assembly-instruction-de/&media=https://automanual.net/wp-content/uploads/2024/06/claas-lexion-600-589-combine-assembly-instruction-de-1.jpg)
Claas LEXION 600 (589) Combine Assembly Instruction DE
$30.00
- Model: LEXION 600 (589) Combine
- Type Of Manual: Assembly Instruction
- Language: DE
- Format: PDF(s)
- Size: 32.3 MB
File List:
– 00 0293 252 1.pdf
– 00 0293 776 0.pdf
– 00 0293 778 0.pdf
– 00 0293 947 1.pdf
– 00 0293 949 0.pdf
– 00 0293 951 0.pdf
– 00 0294 649 1.pdf
– 00 0294 812 0.pdf
00 0293 252 1.pdf
Table of Content:
6 1 Introduction
6.1 1.1 General information
7 2 Security
7.1 2.1 Note
8 3 Scope of delivery
8.1 3.1 Retrofit kits 000 517 640 0 and 91014142
9 4 Cultivation
9.1 4.1 Install CLAAS LASER-PILOT
10 5 Before commissioning
10.1 5.1 Setting and operating CLAAS LASER-PILOT (from mach. no. …)
10.2 5.2 CLAAS autopilot (grain cutter)
11 1 Introduction
11.1 1.1 General Information
12 2 Safety precautions
12.1 2.1 Important
13 3 Package list
13.1 3.1 Supplementary kits 000 517 640 0 and 91014142
14 4 Mounting
14.1 4.1 Installing the CLAAS LASER PILOT
15 5 Prior to operation
15.1 5.1 Adjusting and using the CLAAS LASER-PILOT (from serial no. …)
15.2 5.2 CLAAS Autopilot (Grain cutterbar)
16 1 Introduction
16.1 1.1 General Councils
17 2 Security Councils
17.1 2.1 Observer !
18 3 pieces fournies
18.1 3.1 Ultra assembly kits 000 517 640 0 and 91014142
19 4 Assembly
19.1 4.1 Pose of LASER-PILOT CLAAS
20 5 Avant la mise en service
20.1 5.1 Rglage and utilization of the LASER-PILOT CLAAS (part of the machine N. …)
20.2 5.2 Autopilot CLAAS (tablier de coupe crales)
21 1 Introduction
21.1 1.1 General indications
22 2 Medidas de seguridad
22.1 2.1 Observar
23 3 Conjunto de suministro
23.1 3.1 Rear equipment games 000 517 640 0 and 91014142
24 4 Montaje
24.1 4.1 Montar el CLAAS LASER-PILOT
25 5 Antes de la puesta en marcha
25.1 5.1 Adjust and operate the CLAAS LASER-PILOT (a part of the machine no. …)
25.2 5.2 Autopilot CLAAS (mecanismo de cort?? ????????? ?????? CLAAS
30 5 ????? ?????? ? ???????????
30.1 5.1 ????????? ? ???????????? ????????? ?????? CLAAS (??????? ? ????? ? …)
30.2 5.2 ????????? CLAAS (???????? ?????)
00 0293 776 0.pdf
Table of Content:
1 LEXION 600
2 Installation instructions
3 license plate lighting
4 Fitting Instructions
5 Number-plate illumination
6 Notice of assembly
7 ?clairage de plaque d’immatriculation
Read and observe 8 safety instructions!
9 Please read and follow the safety instructions!
10 Respect and read the security consignments !
10.2 1 Introduction
10.3 2 Safety instructions
10.4 3 Scope of delivery
10.5 4 Cultivation
10.6 1 Introduction
10.7 2 Safety information
10.8 3 Package list
10.9 4 Mounting
10.10 1 Introduction
10.11 2 Security Councils
10.12 3 pieces fournies
10.13 4 Montage
10.14 1 Introduction
10.15 2 Safety instructions
10.16 1 Introduction
10.17 2 Safety information
10.18 1 Introduction
10.19 2 Security Councils
00 0293 778 0.pdf
Table of Content:
1 LEXION 600 – 510
2 Installation instructions
3 Quantimeter
4 Fitting Instructions
5 Quantimeter
6 Notice of assembly
7 Quantimtre
Read and observe 8 safety instructions!
9 Please read and follow the safety instructions!
10 Respect and read the security consignments !
10.2 1 Introduction
10.3 2 Safety instructions
10.4 3 Scope of delivery
10.5 4 Cultivation
10.6 1 Introduction
10.7 2 Safety information
10.8 3 Package list
10.9 4 Mounting
10.10 1 Introduction
10.11 2 Security Councils
10.12 3 pieces fournies
10.13 4 Montage
10.14 1 Introduction
10.15 2 Safety instructions
10.16 3 Scope of delivery
10.17 3.1 Quantimeter scope of delivery
10.19 1666
10.21 4 cultivation
10.22 4.1 Add Quantimeter
10.23 1706
10.24 4.1.1 Install yield sensor
(D) on both sides of the grain elevator. The sealing lids are omitted.
10.29 (Fig. 1)
10.32 1671
10.33 – Screw the pre-assembled light barrier transmitter (1, red) to the rear side of the elevator with screws (2), contact washer (3), washer (4), compression spring (5) and washer (6). Fasten the cable to the elevator with the existing clamp (S).
10.34 (Fig. 2)
10.37 1672
10.38 – Screw the pre-assembled light barrier receiver (7, yellow) to the front side of the elevator with the nut (8) and contact washers (9). Fasten the cable to the elevator with the existing clamp (K).
10.39 (Fig. 3)
10.40 1673
10.44 1674
10.45 – Lock the pre-assembled clamping bolt (S) on the swivel holder (W). Pretension of the clamping bolt (S) with nut and lock nut…
10.46 (Fig. 4, 5)
10.47 1707
10.48 4.1.2 Install hydraulic chain tension
10.51 1675
10.52 Attachment of the hydraulic chain tensioning device only required if not already available
10.53 – Remove pipe (L) of the chain tensioner. Relax the chain by loosening the nut (M). Unscrew the screws (S) and remove the pipe (L).
10.54 (Fig. 6)
10.57 1676
10.58 – Slide angle (11) onto pipe (12).
10.59 – Connect pipe (12 and cylinder (13) with bolt (14).
10.60 – Slide on washer (15) and secure bolt (14) with cotter pin (16).
10.61 (Fig. 7)
10.64 1677
10.67 1678
10.68 – Insert the hydraulic cylinder (13) into the existing guide hole of the old tensioning device. Screw the bracket (11) onto the existing threaded bolts on the elevator shaft with nuts (17). Fasten pipe (12) at the top with existing screws (S).
10.69 (Fig. 8, 9)
10.70 1708
10.71 4.1.3 Install moisture sensor (18)
10.74 1669
10.75 – Use special tool (V) to create negative pressure in the hydraulic oil tank (P) or drain hydraulic oil.
10.76 – Special tool: valve combination for generating vacuum ET no. 181 619.1
10.77 (Fig. 10)
10.80 1679
10.81 – On machines with 3-D, unscrew both angle connectors (W).
10.82 (Fig. 11)
10.85 1680
10.86 – On machines without 3-D, unscrew both blind plugs (T).
10.87 (Fig. 12)
10.90 1681
10.91 – Unscrew the sealing cover (V) on the grain elevator.
10.92 (Fig. 13)
10.95 1682
10.96 – Humidity sensor (18) pre-assembled.
10.97 – Up to mach. no. … use the hydraulic hoses (H).
10.98 – From mach. no. … use the hydraulic lines (21) and (22).
10.99 (Fig. 14)
10.101 1683
10,105 1684
10.106 – Screw the moisture sensor (18) to the grain elevator with nuts (19) and existing nuts.
10.107 – Screw on pipes, angles and T-pieces according to Figures 15 and 16:
10.108 – L-piece (20), pipe (21), pipe (22), pipe (23), pipe (24), T-piece (25), angle (26), hose line (27).
10.109 – Screw on pipes (21) and (22) with clamp (28) and screw (29).
10,110 (Fig. 16)
10,113 1685
10,116 1686
10.117 – Machines with 3-D: Connect the hydraulic line (T) to the distributor at (D). Connect the hydraulic line (P) to the distributor at (B).
10.118 – Pipe (R) only LEXION Montana
10.119 – Hose line (T) chain tension cylinder
10.120 – Remove special tool for generating vacuum or fill up hydraulic oil.
10,121 (Fig. 17, 18)
10,122 1709
10.123 4.1.4 Install tilt sensor
10,126 1687
10.127 – Screw the tilt sensor (30) to the console (32) with screws (31). Fasten cable (K) with clamp (33).
10,128 (Fig. 19)
10,131 1688
10.132 – Unscrew the lower screws (S).
10,133 (Fig. 20)
10,136 1689
10.137 – Screw on the console (32) using the existing screws. Align console (32) parallel to the axis!
10,138 (Fig. 21)
10,141 1690
10.142 – Remove right drive wheel.
10.143 – Remove protection (S).
10,144 (Fig. 22)
10,147 1691
10.148 – Remove protection (K).
10,149 (Fig. 23)
10,152 1692
10.153 – Connect the cable set (34) to the solenoid valve (M) and to the humidity sensor cable (F). Fasten the cable set (34) with cable clamps (33).
10,154 (Fig. 24)
10,156 1693
10.157 – Connect the plug from the cable set (34) to the plug from the light barrier receiver and light barrier transmitter (see arrow).
10,158 (Fig. 25)
10,161 1694
10.162 – Screw on the cable set (34) with pipe clamps (35) and screws (39).
10,163 (Fig. 26)
10,166 1695
10.167 – Screw on the holders (37) using the existing screws. Screw the cable set (34) with pipe clamps (38) to the holder (37).
10,168 (Fig. 27)
10,171 1696
10.172 – Screw on the cable set (34) with pipe clamps (38).
10,173 (Fig. 28)
10,176 1697
10.177 – Screw on cable set (34) with pipe clamp (38).
10,178 (Fig. 29)
10,180 1698
10.181 – Lay the branch of the cable set (34) downwards to the inclination sensor.
10.182 – Screw on the cable set (34) with pipe clamps (35) and existing screws (see arrows).
10,183 (Fig. 30)
10,186 1699
10.187 – Screw on the cable set (34) with the pipe clamp (35) and the existing screw.
10,188 (Fig. 31)
10,191 1700
10.192 – Screw on the cable set (34) with pipe clamps (35) and screw (39).
10.193 – Fasten cable set (34) with cable tie (40).
10,194 (Fig. 32)
10,197 1701
10.198 – Screw on the cable set (34) with pipe clamps (35) and screw (36).
10.199 – Fasten the cable set (34) with cable ties (40).
10,200 (Fig. 33)
10.203 1702
10.204 – Connect the cable set (34) to the cable set of the inclination sensor
10.205 – Fasten cable set (34) with cable tie (40).
10.206 (Fig. 34)
10.209 1703
10.210 – Screw on the cable set (34) with pipe clamps (35) and existing screws (see arrows).
10,211 (Fig. 35)
10,214 1704
10.215 – Unscrew the footplate (T).
10,216 (Fig. 36)
10,219 1705
10.220 – Lay cable set (34) to the central electrical system.
10.221 – Screw the footplate back on.
10,222 (Fig. 37)
10,225 1706
10.226 – Open the screw lock (D) and latch (R).
10.227 – Open the central electrics.
10,228 (Fig. 38)
10,231 1707
10.232 – Unscrew sealing plate (B).
10,233 (Fig. 39)
10,236 1708
10.237 – Remove blind plug (C).
10.238 – Guide cable set (34) through at (C).
10.239 – Insert the cable grommet of the cable set (34) at (C).
10,240 (Fig. 40)
10,243 1709
10.244 – Screw on cable set (34) with pipe clamp (35) and nut (41).
10,245 (Fig. 41)
10,248 1710
10.249 – Fasten the cable set (34) with the clamp (L).
10,250 (Fig. 42)
10,253 1711
10.254 – Insert connector holder (42) so that it locks.
10,255 (Fig. 43)
10,258 1712
10.259 – Insert the plug from the cable set (34) into the plug holder.
10,260 (Fig. 44)
10,262 1713
10.263 – Central electrics up to mach. no. …
10.264 – Plug the second plug from the cable set (34) into the plug location (MP) (see arrow) and secure it with a cable tie (40).
10,265 (Fig. 45)
10,267 1714
10.268 – Central electrics from mach. no. …
10.269 – Plug the second plug from the cable set (34) into the plug location (MP) (see arrow) and secure it with a cable tie (40).
10,270 (Fig. 46)
10,273 1715
10.274 – Insert LEM module (43).
10.275 – Fasten modules with the bracket (H).
10,276 (Fig. 47)
10,277 1712
10.278 4.1.5 Carry out a test run
10,280 1716
10.281 – Close and lock the central electrical circuit board. Reinstall protective panels. Screw the drive wheel back on. For the tightening torque of the wheel nuts, see the combine harvester operating instructions.
10.282 – Close and lock the central electrics. Start the engine and operate the control valve by hand. Cylinder of the humidity sensor m…
10,283 (Fig. 48)
10,284 1 Introduction
10,285 2 Safety information
10,286 1 Introduction
10,287 2 Security Councils
00 0293 947 1.pdf
Table of Content:
2 7 Maintenance
2.1 7.1 Important maintenance instructions
2.2 7.2 Maintenance tables
00 0293 949 0.pdf
Table of Content:
4 1 Introduction
4.1 1.1 General information
5 2 Safety instructions
5.1 2.1 Note
6 3 Scope of delivery
6.1 3.1 Retrofit kit 000 014 922 0
7 4 cultivation
7.1 4.1 Attachment of additional work lighting
8 1 Introduction
8.1 1.1 General Information
9 2 Safety precautions
9.1 2.1 Important
10 3 Package list
10.1 3.1 Retrofit kit 000 014 922 0
11 4 Mounting
11.1 4.1 Installation of additional work lights
12 1 Introduction
12.1 1.1 General Councils
13 2 Security Councils
13.1 2.1 Observer !
14 3 pieces fournies
14.1 3.1 Ultra-equipment kit 000 014 922 0
15 4 Assembly
15.1 4.1 Montage de l’clairage de travail supplmentaire
00 0293 951 0.pdf
Table of Content:
6 1 Introduction
6.1 1.1tivation
9.1 4.1 Telematics
10 1 Introduction
10.1 1.1 General Information
11 2 Safety precautions
11.1 2.1 Important
12 3 Package list
12.1 3.1 Telematics
13 4 Mounting
13.1 4.1 Telematics
14 1 Introduction
14.1 1.1 General Councils
15 2 Security Councils
15.1 2.1 Observer !
16 3 pieces fournies
16.1 3.1 Telematics
17 4 Assembly
17.1 4.1 Telematics
18 1 Introduction
18.1 1.1 General indications
19 2 Medidas de seguridad
19.1 2.1 Observar
20 3 Conjunto de suministro
20.1 3.1 Telematics
21 4 Montaje
21.1 4.1 Telematics
22 1 1N 560 Terra-Trac
4 3 Security
4.1 3.1 Note
4.2 3.2 Warning symbol
5 4 Scope of delivery
5.1 4.1 Rubber half-track
6 5 Cultivation
6.1 5.1 Rubber half-track
7 6 Work input
7.1 6.1 Operation
8 7 Maintenance
8.1 7.1 Important maintenance instructions
8.2 7.2 Maintenance tables
9 8 Lubrication plan
9.1 8.1 Lubrication points


John Deere Repair Technical Manual PDF
John Deere POWERTECH E 4.5 and 6.8 L Diesel Engines TECHNICAL MANUAL 25JAN08
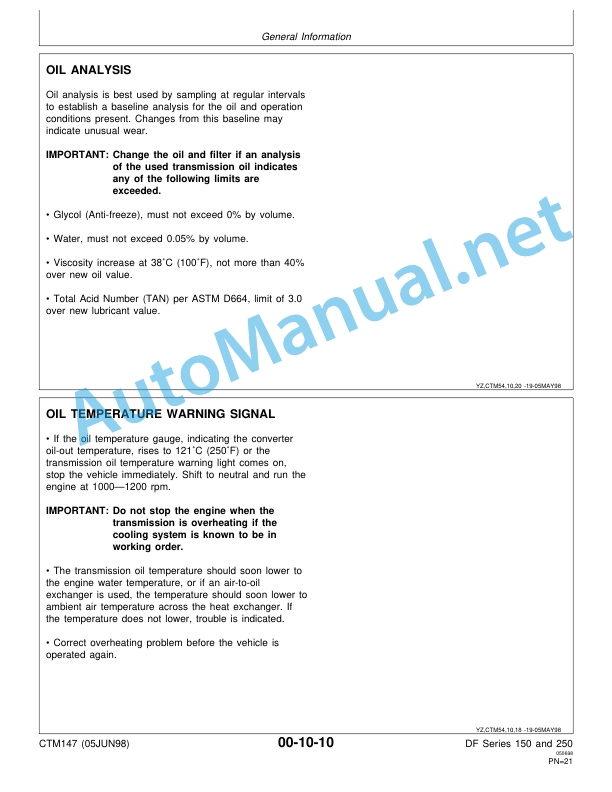
%20Component%20Technical%20Manual%20CTM147%2005JUN98&url=https://automanual.net/doc/john-deere-df-series-150-and-250-transmissions-analog-component-technical-manual-ctm147-05jun98/&media=https://automanual.net/wp-content/uploads/2023/08/john-deere-df-series-150-and-250-transmissions-analog-component-technical-manual-ctm147-05jun98-1.jpg)

John Deere Repair Technical Manual PDF
John Deere DF Series 150 and 250 Transmissions (ANALOG) Component Technical Manual CTM147 05JUN98
%20Component%20Technical%20Manual%20CTM205%20February%202015%20Russian&url=https://automanual.net/doc/john-deere-diesel-engines-4-5l-and-6-8l-component-technical-manual-ctm205-01feb15-russian/&media=https://automanual.net/wp-content/uploads/2023/08/john-deere-diesel-engines-45-l-and-68-l-primary-engine-component-technical-manual-ctm205-february-2015-russian-1.jpg)


John Deere Repair Technical Manual PDF

New Holland Service Manual PDF

John Deere Repair Technical Manual PDF
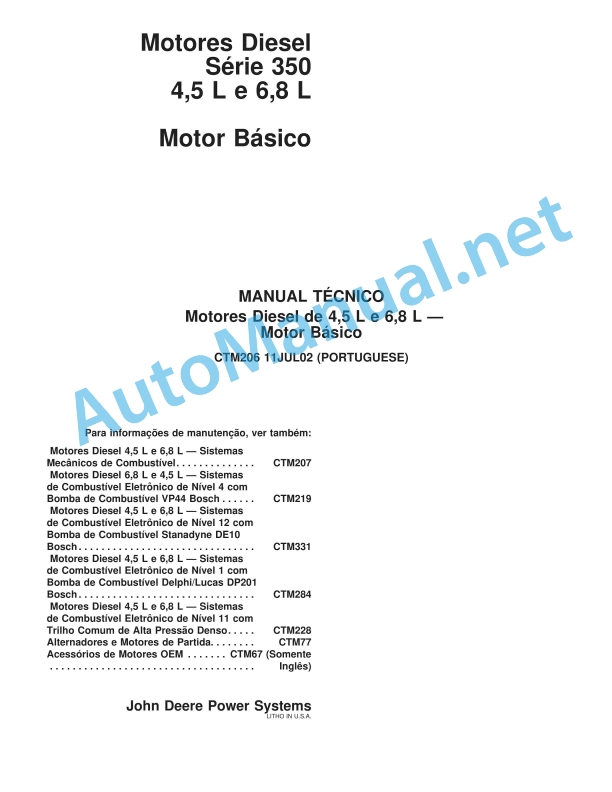
John Deere Diesel Engines PowerTech 4.5L and 6.8L – Motor Base Technical Manual 07MAY08 Portuguese


John Deere Repair Technical Manual PDF


John Deere Repair Technical Manual PDF
John Deere 18-Speed PST Repair Manual Component Technical Manual CTM168 10DEC07


John Deere Repair Technical Manual PDF


John Deere Repair Technical Manual PDF
John Deere Transmission Control Unit Component Technical Manual CTM157 15JUL05
John Deere Repair Technical Manual PDF
- Claas
- Grove
- New Holland
- Komatsu
- Kubota
- John Deere
- Linde
- Bomag
- CASE
- Clark
- JCB
- Jungheinrich
- Linde
- Yale
- Yanmar
- Manitou
- Manitowoc
- CNH
- Doosan
- Fiatagri
- Fiatallis
- Fiatallis Other Manual PDF
- Flexi Coil
- Ford New Holland
- Ford New Holland Other Manual PDF
- Huyndai
- Hypac
- Hyster
- Hyster Service Manual PDF
- Isuzu
- Kobelco
- Kohler
- Krupp
- Lombardini
- Mahindra
- Nuvera
- Perkins
- Sperry New Holland
- Utilev
- Versatile
- ZF