 Tractors Operator Manual EN 1")
 Tractors Operator Manual EN 2")
 Tractors Operator Manual EN 3")
 Tractors Operator Manual EN 4")
 Tractors Operator Manual EN 5")
%20Tractors%20Operator%20Manual%20EN&url=https://automanual.net/doc/claas-nexos-260-220-xl-a69-tractors-operator-manual-en/&media=https://automanual.net/wp-content/uploads/2024/04/claas-nexos-260-220-xl-a69-tractors-operator-manual-en-1.jpg)
Claas Nexos 260-220 Xl (A69) Tractors Operator Manual EN
$50.00
- Model: Nexos 260-220 Xl (A69) Tractors
- Type Of Manual: Operator Manual
- Language: EN
- Format: PDF(s)
- Size: 42.0 MB
File List:
00 0301 051 0.pdf
00 0303 482 0.pdf
00 1169 984 0.pdf
00 1175 164 1.pdf
00 0301 051 0.pdf:
PROFI CAM 3
Table of contents
1 Introduction
1.1 Notes on the manual
1.1.1 Validity of manual
1.1.2 Information about this Operator’s Manual
1.1.3 Symbols and notes
1.1.4 Optional equipment
1.1.5 Qualified specialist workshop
1.1.6 Maintenance information
1.1.7 Warranty notes
1.1.8 Spare parts and technical questions
1.2 Intended use
1.2.1 Intended use
1.2.2 Reasonably foreseeable misuse
2 Safety
2.1 Identifying warnings
2.1.1 Hazard signs
2.1.2 Signal word
2.2 Safety rules
2.2.1 Meaning of Operator’s Manual
2.2.2 Observing safety decals and warnings
2.2.3 Optional equipment and spare parts
3 Product description
3.1 Overview and method of operation
3.1.1 How the PROFI CAM works
3.2 Identification plates and identification number
3.2.1 Position of identification plates
3.2.2 Explanation of PROFI CAM identification plate
3.3 Information on the product
3.3.1 CE marking
4 Operating and control elements
4.1 Camera system
4.1.1 Camera system monitor
4.2 Menu structure
4.2.1 Main menu
4.2.2
4.2.3
4.2.4
4.2.5
4.2.6
5 Technical specifications
5.1 PROFI CAM
5.1.1 Monitor
5.1.2 Camera
5.1.3 Switch box
5.1.4 Degree of protection against foreign bodies and water
6 Preparing the product
6.1 Shutting down and securing the machine
6.1.1 Switching off and securing the machine
6.2 Prior to operation
6.2.1 Carry out prior to operation
6.2.2 Installing the sun protection
6.2.3 Aligning the camera
6.2.4 Connecting the camera electrics
7 Operation
7.1 Monitor
7.1.1 Switching on the monitor
7.1.2 Calling up the menu
7.1.3 Setting a menu item
7.1.4 Setting the image orientation
7.1.5 Setting automatic screen darkening
7.1.6 Image mirroring
7.1.7 Setting the trigger view
7.1.8 Setting the follow-up time for trigger view
7.1.9 Setting the display mode
7.1.10 Activating/deactivating a display mode
8 Faults and remedies
8.1 Electrical and electronic system
8.1.1 Overview of problems on PROFI CAM camera system
8.1.2 Replacing the switch box fuse
9 Maintenance
9.1 Maintenance intervals
9.1.1 Every 10 operating hours or daily
9.2 Camera system
9.2.1 Checking the camera system for dirt
9.2.2 Cleaning the camera
9.2.3 Cleaning the switch box
9.2.4 Cleaning the monitor
10 Placing out of operation and disposal
10.1 General Information
10.1.1 Putting out of operation and disposal
11 Technical terms and abbreviations
11.1 Abbreviations
11.1.1 Units
11.1.2 Abbreviations
11.1.3 Technical terms
00 0303 482 0.pdf:
PROFI CAM 4
Table of contents
1 Introduction
1.1 Notes on the manual
1.1.1 Validity of manual
1.1.2 Information about this Operator’s Manual
1.1.3 Symbols and notes
1.1.4 Optional equipment
1.1.5 Qualified specialist workshop
1.1.6 Maintenance information
1.1.7 Notes on warranty
1.1.8 Spare parts and technical questions
1.2 Intended use
1.2.1 Intended use
1.2.2 Reasonably foreseeable misuse
2 Safety
2.1 Identifying warnings
2.1.1 Hazard signs
2.1.2 Signal word
2.2 Safety rules
2.2.1 Meaning of Operator’s Manual
2.2.2 Structural changes
2.2.3 Optional equipment and spare parts
2.2.4 Operation only following proper putting into operation
2.2.5 Technical status
2.2.6 Respecting technical limit values
Respecting technical limit values
2.2.7 Hazards when driving on roads and fields
3 Product description
3.1 Overview and method of operation
3.1.1 How the PROFI CAM works
3.2 Identification plates and identification number
3.2.1 Identification plates
3.3 Information on the product
3.3.1 CE marking
4 Operating and display elements
4.1 Camera system
4.1.1 Camera system monitor
4.1.2 CEBIS
4.2 Menu structure
4.2.1 Main menu
4.2.2
4.2.3
4.2.4
4.2.5
4.2.6
5 Technical specifications
5.1 PROFI CAM
5.1.1 Monitor
5.1.2 Camera
5.1.3 Switch box
6 Preparing the product
6.1 Switching off and securing the machine
6.1.1 Switching off and securing the machine
6.2 Prior to putting into operation
6.2.1 Carry out prior to operation
6.2.2 Installing the sun protection
6.2.3 Aligning the camera
7 Operation
7.1 Monitor
7.1.1 Switching on the monitor
7.1.2 Calling up the menu
7.1.3 Setting a menu item
7.1.4 Setting the image orientation
7.1.5 Setting automatic screen darkening
7.1.6 Image mirroring
7.1.7 Setting the trigger view
7.1.8 Setting the follow-up time for trigger view
7.1.9 Setting the display mode
7.1.10 Activating/deactivating a display mode
8 Faults and remedies
8.1 Electric and electronic system
8.1.1 Overview of problems on PROFI CAM camera system
9 Maintenance
9.1 Maintenance intervals
9.1.1 Every 10 operating hours or daily
9.2 Camera system
9.2.1 Checking the camera system for dirt
9.2.2 Cleaning the camera
9.2.3 Cleaning the switch box
9.2.4 Cleaning the monitor
10 Putting out of operation and disposal
10.1 General information
10.1.1 Putting out of operation and disposal
11 Technical terms and abbreviations
11.1 Abbreviations
11.1.1 Units
11.1.2 Abbreviations
11.1.3 Technical terms
00 1169 984 0.pdf:
Sensor case for tractors Stage IIIB, IV and VSensor case for tractors Stage IIIB, IV and VSensor case for Stage IIIB, IV and V tractors
Contents
1 Sensorkoffer – Sensor case – Sensor suitcase – Stage IIIB, IV & V
1.1 Auflistung Kofferinhalt
1.1 Listing case content
1.1 Presentation of the contents of the suitcase
00 1175 164 1.pdf:
Operator’s manual
Table of contents
1 Introduction
1.1 Notes on the manual
1.1.1 Validity of the operator’s manual
1.1.2 Information about this Operator’s Manual
1.1.3 Symbols and notes
1.1.4 Optional equipment
1.1.5 Software developments
1.1.6 Qualified specialist workshop
1.1.7 Notes on maintenance
1.1.8 Notes on warranty
1.1.9 Spare parts and technical questions
1.1.10 Transferring the tractor to a third party
1.2 Intended use
1.2.1 Intended use
1.2.2 Reasonably foreseeable misuse
2 Safety
2.1 Identifying warnings
2.1.1 Hazard signs
2.1.2 Signal word
2.2 Safety rules
2.2.1 European regulations
2.2.2 Importance of the Operator’s Manual
2.2.3 Observing safety decals and warnings
2.2.4 Requirements made on all persons working with the tractor
2.2.5 Children in danger
2.2.6 High risk areas
2.2.7 Presence between tractor and machine
2.2.8 Persons riding on the machine
2.2.9 Hitching an implement or trailer to the tractor
2.2.10 Danger of injury on the PTO shaft
2.2.11 Danger of injury on the universal drive shaft
2.2.12 Do not attach a frontloader
2.2.13 Avoid hazards posed by frontloaders
2.2.14 Structural changes
2.2.15 Optional equipment and spare parts
2.2.16 Forestry work
2.2.17 Controlling the tractor when it is running
2.2.18 Operation only after commissioning has been properly performed
2.2.19 Technical condition
2.2.20 Danger from damage on the tractor
2.2.21 Respecting technical limit values
2.2.22 Danger from machine parts running on
2.2.23 Keeping safety devices functional
2.2.24 Personal protective equipment
2.2.25 Wearing suitable clothing
2.2.26 Removing dirt and loose objects
2.2.27 Preparing the tractor for road travel
2.2.28 Hazards when driving on the road and on the field
2.2.29 Parking the tractor securely
2.2.30 Unsuitable operating utilities
2.2.31 Safe handling of operating and auxiliary utilities
2.2.32 Fuel is harmful to your health
2.2.33 Refrigerant is harmful to your health
2.2.34 Environmental protection and disposal
2.2.35 Keeping the cab free of chemicals
2.2.36 Handling of crop protection agents and fertilisers
2.2.37 Avoiding fires
2.2.38 Lethal electrocution from overhead lines
2.2.39 Behaviour in case of voltage flash-over from overhead lines and when lightning strikes
2.2.40 Electrocution by electrical system
2.2.41 Noise may cause health problems
2.2.42 Vibrations may cause health problems
2.2.43 Pressurised fluids
2.2.44 Compressed air
2.2.45 Toxic exhaust gas
2.2.46 Hot surfaces
2.2.47 Accessing and leaving the machine safely
2.2.48 Working on the tractor only when shut down
2.2.49 Maintenance operations and repair work
2.2.50 Raised tractor parts and loads
2.2.51 Hazard posed by welding work
2.2.52 Checking and charging the battery
2.3 Safety decals on the tractor
2.3.1 Structure of safety decals
2.3.2 Warning symbols
3 Tractor description
3.1 Overview
3.1.1 Front right-hand view of the tractor
Cab version
Version with platform
3.1.2 Front left-hand view of the tractor
Cab version
3.1.3 Rear left-hand view of the tractor
Version with platform
3.1.4 Rear view of the tractor
Cab version
3.2 Identification plates and vehicle identification number
3.2.1 Tractor identification plate
Tractor identification number (VIN code)
Decoding the Types/Variants/Versions
Tractor serial number
3.2.2 Engine identification plate
3.2.3 Transmission identification plate
3.2.4 Front axle identification plate
Four-wheel drive tractor with a rigid front axle
3.2.5 Cab or platform identification plate
3.3 Information on the tractor
3.3.1 Lifting points on the tractor
3.3.2 Hydraulic and transmission oil
3.3.3 Service brake fluid
3.3.4 Rear power take-off speed
3.3.5 Engine bonnet
3.3.6 Tractor lubrication
3.3.7 Mechanical rear linkage external control
3.3.8 Hydraulic control valve pressure taps
3.3.9 Emergency exits
3.3.10 Cab category
4 Operating and display elements
4.1.1 Driving position
NEXOS S – Mechanical reverser
NEXOS S – Electrohydraulic reverser (Version 1)
NEXOS S – Electrohydraulic reverser (Version 2)
NEXOS S – Electrohydraulic reverser (Version 3)
NEXOS M/L/XL – Mechanical reverser
NEXOS M/L/XL – Electrohydraulic reverser (Version 1)
NEXOS L/L/XL – Electrohydraulic reverser (Version 2)
NEXOS M/L/XL – Electrohydraulic reverser (Version 3)
Electrical sockets
4.1.2 Dashboard
4.1.3 Controls on top of cab
Right-hand side of cab
Rear screen wiper
Overhead light
Left-hand side of cab
4.1.4 Hinged panels and windows
Cab doors
Opening tailgate
Windscreen open
Sun blind
4.2 Operator’s platform
4.2.1 Driving position
Controls located on the right-hand side of the driving position
Controls located on the left-hand side of the driving position
4.2.2 Dashboard
4.2.3 Work light controls
4.3 Operating and display elements
4.3.1 Instrument panel module
4.3.2 Instrument panel module
4.3.3 Instrument panel digital display
Start-up page
Navigating the digital display menus
Main page
Engine page
Electrohydraulic control valve page
Rear linkage page
Category 4 cab air filtration page
Error code page
Digital display parameters page
4.3.4 Instrument panel digital display
Engine oil warning light
Transmission oil warning light
Tractor calculated speed indication
Tank urea solution level indication
Water in fuel warning light
Speed range doubler status indicator light
Tractor’s direction of travel reverser status indicator light
Second trailer direction indicator light
First trailer direction indicator light
Exhaust gas emission control strategy warning light
Particle filter regeneration warning light
Display of the rear power take-off rotation speed
4.4 Rear power lift
4.4.1 Electrohydraulic rear linkage external controls
4.4.2 Mechanical rear linkage external control
4.5 Hydraulic system
4.5.1 Hydraulic controls
Front linkage
Converting single/double action hydraulic control valves
4.6 Electric and electronic system
4.6.1 Key-operated ignition
4.6.2 Control lever for indicator lights and audible warning
4.6.3 Power supply socket
5 Technical specifications
5.1 NEXOS
5.1.1 Dimensions
Cab version
Version with platform
5.1.2 Tractor weight
Cab version (four-wheel drive)
Cab version (two-wheel drive)
Version with platform
5.1.3 Engine
5.1.4 Gearbox
Mechanical transmission
Electrohydraulic transmission
5.1.5 Tractor travel speeds
5.1.6 12/12 gearbox – 30 km/h version
5.1.7 24/12 transmission – 40 km/h version
5.24/24 gearbox – 40 km/h version
5.1.9 15/15 transmission
40 km/h version
5.1.10 30/15 transmission
40 km/h version
5.1.11 30/30 transmission
40 km/h version
30 km/h version
5.1.12 Front axle (two-wheel drive NEXOS)
Front axle 148827
5.1.13 Front drive axle (four-wheel drive NEXOS)
Suspended front axle
Rigid front axle
Front/Rear inter-axle ratio
NEXOS XL – 30 km/h version with platform
NEXOS L – 30 km/h version with platform
NEXOS L – 40 km/h version with platform
NEXOS XL – 40 km/h version with platform
NEXOS LD – 40 km/h version with platform
NEXOS MD – 40 km/h version with platform
NEXOS XL – Cab version
NEXOS L – Cab version
NEXOS M – Cab version
NEXOS S- Cab version
5.1.14 Rear axle
5.1.15 NEXOS ble of front tracks (cab version)
Variable track wheel rim
Reinforced variable track wheel rim
Rim with fixed wheel disc
5.1.16 NEXOS XL: Table of reatracks (cab version)
Variable track wheel rim
5.1.17 NEXOS XL: Table of front tracks (platform version)
Variable track wheel rim
Reinforced variable track wheel rim
Rim with fixed wheel disc
5.1.18 NEXOS XL: Table of rear tracks (platform version)
Variable track wheel rim
5.1.19 NEXOS L: Table of front tracks (cab version)
Variable track wheel rim
Reinforced variable track wheel rim
Rim with fixed wheel disc
5.1.20 NEXOS L: Table of rear tracks (cab version)
Variable track wheel rim
5.1.21 NEXOS L: Table of front tracks (platform version)
Variable track wheel rim
Reinforced variable track wheel rim
Rim with fixed wheel disc
5.1.22 NEXOS L: Table of rear tracks (platform version)
Variable track wheel rim
5.1.23 NEXOS M: Table of front tracks (cab version)
Variable track wheel rim
Reinforced variable track wheel rim
Rim with fixed wheel disc
5.1.24 NEXOS M: Table of rear tracks (cab version)
Variable track wheel rim
5.1.25 NEXOS S: Table of front tracks (cab version)
Variable disc rim (version with engine front axle)
Reinforced variable disc rim (version with engine front axle)
Fixed disc rim (version with engine front axle)
Variable disc rim (version with undriven front axle)
5.1.26 NEXOS L: Table of rear tracks (cab version)
Variable track wheel rim
5.1.27 NEXOS LD: Table of front track widths
Variable track wheel rim
Reinforced variable track wheel rim
Rim with fixed wheel disc
5.1.28 NEXOS LD: Table of rear tracks
Variable track wheel rim
5.1.29 NEXOS MD: Table of front track widths
Variable track wheel rim
Reinforced variable track wheel rim
Rim with fixed wheel disc
5.1.30 NEXOS MD: Table of rear tracks
Rims with variable wheel disc
5.1.31 Tyre combinations (version with cab)
NEXOS XL
5.1.32 Tyre combinations (version with platform)
NEXOS XL
NEXOS LD
NEXOS MD
5.1.33 Technical specifications of tyres (version with cab)
NEXOS XL (four-wheel drive tractor with GVWR of 4800 kg)
NEXOS L (four-wheel drive tractor with GVWR 4800 kg)
NEXOS M (four-wheel drive tractor with GVWR 4800 kg)
NEXOS S (four-wheel drive tractor with GVWR 4500 kg)
NEXOS S (two-wheel drive tractor with GVWR 4200 kg)
5.1.34 Technical specifications of tyres (version with platform)
5.1.35 Brakes
5.1.36 Direction
5.1.37 Rear linkage
Electrohydraulic rear linkage
Mechanical rear linkage (NEXOS S,M,L,XL with cab)
Mechanical rear linkage (NEXOS with platform)
5.1.38 Front linkage
NEXOS S/M/L/XL
NEXOS LD/MD
5.1.39 Rear hitches
Tractors with cab
Tractors with platform
5.1.40 Rear power take-off
NEXOS S/M/L/XL
NEXOS LD/MD
5.1.41 Front power take-off
5.1.42 Hydraulic circuits
Open centre circuit 60 l/min
87 l/min open centre circuit
5.1.43 Hydraulic control valve combinations
Hydraulic control valves on the 60 l/min circuit
Hydraulic control valves on the 85 l/min circuit
Electrohydraulic control valves on the 85 l/min circuit
5.1.44 Electrical circuit
5.1.45 Sound levels
Passers-by exposure to noise level (according to annex III of delegated regulation 2015/96)
Driver’s exposure to noise level (according to annex XIII of the delegated regulation 1322/2014)
5.1.46 Sound levels
Passers-by exposure to noise level (according to annex III of delegated regulation 2015/96)
Driver’s exposure to noise level (according to annex XIII of the delegated regulation 1322/2014)
5.1.47 Seat vibration level
5.1.48 Level of protection provided by the cab
5.1.49 Level of protection provided by the platform
5.1.50 Tractor ballast
5.1.51 Maximum authorised tow weights
5.1.52 Maximum authorised tow weights
5.1.53 Total authorised laden weight
5.1.54 Total authorised laden weight
5.2 Operating utilities
5.2.1 Lubricants and hydraulic oils
5.2.2 Engine coolant
5.2.3 Brake fluid
5.2.4 Air conditioning circuit
6 Tractor preparation
6.1 Securing the tractor
6.1.1 Stop the tractor and secure it
6.1.2 Securing the tractor
6.2 Prior to putting into operation
6.2.1 Preparing for initial commissioning
6.2.2 Preparing for commissioning
6.2.3 Hitching and connecting the implement
6.3 Engine
6.3.1 Fuel
Quality requirement
Special notes on biofuels
Handling fuel
6.3.2 Urea solution
Using urea solution
Urea solution purity and standard
Storing urea solution in tanks or containers
6.3.3 Topping up the tractor
Topping up the fuel tank
Top up the urea solution tank
6.4 Frame
6.4.1 Track adjustment
Tracking method
6.4.2 Adjusting the steering stops
Adjustment
6.4.3 General information about the tyres
6.4.4 Inflation pressure
Effect on soil compaction
Effect on consumption
6.4.5 Specifications
Load index
Speed symbol
6.5 Brake
6.5.1 Coupling the brake pedals
6.5.2 Trailer hydraulic brake
Test the trailer brake hydraulic valve
6.6 Steering
6.6.1 Adjusting the angle of the steering column
Cab version
Version with platform
6.7 Rear power lift
6.7.1 Axle stands
6.7.2 Top link
6.7.3 Rear linkage stabilisers
NEXOS L/XL
NEXOS LD/MD
6.7.4 Vertical hydraulic tie rod (without stabiliser option and without hydraulic sideshift)
6.7.5 Vertical hydraulic tie rod, stabilisers and hydraulic sideshift
Control lever (cab version)
6.7.6 Automatic hitches
6.7.7 Rear linkage external controls
Electrohydraulic rear linkage
Mechanical rear linkage
6.7.8 Hitch and unhitch an implement
Recommendations for hitching an implement
Hitching an implement
Unhitching an implement
6.8 Front power lift
6.8.1 Fitting caps on the pressure taps
6.8.2 Converting the single action/double action front linkage
6.8.3 Locking the front linkage
6.8.4 Top link
6.8.5 Lower links for the front linkage
6.8.6 Automatic hitches
6.8.7 Hitch and unhitch an implement
Recommendations for hitching an implement
Hitching an implement
Unhitching an implement
6.9 Rear power take-off
6.9.1 Hitch and unhitch an implement
Connecting and disconnecting the rear power take-off universal drive shaft
Hitching an implement to the rear power take-off
Unhitching an implement from the rear power take-off
6.10 Hitch
6.10.1 Recommendations
6.10.2 Calculating the maximum tow load (not including CUNA clevis)
6.10.3 Clevis drawbars
6.10.4 Swinging drawbar
Tightening the clevis
Safety device
6.10.5 Pick-up hitch
6.11 Hydraulic system
6.11.1 Rear pressure taps
Connecting or disconnecting the pressure taps
Free return to the tank
6.11.2 Single/double action setting
6.11.3 Selecting the behaviour adopted by the hydraulic control valve after the control lever is released
6.11.4 Lateral hydraulic pressure taps
Connecting and disconnecting the lateral hydraulic pressure taps
6.12 Electric and electronic system
6.12.1 Electrical sockets
Light socket for the trailer or implement
Power supply socket
6.12.2 Adjusting the engine bonnet dipped beam headlights
6.13 Cab and operator’s platform
6.13.1 Adjusting the rear-view mirrors
Electronically-adjusted exterior rear view mirrors (cab version)
Manually-adjusted exterior rear view mirrors (cab version)
Manually-adjusted exterior rear view mirrors (version with platform)
Interior rear-view mirror
6.13.2 Folding roll hoop
6.13.3 Adjusting the driver’s seat
6.13.4 Cable routing
6.13.5 Category 2 or category 4 cab filtration
6.14 Assembly parts and machine body
6.14.1 Ballast
6.14.2 Balancing the tractor with mounted implements
Summary table
6.14.3 Fitting and removing the front ballast weights
6.14.4 Opening and closing covers
One-piece bonnet
Opening the engine bonnet
Closing the engine bonnet
Side covers
Removing the main side covers
Fitting the side covers
Right-hand side cover
Removing the right-hand side cover
Fitting the right-hand side cover
6.14.5 Opening and closing the engine covers
Opening the one-piece engine bonnet
Removing the engine side covers
Refitting the engine side covers
Closing the one-piece engine bonnet
6.14.6 Front attachment points
6.14.7 Tool box
6.15 Transport of the tractor
6.15.1 Transport
7 Operation
7.1 Driving and transportation
7.1.1 Preparing for road travel
7.1.2 Prepare for driving in the field
7.1.3 Driving with the implements
Heavy-duty pulling operations
7.2 Engine
7.2.1 Running in
7.2.2 Start the engine
Preliminary operations
Start the engine
Recommendations
Start the engine
Recommendations
7.2.3 Start the engine
Preliminary operations
Start the engine
Recommendations
7.2.4 Accelerator pedal
7.2.5 Hand accelerator
7.2.6 Engine speed memories
Activating an engine speed memory
Manually adjusting the engine speed memories (method 1)
Manually adjusting the engine speed memories (method 2)
7.2.7 Engine speed memories
Activating an engine speed memory
Manually adjusting the engine speed memories (method 1)
Manually adjusting the engine speed memories (method 2)
7.2.8 Engine particulate filter
Particulate filter filling percentage
Dashboard (cab version)
Dashboard (platform version)
Particulate filter operating logic
Normal operation of the particulate filter
Activation of soot treatment
Particulate filter automatic regeneration (cab version)
Particulate filter automatic regeneration (version with platform)
Particulate filter forced regeneration (cab version)
Particulate filter forced regeneration (version with platform)
7.2.9 Inhibiting the unburnt fuel elimination strategy
7.2.10 Inhibiting the unburnt fuel elimination strategy
7.2.11 Switching off the engine
7.3 Gearbox, clutch and universal drive shaft
7.3.1 Set the direction of travel reverser to neutral
Tractors with electrohydraulic reverser
Tractors with mechanical reverser
7.3.2 Shift the transmission to neutral
7.3.3 Selecting the tractor’s direction of travel
Recommendations
Tractors with electrohydraulic reverser
Tractors with ELECTROPILOT joystick
Tractors with mechanical reverser
7.3.4 Clutch
Clutch pedal
7.3.5 Speed selection
7.3.6 Selecting a speed range
7.3.7 Range doubler
Electrohydraulic range doubler
Mechanical range doubler
7.3.8 Differential lock
7.4 Chassis
7.4.1 Engaging the front axle
Front axle automatic mode
Front axle permanent mode
Configuring the steering angle of the front wheels
Activate the automatic disengagement of the front axle based on the steering angle of the wheels
7.4.2 Engaging the front axle
Front axle automatic mode
Front axle disengaged mode
Front axle permanent mode
7.4.3 Suspended front axle
Activating the front axle suspension
Adjust the height of the front axle suspension
Starting the front axle suspension system
Front axle suspension manual mode
Front axle suspension locked mode
Front axle suspension automatic mode
7.5 Brake
7.5.1 Service brakes
7.5.2 Parking brake
7.6 Electronic rear linkage
7.6.1 Warning light
7.6.2 Road transport safety
7.6.3 Operating the linkage
7.6.4 Adjusting the speed for raising the rear linkage lower links
7.6.5 Selecting the electrohydraulic rear linkage modes
7.6.6 Position control
7.6.7 Draft control
Draft control in normal mode
Draft control in automatic mode
7.6.8 Upper stop
7.6.9 Lowering speed
7.6.10 Using the implement’s rapid soil entry function
7.6.11 External controls
7.7 Mechanical rear linkage
7.7.1 Checking the position of the mechanical rear linkage
7.7.2 Rear linkage draft control
Set the draft control
Implement handling at the headland
7.7.3 Rear linkage mixed control
Adjusting the rear linkage mixed control
Implement handling at the headland
7.7.4 Rear linkage floating position
7.7.5 Adjusting the sensitivity of the rear linkage
7.7.6 Mechanical rear linkage external controls
7.8 Front power lift
7.8.1 Using the front linkage
7.9 Rear power take-off
7.9.1 Selecting the rear power take-off speed
Selecting the power take-off speed proportional to the tractor’s ground speed
7.9.2 Using the rear power take-off
Power take-off with assisted mechanical engagement
Power take-off with electrohydraulic engagement
Information display
7.9.3 Stationary working
7.10 Front power take-off
7.10.1 Using the front power take-off
Engaging the front power take-off (Cab version)
Engaging the front power take-off (version with platform)
Stopping the front power take-off
7.10.2 Stationary working
7.11 Hydraulic system
7.11.1 Mechanically-controlled hydraulic control valves
Select the position of the hydraulic control valve by releasing the control lever
Hydraulic control valve control levers
Using the hydraulic control valve controls
Activating the hydraulic control valves
Single or double action hydraulic control valves
Hydraulic control valve flow divider
Hydraulic control valve flow controller
7.11.2 Using the electrohydraulic control valves
Electrohydraulic control valves
Activating the electrohydraulic control valves
Emergency stop for the electrohydraulic control valves
Use the linear controls
Linear control floating position
Using the ELECTROPILOT lever
ELECTROPILOT lever floating position
Electrohydraulic control valve status and adjustment
Adjusting the sensitivity of each electrohydraulic control valve
Configure the maximum hydraulic flow rate for each electrohydraulic control valve
Configuring the electrohydraulic control valve timer
7.11.3 Lateral hydraulic pressure taps
Lateral hydraulic pressure taps without duplicator
Lateral hydraulic pressure taps with duplicator
Lateral hydraulic pressure taps with duplicator
7.11.4 Stationary working
7.12 Electric and electronic system
7.12.1 Electric circuit breaker
7.12.2 Instrument panel digital display
Navigating the digital display menus
Start-up page
Main page
Engine page
Electrohydraulic control valve page
Rear linkage page
Category 4 cab air filtration page
Error code page
Digital display parameters page
7.12.3 Instrument panel display
Information menu on the dashboard display
Information available:
Dashboard display menu
Particulate filter (DPF)
Inhibiting the strategy to reduce the volume of unburnt fuel
Language
Units of measurement
Transmission errors
Engine errors
Recalibrating the tractor speed
Exiting the user menu
7.13 Cab and operator’s platform
7.13.1 Heating, ventilation and air conditioning
Heating and air conditioning controls in the cab
Ventilation control
Air conditioning control
Heating control
Cab air recirculation control
Cab air ventilation grilles
7.13.2 Category 2 filtration system
7.13.3 Category 4 filtration system
Start the category 4 air filtration device
Activating the category 4 air filtration device
Using the category 4 air filtration level
Warnings relating to the category 4 air filtration device
Errors relating to the category 4 air filtration device
Managing the air filter service life
Category 4 air filter
Storage conditions
7.14 Assembly parts and machine body
7.14.1 Sight
8 Faults and remedies
8.1 Alarms
8.1.1 Operating faults
Viewing error codes
8.1.2 Primary alarms
8.1.3 Secondary alarms
8.1.4 Other alarms
8.1.5 Resolution procedures for specific faults
Tractor error codes
Engine error codes
8.2 Engine
8.2.1 Faults caused by a low fuel level
8.2.2 Assistance with engine starting
Assisted engine starting by towing
Assisted engine starting using an external battery
8.2.3 Exhaust gas post-treatment system
Information on exhaust gas post-treatment system faults
Particulate filter faults
Low urea solution level in the tank
Urea solution quality
Faults due to system alterations
Exhaust gas recycling valve faults
8.3 Frame
8.3.1 Fitting a jack
8.3.2 Replacing a wheel
8.3.3 Towing the tractor
Towing with the engine running
Towing with the engine stopped
Towing clevises
8.3.4 Digging out the tractor
Digging out a tractor
Digging out a tractor by towing
8.3.5 Suspended front axle
8.4 Electric and electronic system
8.4.1 Fuses and relays
Engine front part fuse and relay box
Allocation of fuses
Relay allocation
Fuse tester
Components located underneath the dashboard
Components located on left-hand side of cab
Components located behind the driver’s seat
8.4.2 Fuses and relays
Main fuse and relay box
Tractor with mechanical reverser
Allocation of fuses
Relay allocation
Tractor with hydraulic
%20Portuguese&url=https://automanual.net/doc/john-deere-tractors-6300-6500-and-6600-parts-catalog-cq26564-29set05/&media=https://automanual.net/wp-content/uploads/2023/08/john-deere-tractors-6300-6500-and-6600-parts-catalog-cq26564-29set05-portuguese-1.jpg)


John Deere Parts Catalog PDF
John Deere Tractors 6300, 6500, and 6600 Parts Catalog CQ26564 (29SET05) Portuguese


John Deere Repair Technical Manual PDF
&url=https://automanual.net/doc/john-deere-16-18-20-and-24hp-onan-engines-component-technical-manual-ctm2-19apr90/&media=https://automanual.net/wp-content/uploads/2023/08/john-deere-16-18-20-and-24hp-onan-engines-component-technical-manual-ctm2-19apr90-1.jpg)


John Deere Repair Technical Manual PDF
John Deere 16, 18, 20 and 24HP Onan Engines Component Technical Manual CTM2 (19APR90)
%20Component%20Technical%20Manual%20CTM147%2005JUN98&url=https://automanual.net/doc/john-deere-df-series-150-and-250-transmissions-analog-component-technical-manual-ctm147-05jun98/&media=https://automanual.net/wp-content/uploads/2023/08/john-deere-df-series-150-and-250-transmissions-analog-component-technical-manual-ctm147-05jun98-1.jpg)

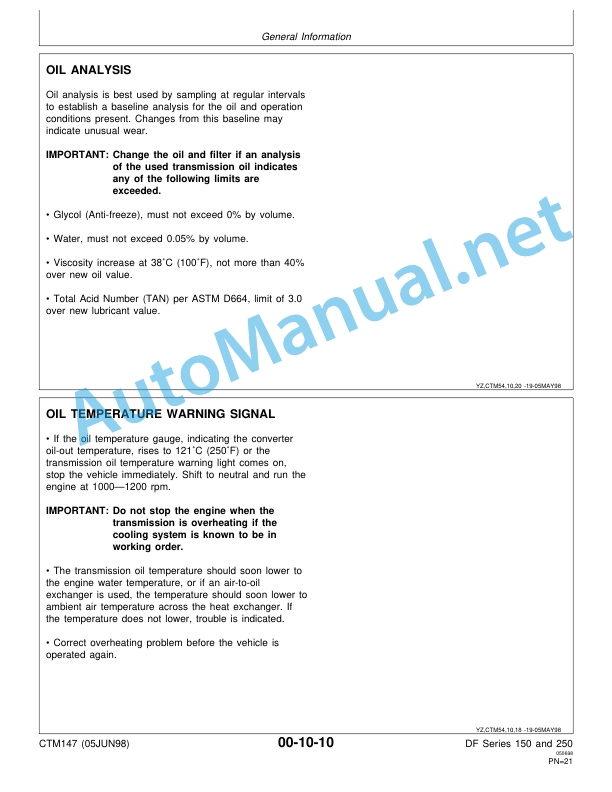
John Deere Repair Technical Manual PDF
John Deere DF Series 150 and 250 Transmissions (ANALOG) Component Technical Manual CTM147 05JUN98
John Deere Repair Technical Manual PDF
John Deere Parts Catalog PDF
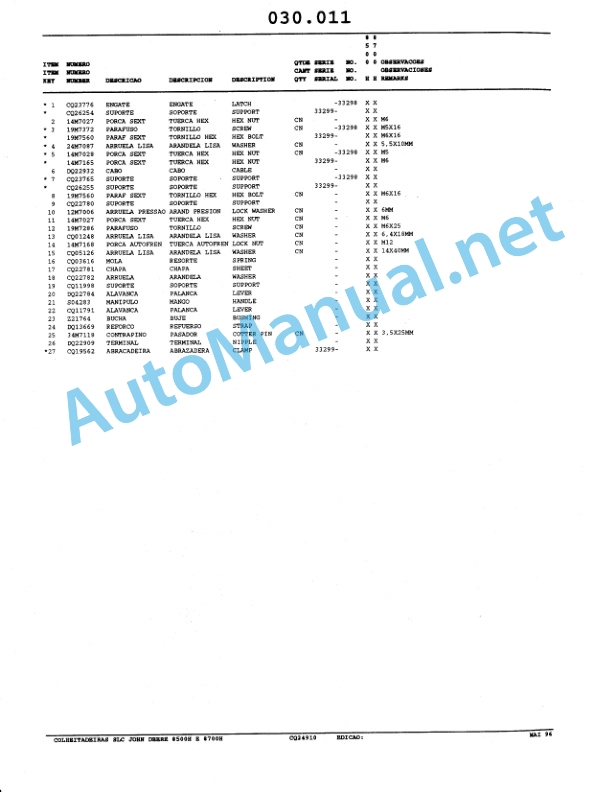
John Deere Harvesters 8500 and 8700 Parts Catalog CPCQ24910 Spanish

John Deere Repair Technical Manual PDF
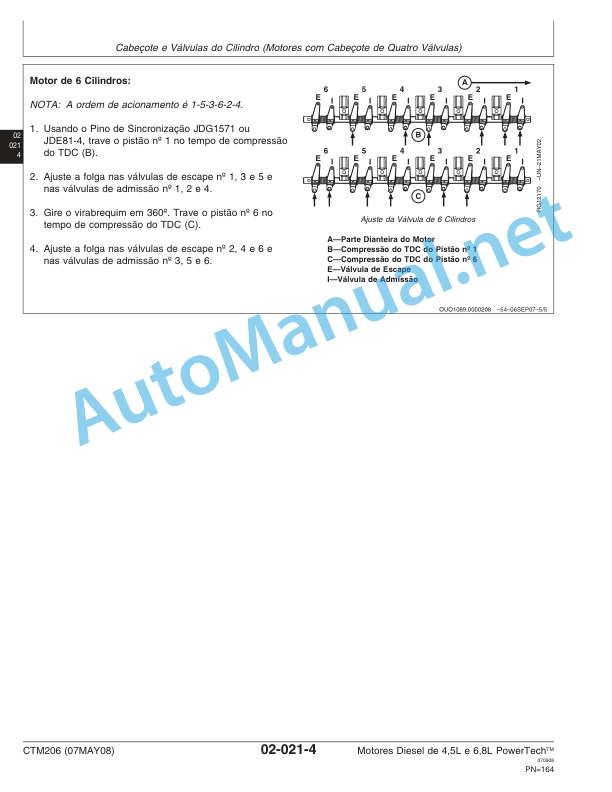
John Deere Diesel Engines PowerTech 4.5L and 6.8L – Motor Base Technical Manual 07MAY08 Portuguese


John Deere Repair Technical Manual PDF
John Deere PowerTech M 10.5 L and 12.5 L Diesel Engines COMPONENT TECHNICAL MANUAL CTM100 10MAY11


John Deere Repair Technical Manual PDF