 Balers Operator Manual EN 1")
 Balers Operator Manual EN 2")
 Balers Operator Manual EN 3")
 Balers Operator Manual EN 4")
 Balers Operator Manual EN 5")

John Deere Repair Technical Manual PDF
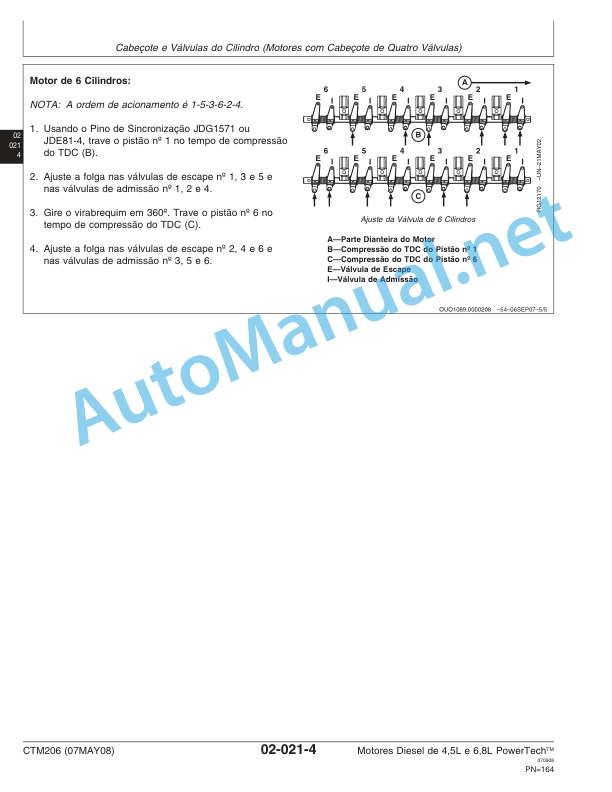
John Deere Diesel Engines PowerTech 4.5L and 6.8L – Motor Base Technical Manual 07MAY08 Portuguese
John Deere Repair Technical Manual PDF


John Deere Repair Technical Manual PDF
John Deere 18-Speed PST Repair Manual Component Technical Manual CTM168 10DEC07


John Deere Repair Technical Manual PDF
John Deere POWERTECH E 4.5 and 6.8 L Diesel Engines TECHNICAL MANUAL 25JAN08


John Deere Repair Technical Manual PDF


John Deere Repair Technical Manual PDF

John Deere Repair Technical Manual PDF
John Deere Transmission Control Unit Component Technical Manual CTM157 15JUL05

John Deere Repair Technical Manual PDF


John Deere Repair Technical Manual PDF


%20Balers%20Operator%20Manual%20EN&url=https://automanual.net/doc/claas-quadrant-2100-742-balers-operator-manual-en/&media=https://automanual.net/wp-content/uploads/2024/04/claas-quadrant-2100-742-balers-operator-manual-en-1.jpg)
%20Interim%20Tier%204%20Stage%20III%20B%20Component%20Technical%20Manual%20CTM104754%2025%20July%202012%20Portuguese&url=https://automanual.net/doc/john-deere-powertech-m-6068-oem-diesel-engines-above-130-kw-174-hp-compo-technical-manual-ctm104754-25jul12-portuguese/&media=https://automanual.net/wp-content/uploads/2023/08/john-deere-powertech-6068-engines-above-130-kw-174-hp-interim-tier-4-stage-iii-b-component-technical-manual-ctm104754-25-july-2012-portuguese-1.jpg)
John Deere Parts Catalog PDF
John Deere Tractors 7500 Parts Catalog CPCQ26568 30 Jan 02 Portuguese