 Combines Operator Manual EN 1")
 Combines Operator Manual EN 2")
 Combines Operator Manual EN 3")
 Combines Operator Manual EN 4")
 Combines Operator Manual EN 5")
 Combines Operator Manual EN 6")
 Combines Operator Manual EN 7")
 Combines Operator Manual EN 8")
 Combines Operator Manual EN 9")
 Combines Operator Manual EN 10")
Claas Tucano 430-420 (L34) Combines Operator Manual EN
$50.00
- Model: Tucano 430-420 (L34) Combines
- Type Of Manual: Operator Manual
- Language: EN
- Format: PDF(s)
- Size: 402 MB
File List:
00 0018 552 1.pdf
00 0301 051 0.pdf
00 0302 635 5.pdf
00 0302 957 2.pdf
00 0303 482 0.pdf
00 1405 164 7.pdf
00 1405 184 7.pdf
00 1420 028 4.pdf
00 1420 056 2.pdf
00 0018 552 1.pdf:
TELEMATICS Website
Table of contents
1 About this Concise Operator’s Manual
1.1 Notes on the manual
1.1.1 Validity of manual
1.1.2 Notes regarding the Concise Operator’s Manual
1.1.3 Notes on warranty
2 Safety
2.1 Intended use
2.1.1 Proper use
3 Product description
3.1 Overview and method of operation
3.1.1 TELEMATICS product variants
3.1.2 TONI (TELEMATICS on implements)
3.1.3 Fleet View
3.1.4 TELEMATICS basic
3.1.5 TELEMATICS advanced
3.1.6 TELEMATICS professional
3.1.7 TELEMATICS app
4 Operating and control elements
4.1 TELEMATICS overview
4.1.1 Illustration conventions of buttons and navigation elements
4.1.2 Symbols and colours
4.2 Menu structure
4.2.1 Start screen
4.2.2 TELEMATICS website site map
4.2.3 Main menu overview
4.2.4
4.2.5
4.2.6
00 0301 051 0.pdf:
PROFI CAM 3
Table of contents
1 Introduction
1.1 Notes on the manual
1.1.1 Validity of manual
1.1.2 Information about this Operator’s Manual
1.1.3 Symbols and notes
1.1.4 Optional equipment
1.1.5 Qualified specialist workshop
1.1.6 Maintenance information
1.1.7 Warranty notes
1.1.8 Spare parts and technical questions
1.2 Intended use
1.2.1 Intended use
1.2.2 Reasonably foreseeable misuse
2 Safety
2.1 Identifying warnings
2.1.1 Hazard signs
2.1.2 Signal word
2.2 Safety rules
2.2.1 Meaning of Operator’s Manual
2.2.2 Observing safety decals and warnings
2.2.3 Optional equipment and spare parts
3 Product description
3.1 Overview and method of operation
3.1.1 How the PROFI CAM works
3.2 Identification plates and identification number
3.2.1 Position of identification plates
3.2.2 Explanation of PROFI CAM identification plate
3.3 Information on the product
3.3.1 CE marking
4 Operating and control elements
4.1 Camera system
4.1.1 Camera system monitor
4.2 Menu structure
4.2.1 Main menu
4.2.2
4.2.3
4.2.4
4.2.5
4.2.6
5 Technical specifications
5.1 PROFI CAM
5.1.1 Monitor
5.1.2 Camera
5.1.3 Switch box
5.1.4 Degree of protection against foreign bodies and water
6 Preparing the product
6.1 Shutting down and securing the machine
6.1.1 Switching off and securing the machine
6.2 Prior to operation
6.2.1 Carry out prior to operation
6.2.2 Installing the sun protection
6.2.3 Aligning the camera
6.2.4 Connecting the camera electrics
7 Operation
7.1 Monitor
7.1.1 Switching on the monitor
7.1.2 Calling up the menu
7.1.3 Setting a menu item
7.1.4 Setting the image orientation
7.1.5 Setting automatic screen darkening
7.1.6 Image mirroring
7.1.7 Setting the trigger view
7.1.8 Setting the follow-up time for trigger view
7.1.9 Setting the display mode
7.1.10 Activating/deactivating a display mode
8 Faults and remedies
8.1 Electrical and electronic system
8.1.1 Overview of problems on PROFI CAM camera system
8.1.2 Replacing the switch box fuse
9 Maintenance
9.1 Maintenance intervals
9.1.1 Every 10 operating hours or daily
9.2 Camera system
9.2.1 Checking the camera system for dirt
9.2.2 Cleaning the camera
9.2.3 Cleaning the switch box
9.2.4 Cleaning the monitor
10 Placing out of operation and disposal
10.1 General Information
10.1.1 Putting out of operation and disposal
11 Technical terms and abbreviations
11.1 Abbreviations
11.1.1 Units
11.1.2 Abbreviations
11.1.3 Technical terms
00 0302 957 2.pdf:
TUCANO 580 / 570 / 560TUCANO 450 / 430MONTANA
Table of contents
1 Introduction
1.1 Notes on the manual
1.1.1 Validity of manual
2 Safety
2.1 Safety decals on the machine
2.1.1 Safety decals on cab
2.1.2 Safety decals on feeder unit
3 Machine description
3.1 Overview and method of operation
3.1.1 MONTANA overview
3.2 Identification plates and identification numbers
3.2.1 Drive axle identification plate
4 Operating and display elements
4.1 Cab and operator’s platform
4.1.1 Control terminal
4.1.2 MONTANA control panel
5 Technical specifications
5.1 TUCANO 580 / 570 / 560 / 450 / 430 MONTANA
5.1.1 Machine dimensions
5.1.2 Machine weights
Weight of machine
Weight of option
5.1.3 Dimensions of grain tank unloading tube in working position
5.1.4 Turning circle diameter
Measurement conditions
5.1.5 Sound pressure level and vibrations
5.1.6 Diesel engine of machine
5.1.7 Mercedes-Benz OM 936 LA.E5 diesel engine
5.1.8 Hydrostatic ground drive
5.1.9 Hillside chassis
5.1.10 Overview of drive axle track widths
5.1.11 Overview of rear axle track widths
5.1.12 Track width table 01
5.1.13 Track width table 02
5.1.14 Track width table 03
5.1.15 Track width table 04
5.1.16 Track width table 05
5.1.17 Track width table 06
5.1.18 Track width table 07
5.1.19 Brake
5.1.20 Mercedes-Benz OM 936 LA.E5 diesel engine battery
5.1.21 Machine threshing drum width
5.1.22 Machine threshing system
5.1.23 Threshing mechanism with APS threshing system
5.1.24 Machine separation system
5.1.25 Rotor separation system
5.1.26 Straw walker separation system
5.1.27 Cleaning unit
5.1.28 Crop discharge and straw discharge
5.1.29 Grain tank capacity
5.1.30 Grain tank unloading capacity
5.1.31 Central lubrication system*
5.2 Operating utilities
5.2.1 Lubricants
5.2.2 Hydraulic oils
6 Machine preparation
6.1 Switching off and securing the machine
6.1.1 Switching off and securing the machine
6.2 Preparing the machine for driving
6.2.1 Preparing road travel
6.2.2 Preparing fieldwork
6.3 Feeder unit
6.3.1 Checking the anti-slip strips of the feeder housing
6.4 Chassis
6.4.1 Jacking up the machine
6.4.2 Removing and installing the wheels
Removing the wheels
Installing the wheels
Teaching in pulses per 100 m
6.4.3 Procedure for adjusting the rear axle track width
6.4.4 Converting the rear axle from transport position to working position
6.4.5 Jacking up the machine for rear axle pendulum movements
6.4.6 Adjusting the rear axle track width
6.4.7 Adjusting the rear axle track width
6.4.8 Selecting the drilled holes on the adjustable element
6.5 Assembly parts and machine body
6.5.1 Fitting an additional weight to the machine
6.5.2 Fitting the additional weights for folding front attachments
7 Operation
7.1 Driving the machine
7.1.1 Driving the machine
Driving the machine forward
Braking the machine
Stopping the machine
Driving the machine backward
7.2 Front attachment
7.2.1 Adjusting the cutting angle
7.3 Chassis
7.3.1 Selecting the MONTANA operating mode
7.3.2 Lowering the machine to transport position
7.3.3 Checking the MONTANA functions
Checking the MONTANA functions on level ground
7.3.4 Switching MONTANA automatic mode on and off
Activating the MONTANA automatic mode
Deactivating the MONTANA automatic mode
7.3.5 Switching the MONTANA manual control on and off
7.3.6 Shifting gears
7.3.7 Activating and deactivating the OVERDRIVE* operating mode
7.3.8 Engaging and disengaging the differential lock
7.3.9 Towing the machine out of a hazard area
7.4 Brake
7.4.1 Coupling and uncoupling the brake pedals
8 Faults and remedies
8.1 Chassis
8.1.1 Overview of chassis faults
8.2 Electric and electronic system
8.2.1 Overview of faults in MONTANA automatic mode
9 Maintenance
9.1 Maintenance interval overview
9.1.1 Before the harvest
9.1.2 After the first 100 operating hours
9.1.3 After the first 500 operating hours
9.1.4 Every 10 operating hours or daily
9.1.5 Every 50 operating hours
9.1.6 Every 100 operating hours
9.1.7 Every 250 operating hours
9.1.8 Every 500 operating hours
9.1.9 Every 500 operating hours or annually
9.1.10 Every 1000 operating hours
9.1.11 Annually
9.2 Lubrication plan
9.2.1 Lubricating the grease points on the left every 100 operating hours
9.2.2 Lubricating the grease points on the right every 100 operating hours
9.2.3 Greasing the annual grease points on the left
9.2.4 Greasing the annual grease points on the right
9.3 Chassis
9.3.1 Removing and installing the strengthening plate of the MONTANA drive axle
9.3.2 Greasing the slewing rings of swing arms as per greasing instructions
9.3.3 Checking the oil level of the drive axle variable speed gearbox
9.3.4 Changing the drive axle variable speed gearbox oil
Draining the oil
Topping up oil
9.3.5 Checking the oil level of the drive axle supports
9.3.6 Changing the oil of the drive axle supports
Draining the oil
Topping up oil
9.3.7 Checking the oil level of drive axle wheel pivots
9.3.8 Changing the drive axle wheel pivot oil
Draining the oil
Topping up oil
9.4 Brake
9.4.1 Checking the breather of brake cylinders
9.5 Hydraulic system
9.5.1 Checking the hydraulic oil level
9.5.2 Changing the hydraulic fluid and filters
Draining the oil
Topping up oil
9.6 Feeder unit
9.6.1 Bleeding the front attachment cross-levelling hydraulic cylinders
00 0303 482 0.pdf:
PROFI CAM 4
Table of contents
1 Introduction
1.1 Notes on the manual
1.1.1 Validity of manual
1.1.2 Information about this Operator’s Manual
1.1.3 Symbols and notes
1.1.4 Optional equipment
1.1.5 Qualified specialist workshop
1.1.6 Maintenance information
1.1.7 Notes on warranty
1.1.8 Spare parts and technical questions
1.2 Intended use
1.2.1 Intended use
1.2.2 Reasonably foreseeable misuse
2 Safety
2.1 Identifying warnings
2.1.1 Hazard signs
2.1.2 Signal word
2.2 Safety rules
2.2.1 Meaning of Operator’s Manual
2.2.2 Structural changes
2.2.3 Optional equipment and spare parts
2.2.4 Operation only following proper putting into operation
2.2.5 Technical status
2.2.6 Respecting technical limit values
Respecting technical limit values
2.2.7 Hazards when driving on roads and fields
3 Product description
3.1 Overview and method of operation
3.1.1 How the PROFI CAM works
3.2 Identification plates and identification number
3.2.1 Identification plates
3.3 Information on the product
3.3.1 CE marking
4 Operating and display elements
4.1 Camera system
4.1.1 Camera system monitor
4.1.2 CEBIS
4.2 Menu structure
4.2.1 Main menu
4.2.2
4.2.3
4.2.4
4.2.5
4.2.6
5 Technical specifications
5.1 PROFI CAM
5.1.1 Monitor
5.1.2 Camera
5.1.3 Switch box
6 Preparing the product
6.1 Switching off and securing the machine
6.1.1 Switching off and securing the machine
6.2 Prior to putting into operation
6.2.1 Carry out prior to operation
6.2.2 Installing the sun protection
6.2.3 Aligning the camera
7 Operation
7.1 Monitor
7.1.1 Switching on the monitor
7.1.2 Calling up the menu
7.1.3 Setting a menu item
7.1.4 Setting the image orientation
7.1.5 Setting automatic screen darkening
7.1.6 Image mirroring
7.1.7 Setting the trigger view
7.1.8 Setting the follow-up time for trigger view
7.1.9 Setting the display mode
7.1.10 Activating/deactivating a display mode
8 Faults and remedies
8.1 Electric and electronic system
8.1.1 Overview of problems on PROFI CAM camera system
9 Maintenance
9.1 Maintenance intervals
9.1.1 Every 10 operating hours or daily
9.2 Camera system
9.2.1 Checking the camera system for dirt
9.2.2 Cleaning the camera
9.2.3 Cleaning the switch box
9.2.4 Cleaning the monitor
10 Putting out of operation and disposal
10.1 General information
10.1.1 Putting out of operation and disposal
11 Technical terms and abbreviations
11.1 Abbreviations
11.1.1 Units
11.1.2 Abbreviations
11.1.3 Technical terms
00 1405 164 7.pdf:
GPS PILOT
Table of contents
1 Introduction
1.1 General information
1.1.1 Validity of Manual
1.1.2 Information about this Operator’s Manual
1.1.3 Symbols and notes
1.1.4 Optional equipment
1.1.5 Qualified specialist workshop
1.1.6 Maintenance notes
1.1.7 Notes on warranty
1.1.8 Spare parts and technical questions
1.1.9 Licensing for road traffic
Sample report
Clearance certificate
General operating permit
1.2 Intended use
1.2.1 Intended use
1.2.2 Reasonably foreseeable misuse
2 Safety
2.1 Identifying warnings
2.1.1 Hazard signs
2.1.2 Signal word
2.2 Safety rules
2.2.1 Meaning of Operator’s Manual
2.2.2 Update of terminal software
2.2.3 Requirements made on all persons working with the product
2.2.4 Hazard areas
Hazard areas
2.2.5 Interaction between the control terminal and the machine or tractor
2.2.6 Structural changes
2.2.7 Optional equipment and spare parts
2.2.8 Use of USB devices
2.2.9 Operation only following proper putting into operation
2.2.10 Technical status
2.2.11 Hazard from damage on the product
2.2.12 Respecting technical limit values
Respecting technical limit values
2.2.13 Preparing the product for road travel
2.2.14 Hazards when driving on the road with an ISOBUS implement
Switching on the terminal during road travel.
2.2.15 Hazards when driving on the road and on the field
2.2.16 Electrocution by electrical system
2.2.17 Potentially fatal electric shock from overhead lines
2.2.18 Liquids under pressure
2.2.19 Maintenance operations and repair work
2.2.20 Driving with the GPS PILOT
Road travel
Fieldwork
2.2.21 Working with Task Control* and Section Control*
3 Product description
3.1 Overview and method of operation
3.1.1 Overview of GPS PILOT – Hydraulic system
3.1.2 Overview of GPS PILOT – Steer ready
3.1.3 Overview of GPS PILOT FLEX
3.1.4 Overview of GPS PILOT ex works
3.1.5 Overview of the S10 terminal
3.1.6 Overview of navigation computer (ECU)
3.1.7 Electric steering wheel
3.1.8 Overview of correction signals
EGNOS/WAAS/MSAS
Omnistar HP / XP / G2
RTK FIELD BASE and BASELINE HD
RTK FARM BASE
3.1.9 Module overview
BASELINE HD
RTK FIELD BASE
RTK (Motorola)
RTK FARM BASE
3.2 Safety devices
3.2.1 Automatic cut-out when the maximum speed is exceeded
3.2.2 Automatic cut-out when the speed falls below the minimum
3.2.3 Seat contact switch
3.2.4 Manual override
Electric steering wheel
3.3 Optional equipment
3.3.1 GPS L2*
3.3.2 GLONASS*
3.3.3 TURN IN*
3.3.4 AUTO TURN*
3.3.5 Task Control*
Task Control Basic*
Task Control Geo*
3.3.6 Section Control*
3.4 Identification plates and identification numbers
3.4.1 GPS PILOT identification plate
3.4.2 Identification plate of terminal
3.4.3 Identification plate of navigation controller
4 Operating and display elements
4.1 GPS PILOT
4.1.1 Master switch and drive switch
4.2 Overview of the S10 terminal
4.2.1 Layout conventions of buttons and displays
4.3 GPS PILOT menu structure
4.3.1 Start menu
Start menu without Task Control*
Start menu with Task Control*
4.3.2 Menu overview
4.3.3 Overview of display field
4.3.4
4.3.5
4.3.6


John Deere Repair Technical Manual PDF


John Deere Repair Technical Manual PDF
John Deere 18-Speed PST Repair Manual Component Technical Manual CTM168 10DEC07
John Deere Parts Catalog PDF
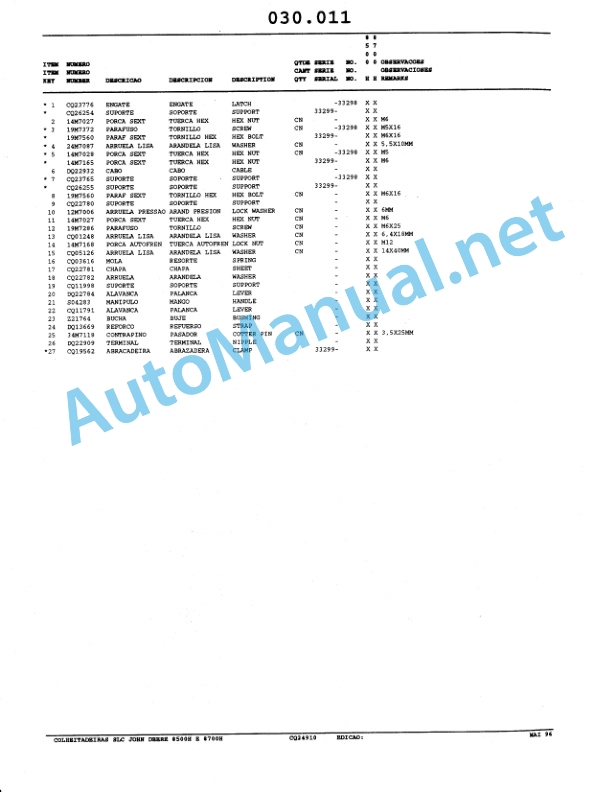
John Deere Harvesters 8500 and 8700 Parts Catalog CPCQ24910 Spanish


John Deere Parts Catalog PDF
John Deere Tractors 6300, 6500, and 6600 Parts Catalog CQ26564 (29SET05) Portuguese


John Deere Repair Technical Manual PDF


John Deere Repair Technical Manual PDF


John Deere Repair Technical Manual PDF
John Deere 16, 18, 20 and 24HP Onan Engines Component Technical Manual CTM2 (19APR90)


%20Combines%20Operator%20Manual%20EN&url=https://automanual.net/doc/claas-tucano-430-420-l34-combines-operator-manual-en/&media=https://automanual.net/wp-content/uploads/2024/04/claas-tucano-430-420-l34-combines-operator-manual-en-1.jpg)
%20Portuguese&url=https://automanual.net/doc/john-deere-tractors-6300-6500-and-6600-parts-catalog-cq26564-29set05/&media=https://automanual.net/wp-content/uploads/2023/08/john-deere-tractors-6300-6500-and-6600-parts-catalog-cq26564-29set05-portuguese-1.jpg)
&url=https://automanual.net/doc/john-deere-16-18-20-and-24hp-onan-engines-component-technical-manual-ctm2-19apr90/&media=https://automanual.net/wp-content/uploads/2023/08/john-deere-16-18-20-and-24hp-onan-engines-component-technical-manual-ctm2-19apr90-1.jpg)


John Deere Repair Technical Manual PDF
John Deere PowerTech M 10.5 L and 12.5 L Diesel Engines COMPONENT TECHNICAL MANUAL CTM100 10MAY11
%20Interim%20Tier%204%20Stage%20III%20B%20Component%20Technical%20Manual%20CTM104754%2025%20July%202012%20Portuguese&url=https://automanual.net/doc/john-deere-powertech-m-6068-oem-diesel-engines-above-130-kw-174-hp-compo-technical-manual-ctm104754-25jul12-portuguese/&media=https://automanual.net/wp-content/uploads/2023/08/john-deere-powertech-6068-engines-above-130-kw-174-hp-interim-tier-4-stage-iii-b-component-technical-manual-ctm104754-25-july-2012-portuguese-1.jpg)

John Deere Repair Technical Manual PDF