- Claas
- Grove
- New Holland
- Komatsu
- Kubota
- John Deere
- Linde
- Bomag
- CASE
- Clark
- JCB
- Jungheinrich
- Linde
- Yale
- Yanmar
- Manitou
- Manitowoc
- CNH
- Doosan
- Fiatagri
- Fiatallis
- Fiatallis Other Manual PDF
- Flexi Coil
- Ford New Holland
- Ford New Holland Other Manual PDF
- Huyndai
- Hypac
- Hyster
- Hyster Service Manual PDF
- Isuzu
- Kobelco
- Kohler
- Krupp
- Lombardini
- Mahindra
- Nuvera
- Perkins
- Sperry New Holland
- Utilev
- Versatile
- ZF
 Forage Harvesters Operator Manual EN 1")
 Forage Harvesters Operator Manual EN 2")
 Forage Harvesters Operator Manual EN 3")
 Forage Harvesters Operator Manual EN 4")
 Forage Harvesters Operator Manual EN 5")
 Forage Harvesters Operator Manual EN 6")
 Forage Harvesters Operator Manual EN 7")
Claas Orbis 450 (I49) Forage Harvesters Operator Manual EN
$50.00
- Model: Orbis 450 (I49) Forage Harvesters
- Type Of Manual: Operator Manual
- Language: EN
- Format: PDF(s)
- Size: 129 MB
File List:
00 0290 693 6.pdf
00 0301 051 0.pdf
00 0303 482 0.pdf
00 2601 384 2.pdf
00 2702 465 0.pdf
00 2716 134 0.pdf
00 0290 693 6.pdf:
ORBIS 450
Table of contents
1 Introduction
1.1 General information
1.1.1 Validity of the manual
1.1.2 Information about this Operator’s Manual
1.1.3 Symbols and notes
1.1.4 Optional equipment
1.1.5 Qualified specialist workshop
1.1.6 Maintenance notes
1.1.7 Warranty notes
1.1.8 Spare parts and technical questions
1.2 Intended use
1.2.1 Intended use
1.2.2 Reasonably foreseeable misuse
2 Safety
2.1 Identifying warnings
2.1.1 Hazard signs
2.1.2 Signal word
2.2 Safety rules
2.2.1 Importance of Operator’s Manual
2.2.2 Observe the safety decals and warnings
2.2.3 Requirements for all persons working with the machine
2.2.4 Children in danger
2.2.5 Hazard areas
2.2.6 Standing between machine and front attachment
2.2.7 Coupling the machine to the front attachment
2.2.8 Danger of injury from rotating shafts
2.2.9 Structural changes
2.2.10 Optional equipment and spare parts
2.2.11 Control of the machine while it is running
2.2.12 Only use once properly put into operation
2.2.13 Technical condition
2.2.14 Danger from damage to the machine
2.2.15 Complying with technical limit values
2.2.16 Danger from machine parts running on
2.2.17 Keeping the safety devices functional
2.2.18 Personal protective equipment
2.2.19 Wearing suitable clothing
2.2.20 Removing dirt and loose objects
2.2.21 Preparing the machine for road travel
2.2.22 Hazards when driving on the road and on the field
2.2.23 Parking the machine safely
2.2.24 Unsuitable operating utilities
2.2.25 Safe handling of operating materials and auxiliary materials
2.2.26 Environmental protection and disposal
2.2.27 Fire prevention
2.2.28 Electrocution by electrical system
2.2.29 Pressurised fluids
2.2.30 Hot surfaces
2.2.31 Only carry out work on the machine when it is stopped
2.2.32 Maintenance operations and repair work
2.2.33 Raised machine parts and loads
2.2.34 Hazard from welding work
2.3 Safety marking
2.3.1 Layout of safety decals
2.3.2 Safety decals on the machine
3 Machine description
3.1 Overview and method of operation
3.1.1 Machine overview
3.1.2 Overview of gearboxes
3.1.3 Overview of clutches
3.1.4 Function of ORBIS header
3.2 Optional equipment
3.2.1 Reverser input gearbox*
3.2.2 Manual input gearbox*
3.2.3 AUTO PILOT*
3.2.4 Additional weights*
3.2.5 Tip extensions*
3.2.6 Legal equipment for France*
3.2.7 Wear plates for the skids*
3.2.8 Skid cover*
3.2.9 Support brackets*
3.3 Identification plates and vehicle identification number
3.3.1 Machine identification plate
3.4 Information on the machine
3.4.1 Stickers on the machine
4 Operating and display elements
4.1 Controls
4.1.1 Gearbox
4.1.2 Pendulum frame
4.1.3 Down maize auger
4.1.4 Attachment parts and machine body
5 Technical specifications
5.1 ORBIS 450
5.1.1 Approved machines
5.1.2 Dimensions
5.1.3 Weights
5.1.4 Response torques of safety clutches
5.1.5 Operating utilities and filling quantities
6 Machine preparation
6.1 Switching off and securing the machine
6.1.1 Switching off and securing the machine
6.1.2 Securing the raised front attachment
6.2 Assembling the front attachment
6.2.1 Overview of shipping package
6.2.2 Fitting the locking bar
6.2.3 Fitting the push bar
6.2.4 Removing the transport frame
6.2.5 Fitting the outer divider points
6.2.6 Screwing on and adjusting the guide fingers
6.2.7 Removing the protective strip
6.3 Accessing workplaces and maintenance spaces
6.3.1 Removing the guards
6.4 Adapting the forage harvester
6.4.1 Additional weights for forage harvester*
6.4.2 Additional drive lights*
6.4.3 Checking the restrictor in the coupling hydraulic cylinder
6.4.4 Adjusting the drop rate
6.4.5 Adjusting the drop rate
6.5 Adjusting the front attachment
6.5.1 Adapting the speed of the reverser input gearbox*
Turning the reverser input gearbox
6.5.2 Fitting the coupling flange
6.5.3 Adjusting the dog clutch
6.5.4 Folding the input gearbox downwards
6.5.5 Preparing for whole crop harvesting
6.5.6 Adjusting the locking device
6.5.7 Adjusting the locking linkage
6.6 Mounting the front attachment
6.6.1 Removing the CAM PILOT*
Fitting the CAM PILOT
6.6.2 Opening the locking device
6.6.3 Fitting the front attachment
6.6.4 Closing the locking device
6.6.5 Connecting the hydraulic hose lines and the power supply
Connecting the hydraulic hose lines
Connecting the power supply
6.6.6 Raising the stands
6.6.7 Removing the support brackets*
6.7 Removing the front attachment
6.7.1 Setting the front attachment down on stands
6.7.2 Setting the front attachment with support brackets* down
Preparatory work
Fitting the support brackets
6.7.3 Disconnecting the hydraulic hose lines and the power supply
Disconnecting the hydraulic hose lines
Disconnecting the power supply
6.7.4 Opening the locking device
6.7.5 Unhitching the front attachment
6.8 Prepare road travel
6.8.1 Fold front attachment into transport position,
6.8.2 Swinging up the AUTO PILOT*
6.8.3 Fitting safety bars and safety guards
6.9 Preparing fieldwork
6.9.1 Removing safety bars and safety guards
6.9.2 Folding down the AUTO PILOT*
6.9.3 Folding the front attachment into the working position
6.10 Loading the front attachment
6.10.1 Raising the front attachment
7 Operation
7.1 Driving on the road
7.1.1 Driving on public roads
7.2 Fieldwork settings
7.2.1 Adjusting the row angle of the outer point
7.2.2 Adjusting the variable front attachment drive
Setting conditions on the ORBIS
Setting the operating mode
Speed adjustment (key pad)
Speed adjustment (Silhouette)
Speed adjustment (Menu)
7.2.3 Adjusting the length of cut
7.2.4 Adjusting the length of cut
7.2.5 Adjusting the length of cut
7.2.6 Adapting the speed of the manual input gearbox*
7.2.7 Adjusting the speed of the 2-speed main gearbox*
7.2.8 Adjusting the speed of the 3-speed main gearbox*
7.2.9 Adjusting the cutting height
7.2.10 Switching AUTO PILOT* on and off
Switching AUTO PILOT on
Switching AUTO PILOT off
7.2.11 Adjusting before down maize harvesting
Engaging the down maize auger
Disengaging the down maize auger
7.2.12 Adjusting before whole crop harvesting
7.3 Fieldwork
7.3.1 Folding to transport position
7.3.2 Folding to working position
7.3.3 Using the front attachment
7.3.4 Switching on the front attachment
7.3.5 Raising and lowering the front attachment
7.3.6 Reversing the front attachment
7.3.7 Disengaging the front attachment
7.3.8 Observe the following during field work
7.3.9 Recommendations for whole crop harvesting
8 Faults and remedies
8.1 Overview of problems
8.1.1 Overview of problems on the machine
8.2 Crop feeding
8.2.1 Overview of problems in the crop pick-up
8.3 Cutting discs
8.3.1 Overview of problems on the cutting discs
8.3.2 Bolting the cleaners and knife sections down to the cutting discs
9 Maintenance
9.1 Maintenance interval overview
9.1.1 Before the harvest
9.1.2 Every 8 operating hours or daily
9.1.3 Every 50 operating hours
9.1.4 Every 100 operating hours
9.1.5 Every 250 operating hours
9.1.6 Every 500 operating hours or annually
9.1.7 Every 1000 operating hours or every 2 years
9.1.8 After the harvest
9.2 Gearbox
9.2.1 Checking the gearbox for leaks
9.2.2 Main gearbox (A)
9.2.3 Drum intake gearbox (B)
9.2.4 Angle drive (C)
9.2.5 Angle drive (D)
9.2.6 Input gearbox (E)
9.2.7 Reverser input gearbox* (E)
JAGUAR Type 494 / 493 – Standard installation position I
JAGUAR Type 494 / 493 – Installation position II
JAGUAR Type 492 – Standard installation position I
JAGUAR Type 492 – Installation position II
9.2.8 Manual input gearbox* (E)
JAGUAR Type 494 / 493
Oil level check, top up the oil and drain the oil
9.2.9 Rotor gears (F) and (G)
9.2.10 Rotor gears (I) and (J)
9.2.11 Gearbox for down maize auger (H)
9.3 Clutch
9.3.1 Check the overload clutches
Over-run clutch (A)
Over-run clutch (B)
Cut-out clutch (C)
Locking element coupling (D)
9.4 Universal drive shaft
9.4.1 Servicing the universal drive shafts
9.5 Hydraulic system
9.5.1 Checking the hydraulic hoses
9.6 Divider tips
9.6.1 Checking the centre divider tip
9.6.2 Checking the side arm divider tip
9.6.3 Check the guide fingers
9.7 Cutting discs
9.7.1 Checking the scrapers
Clearance between the spacer and the scraper housing
Clearance between the scraper and the intake drum
Clearance between the cleaner and the scraper housing
9.7.2 Check the knives
9.7.3 Replacing the knives
9.7.4 Checking the cleaners
9.8 Frame
9.8.1 Retightening the frame bolts
9.8.2 Check the spring-loaded cylinder length on the pendulum frame
9.9 Crop guard
9.9.1 Checking the outer push bars
9.9.2 Checking the centre transverse pipe
9.9.3 Checking the maize ear guide tube
9.9.4 Twisting the hoses
9.10 Assembly parts and machine body
9.10.1 Check the fittings
9.10.2 Check skids
9.10.3 Removing crop residues
9.10.4 Clean the machine
9.10.5 Preserve the machine
9.11 Lubrication plan
9.11.1 Lubricate grease points every 50 hours
9.11.2 Lubricate grease points every 100 hours
9.11.3 Lubricate grease points every 250 hours
10 Putting out of operation and disposal
10.1 General information
10.1.1 Decommissioning and disposal
11 EC declaration of conformity
11.1 ORBIS 450
11.1.1 EC Declaration of Conformity
12 Technical terms and abbreviations
12.1 Terms and explanations
12.1.1 Abbreviations
12.1.2 Technical terms
00 0301 051 0.pdf:
PROFI CAM 3
Table of contents
1 Introduction
1.1 Notes on the manual
1.1.1 Validity of manual
1.1.2 Information about this Operator’s Manual
1.1.3 Symbols and notes
1.1.4 Optional equipment
1.1.5 Qualified specialist workshop
1.1.6 Maintenance information
1.1.7 Warranty notes
1.1.8 Spare parts and technical questions
1.2 Intended use
1.2.1 Intended use
1.2.2 Reasonably foreseeable misuse
2 Safety
2.1 Identifying warnings
2.1.1 Hazard signs
2.1.2 Signal word
2.2 Safety rules
2.2.1 Meaning of Operator’s Manual
2.2.2 Observing safety decals and warnings
2.2.3 Optional equipment and spare parts
3 Product description
3.1 Overview and method of operation
3.1.1 How the PROFI CAM works
3.2 Identification plates and identification number
3.2.1 Position of identification plates
3.2.2 Explanation of PROFI CAM identification plate
3.3 Information on the product
3.3.1 CE marking
4 Operating and control elements
4.1 Camera system
4.1.1 Camera system monitor
4.2 Menu structure
4.2.1 Main menu
4.2.2
4.2.3
4.2.4
4.2.5
4.2.6
5 Technical specifications
5.1 PROFI CAM
5.1.1 Monitor
5.1.2 Camera
5.1.3 Switch box
5.1.4 Degree of protection against foreign bodies and water
6 Preparing the product
6.1 Shutting down and securing the machine
6.1.1 Switching off and securing the machine
6.2 Prior to operation
6.2.1 Carry out prior to operation
6.2.2 Installing the sun protection
6.2.3 Aligning the camera
6.2.4 Connecting the camera electrics
7 Operation
7.1 Monitor
7.1.1 Switching on the monitor
7.1.2 Calling up the menu
7.1.3 Setting a menu item
7.1.4 Setting the image orientation
7.1.5 Setting automatic screen darkening
7.1.6 Image mirroring
7.1.7 Setting the trigger view
7.1.8 Setting the follow-up time for trigger view
7.1.9 Setting the display mode
7.1.10 Activating/deactivating a display mode
8 Faults and remedies
8.1 Electrical and electronic system
8.1.1 Overview of problems on PROFI CAM camera system
8.1.2 Replacing the switch box fuse
9 Maintenance
9.1 Maintenance intervals
9.1.1 Every 10 operating hours or daily
9.2 Camera system
9.2.1 Checking the camera system for dirt
9.2.2 Cleaning the camera
9.2.3 Cleaning the switch box
9.2.4 Cleaning the monitor
10 Placing out of operation and disposal
10.1 General Information
10.1.1 Putting out of operation and disposal
11 Technical terms and abbreviations
11.1 Abbreviations
11.1.1 Units
11.1.2 Abbreviations
11.1.3 Technical terms
00 0303 482 0.pdf:
PROFI CAM 4
Table of contents
1 Introduction
1.1 Notes on the manual
1.1.1 Validity of manual
1.1.2 Information about this Operator’s Manual
1.1.3 Symbols and notes
1.1.4 Optional equipment
1.1.5 Qualified specialist workshop
1.1.6 Maintenance information
1.1.7 Notes on warranty
1.1.8 Spare parts and technical questions
1.2 Intended use
1.2.1 Intended use
1.2.2 Reasonably foreseeable misuse
2 Safety
2.1 Identifying warnings
2.1.1 Hazard signs
2.1.2 Signal word
2.2 Safety rules
2.2.1 Meaning of Operator’s Manual
2.2.2 Structural changes
2.2.3 Optional equipment and spare parts
2.2.4 Operation only following proper putting into operation
2.2.5 Technical status
2.2.6 Respecting technical limit values
Respecting technical limit values
2.2.7 Hazards when driving on roads and fields
3 Product description
3.1 Overview and method of operation
3.1.1 How the PROFI CAM works
3.2 Identification plates and identification number
3.2.1 Identification plates
3.3 Information on the product
3.3.1 CE marking
4 Operating and display elements
4.1 Camera system
4.1.1 Camera system monitor
4.1.2 CEBIS
4.2 Menu structure
4.2.1 Main menu
4.2.2
4.2.3
4.2.4
4.2.5
4.2.6
5 Technical specifications
5.1 PROFI CAM
5.1.1 Monitor
5.1.2 Camera
5.1.3 Switch box
6 Preparing the product
6.1 Switching off and securing the machine
6.1.1 Switching off and securing the machine
6.2 Prior to putting into operation
6.2.1 Carry out prior to operation
6.2.2 Installing the sun protection
6.2.3 Aligning the camera
7 Operation
7.1 Monitor
7.1.1 Switching on the monitor
7.1.2 Calling up the menu
7.1.3 Setting a menu item
7.1.4 Setting the image orientation
7.1.5 Setting automatic screen darkening
7.1.6 Image mirroring
7.1.7 Setting the trigger view
7.1.8 Setting the follow-up time for trigger view
7.1.9 Setting the display mode
7.1.10 Activating/deactivating a display mode
8 Faults and remedies
8.1 Electric and electronic system
8.1.1 Overview of problems on PROFI CAM camera system
9 Maintenance
9.1 Maintenance intervals
9.1.1 Every 10 operating hours or daily
9.2 Camera system
9.2.1 Checking the camera system for dirt
9.2.2 Cleaning the camera
9.2.3 Cleaning the switch box
9.2.4 Cleaning the monitor
10 Putting out of operation and disposal
10.1 General information
10.1.1 Putting out of operation and disposal
11 Technical terms and abbreviations
11.1 Abbreviations
11.1.1 Units
11.1.2 Abbreviations
11.1.3 Technical terms
00 2702 465 0.pdf:
ORBIS 900 – 450
Table of contents
Introduction
Notes on the manual
Validity of the manual
Symbols and notes
Safety rules
Fitting and conversion work
Package list
00 2702 288 0 retrofit kit
Assembling
Prepare removal
Removal of the stripper boxes
Removal of the feeder drums
Installation
Installation of the cleaners
Installation of the feeder drums
Installation of the stripper boxes
Installation of the guide bars
Complete front attachment
00 2716 134 0.pdf:
ORBIS 900 – 450
Table of contents
Introduction
Notes on the manual
Validity of the manual
Symbols and notes
Safety rules
Fitting and conversion work
Package list
00 2601 271 7 retrofit kit
Assembling
Preparing for installation
Set the main gearbox to idling
Set the main gearbox to idling
Positioning of scraper boxes
Installation
Installation of the cleaners
Complete front attachment


John Deere Repair Technical Manual PDF
John Deere Parts Catalog PDF
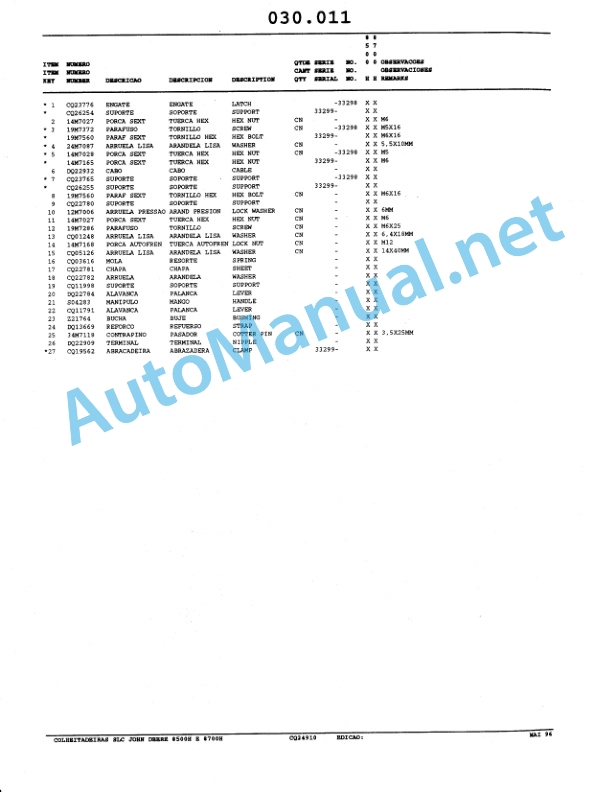
John Deere Harvesters 8500 and 8700 Parts Catalog CPCQ24910 Spanish


John Deere Repair Technical Manual PDF

New Holland Service Manual PDF


John Deere Repair Technical Manual PDF
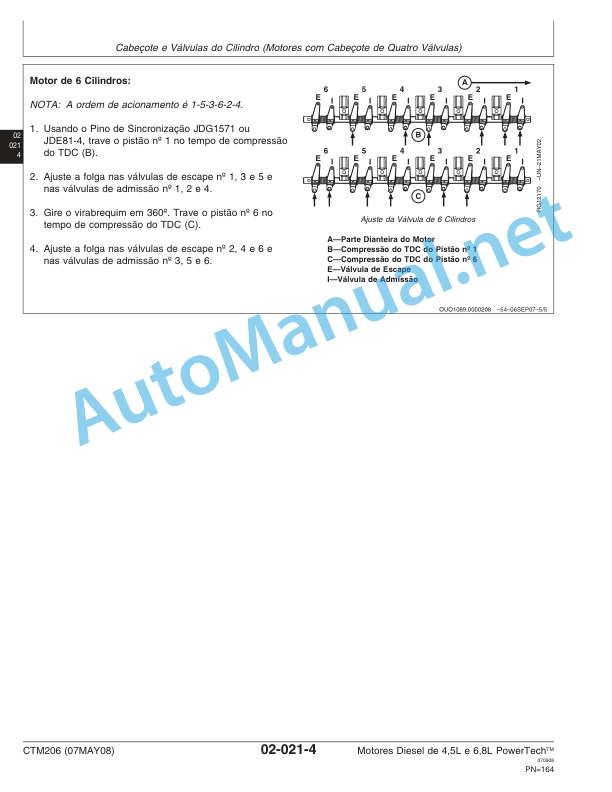
John Deere Diesel Engines PowerTech 4.5L and 6.8L – Motor Base Technical Manual 07MAY08 Portuguese


John Deere Repair Technical Manual PDF


%20Forage%20Harvesters%20Operator%20Manual%20EN&url=https://automanual.net/doc/claas-orbis-450-i49-forage-harvesters-operator-manual-en/&media=https://automanual.net/wp-content/uploads/2024/04/claas-orbis-450-i49-forage-harvesters-operator-manual-en-1.jpg)


John Deere Repair Technical Manual PDF


John Deere Repair Technical Manual PDF
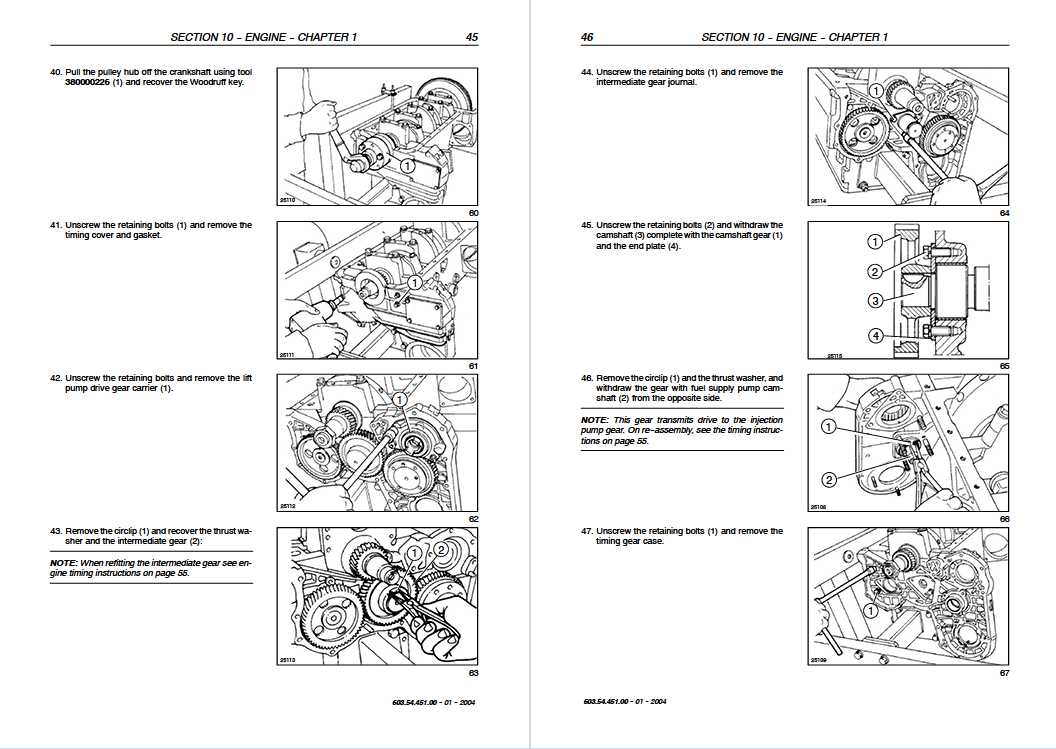
John Deere POWERTECH E 4.5 and 6.8 L Diesel Engines TECHNICAL MANUAL 25JAN08
- Claas
- Grove
- New Holland
- Komatsu
- Kubota
- John Deere
- Linde
- Bomag
- CASE
- Clark
- JCB
- Jungheinrich
- Linde
- Yale
- Yanmar
- Manitou
- Manitowoc
- CNH
- Doosan
- Fiatagri
- Fiatallis
- Fiatallis Other Manual PDF
- Flexi Coil
- Ford New Holland
- Ford New Holland Other Manual PDF
- Huyndai
- Hypac
- Hyster
- Hyster Service Manual PDF
- Isuzu
- Kobelco
- Kohler
- Krupp
- Lombardini
- Mahindra
- Nuvera
- Perkins
- Sperry New Holland
- Utilev
- Versatile
- ZF