- Claas
- Grove
- New Holland
- Komatsu
- Kubota
- John Deere
- Linde
- Bomag
- CASE
- Clark
- JCB
- Jungheinrich
- Linde
- Yale
- Yanmar
- Manitou
- Manitowoc
- CNH
- Doosan
- Fiatagri
- Fiatallis
- Fiatallis Other Manual PDF
- Flexi Coil
- Ford New Holland
- Ford New Holland Other Manual PDF
- Huyndai
- Hypac
- Hyster
- Hyster Service Manual PDF
- Isuzu
- Kobelco
- Kohler
- Krupp
- Lombardini
- Mahindra
- Nuvera
- Perkins
- Sperry New Holland
- Utilev
- Versatile
- ZF
 Forage Harvesters Repair Manual EN 1")
 Forage Harvesters Repair Manual EN 2")
 Forage Harvesters Repair Manual EN 3")
 Forage Harvesters Repair Manual EN 4")
 Forage Harvesters Repair Manual EN 5")
 Forage Harvesters Repair Manual EN 6")
%20Forage%20Harvesters%20Repair%20Manual%20EN&url=https://automanual.net/doc/claas-jaguar-900-830-493-forage-harvesters-repair-manual-en/&media=https://automanual.net/wp-content/uploads/2024/04/claas-jaguar-900-830-493-forage-harvesters-repair-manual-en-1.jpg)
Claas Jaguar 900-830 (493) Forage Harvesters Repair Manual EN
$200.00
- Model: Jaguar 900-830 (493) Forage Harvesters
- Type Of Manual: Repair Manual
- Language: EN
- Format: PDF(s)
- Size: 54.4 MB
File List:
00 0294 662 1.pdf
00 0298 077 0.pdf
00 0303 966 1.pdf
00 0305 072 0.pdf
Inspection protocol OM 502 LA OM 460 LA.pdf
00 0294 662 1.pdf:
Contents
1 General Information
1.1 General
1.1.1 Introduction
1.2 Safety rules
1.2.1 Important notice
1.2.2 Identification of warning and danger signs
1.2.3 General safety and accident prevention regulations
1.2.4 Leaving the machine
1.2.5 Front attachments and trailers
1.2.6 Forage harvester chopping unit
1.2.7 Air conditioner
1.2.8 Adjustment and maintenance work
1.2.9 Pressure accumulator
1.2.10 Antifreeze
1.2.11 First aid measures
1.2.12 Wheel chocks
1.2.13 Fire extinguisher
1.2.14 Battery isolating switch
1.2.15 Danger of injury due to escaping hydraulic liquid
1.3 General repair instructions
1.3.1 Reason of damage
1.3.2 Spare parts
1.3.3 Diesel engine
1.3.4 Gearboxes
1.3.5 Alternator
1.3.6 Taper ring fasteners
1.3.7 Self-locking bolts with micro-encapsulated adhesive
1.3.8 Liquid locking compound
1.3.9 Lock collar bearings
1.3.10 Adapter sleeve bearing
1.3.11 Ferrule fittings on hydraulic lines
1.3.12 Progressive ring fittings on hydraulic lines
1.3.13 Taper fittings on hydraulic lines
1.3.14 Hydraulic hoses
1.3.15 Welding Work
1.3.16 Some advice for speedy and correct repair work:
1.4 Torque settings
1.4.1 Tightening torques for metric standard threads
1.4.2 Tightening torques for metric fine threads
1.4.3 Tightening torques for hydraulic screw fittings with ferrule according to DIN 3861
1.4.4 Tightening torques for hydraulic screw fittings and air conditioner fittings with a sealing cone and O-ring DIN 3865
1.4.5 Tightening torques for hydraulic male connector DIN 3901
1.4.6 Tightening torques for direction-adjustable hydraulic male connectors ISO 6149-2 / ISO 11926-2 (3)
1.4.7 Tightening torque for hydraulic swivelling screw fittings
1.4.8 Tightening torques for hollow screws DIN 7643
1.4.9 Tightening torques of brake line screw fittings
1.4.10 Tightening torques for screw thread clamps
1.4.11 Tightening torque for tyres
1.5 Specifications
1.5.1 Lubricants
2 Drives
2.1 Drive belt
2.1.1 Drive diagram, left side
2.1.2 Drive diagram, right side
2.1.3 Removing belt (R1)
2.1.4 Installing belt (R1)
2.1.5 Adjusting belt (R1)
2.1.6 Removing belt (R2)
2.1.7 Installing belt (R2)
2.1.8 Adjusting belt (R2)
2.1.9 Removing belt (R10)
2.1.10 Installing belt (R10)
2.1.11 Adjusting belt (R10)
2.1.12 Removing belt (R11)
2.1.13 Installing belt (R11)
2.1.14 Adjusting belt (R11)
2.1.15 Removing belt (R12)
2.1.16 Installing belt (R12)
2.1.17 Adjusting belt (R12)
2.2 Special tool drive belt
2.2.1 Removing belt (R1)
2.3 Feeder drive
2.3.1 Removing the quick-release coupler
2.3.2 Quick-release coupler, exploded view
2.3.3 Installing the quick-release coupler
2.3.4 Removing the feeder
2.3.5 Fitting the feeder
2.3.6 Removing the angle drive
2.3.7 Overview of angle drive
2.3.8 Installing the angle drive
2.3.9 Removing the feeder drive manual gearbox
2.3.10 Installing the feeder drive gearbox
2.3.11 Disassembling the feeder drive manual gearbox
2.3.12 Overview of feeder drive gearbox
2.3.13 Assembling the feeder drive manual gearbox
2.3.14 Removing the top rollers gearbox
2.3.15 Installing the top rollers gearbox
2.3.16 Disassembling the top rollers gearbox
2.3.17 Overview of gearbox for upper rollers
2.3.18 Assembling the top rollers gearbox
2.4 Feeder drive special tool
2.4.1 Removing the angle drive
2.4.2 Removing the angle drive
2.4.3 Installing the angle drive
2.4.4 Disassembling the feeder drive manual gearbox
2.5 Fan drive
2.5.1 Removing the fan drive angle drive
2.5.2 Installing the fan drive angle drive
2.5.3 Disassembling the fan drive angle drive
2.5.4 Overview of fan drive angle drive
2.5.5 Assembling the fan drive angle drive
3 Corn cracker
3.1 Corn cracker
3.1.1 Removing the corn cracker
3.1.2 Installing the corn cracker
3.1.3 Adjusting the corn cracker gap dimension
3.1.4 Venting the corn cracker hydraulic system
3.1.5 Removing the front roller (HD version)
3.1.6 Disassembling the front roller (HD version)
3.1.7 Front pressure roller (HD version) overview
3.1.8 Assembling the front roller (HD version)
3.1.9 Installing the front roller (HD version)
3.1.10 Removing the rear roller (HD version)
3.1.11 Disassembling the rear roller (HD version)
3.1.12 Rear pressure roller (HD version) overview
3.1.13 Assemble rear roller (HD version)
3.1.14 Installing the rear roller (HD version)
3.1.15 Front pressure roller (standard version) overview
3.1.16 Rear pressure roller (standard version) overview
3.2 Corn cracker gap adjustment unit
3.2.1 Removing the corn cracker gap adjustment unit
3.2.2 Disassembling the corn cracker gap adjustment unit
3.2.3 Corn cracker gap adjustment unit, exploded view
3.2.4 Assembling the corn cracker gap adjustment unit
3.2.5 Installing the corn cracker gap adjustment unit
3.3 Corn cracker special tool
3.3.1 Venting the corn cracker hydraulic system
00 0298 077 0.pdf:
JAGUAR 900 – 830
Table of contents
Introduction
General Information
Validity of manual
Handling the manual
Texts and figures
Document structure based on the assembly structure
Search and find
Directions
Abbreviations
Technical terms
General repair instructions
Technical specifications
Information on proper repairs
Self-locking bolts
Liquid locking compound
Steel roller chains
Tensioning
Chain connector
Taper ring fasteners
Dismounting
Installation
Gib head key joints
Dismounting
Installation
Lock collar bearing
Dismounting
Installation
Adapter sleeve bearings
Dismounting
Installation
Chuck bushing
Dismounting
Installation
Circlips
Ferrule fittings
Screwing in
Non-tight ferrule connection
Sealing cone fittings
Hydraulic hoses
Hose placement
Treatment of sealing faces
Spare parts
Torque settings
Tightening torques for metric standard threads
Tightening torques for metric fine thread screws
Tightening torques for hydraulic screw fittings and air conditioner screw fittings with sealing cone and O-ring according to DIN 3865
Tightening torques for hydraulic screw fittings with ferrule according to DIN 3861
Tightening torques for SDS hydraulic male connectors
Tightening torques for hydraulic swivel fittings
Tightening torques for hollow screws DIN 7643
Tightening torques for direction-adjustable SDE hydraulic male connectors
Tightening torques for brake line screw fittings
Tightening torques for worm drive hose clamps
Tightening torque for spring-loaded worm drive hose clamps
Tightening torques for tyres
CCN explanation
CCN (CLAAS Component Number)
Electric systems standard
Hydraulic system standard
CCN (CLAAS Component Number)
General Information
Of special importance
Identification of warning and danger signs
General safety and accident prevention regulations
First aid measures
Danger of injury from hydraulic liquid
Leaving the machine
Putting the machine out of operation
Jacking up the machine
Adjustment and maintenance operations
Welding work
03 Chassis
0330 Driven steering axle, rear
Rear drive axle
Work preparation
Special tool
Technical specifications
Installation
Axle body
Work preparation
Special tool
Technical specifications
Disassembly
Assembly
Stub axle
Work preparation
Special tool
Technical specifications
Installation
Bevel gear drive
Work preparation
Special tool
Technical specifications
Disassembly
Assembly
Checking the backlash
Installation
Differential
Work preparation
Special tool
Technical specifications
Disassembly
Assembly
Installation
If the measured play equals the value specified for play (a), skip this work step!
If the measured rolling moment equals the specified rolling moment value (b), skip this work step!
Plug-in axles
Technical specifications
Installation
Wheel hub
Work preparation
Special tool
Technical specifications
Remove the wheel hub completely.
Installing the wheel hub completely
Disassembly
Assembly
Track rods
Technical specifications
Adjusting the track and the steering angle
05 Steering
0505 Steering
Steering hydraulic cylinder (3023)
Technical specifications
Disassembly
Assembly
Installation
0510 Automatic steering
AUTO PILOT steering angle sensor (B006)
Technical specifications
00 0303 966 1.pdf:
JAGUAR 990-830Chopping
Table of contents
Introduction
General information
Important!
Validity of manual
Shipping package
Repair kit 00 2926 032 0
Shear bar adjustment module A084 generation II (CLAAS JAGUAR 500, 496)
Modification
Sequence of work steps
Putting the machine out of operation
Removing shear bar adjustment module A084 (CLAAS JAGUAR 500, 496)
Mounting
Installing shear bar adjustment module A084 generation II (CLAAS JAGUAR 500, 496)
Shipping package
Repair kit 00 2406 842 1
Shear bar adjustment module A084 generation II (CLAAS JAGUAR 502, 499, 498)
Modification
Sequence of work steps
Putting the machine out of operation
Removing shear bar adjustment module A084 (CLAAS JAGUAR 502, 499, 498)
Mounting
Installing shear bar adjustment module A084 generation II (CLAAS JAGUAR 502, 499, 498)
Software, configuration and shear bar adjustment
Software update
Updating the SBM (shear bar adjustment module) A084 software
Configuration and backup
Checking the configuration and preparing a backup
Shear bar adjustment
Sharpening the knives and adjusting the shear bar clearance
00 0305 072 0.pdf:
JAGUAR 990-830Cooling system
Table of contents
Introduction
General information
Validity of manual
Quick navigation
Shipping package
Repair kit 00 2789 091 0
Rotary screen XL: Replacing the perforated plate
Modification
General safety precautions
Putting the machine out of operation
Important!
Removing the rotary screen
Assembly 00 2789 091 0
Rotary screen XL: Replacing the perforated plate
Installation
Installing the rotary screen
Shipping package
Repair kit 00 2789 092 0
Rotary screen M: Replacing the perforated plate
Modification
General safety precautions
Putting the machine out of operation
Important!
Removing the rotary screen
Assembly 00 2789 092 0
Rotary screen M: Replacing the perforated plate
Installation
Installing the rotary screen
Inspection protocol OM 502 LA OM 460 LA.pdf:
Customer-specific data
Please enter
Engine model series 500 / 460
Technical features
CLAAS Checklist
Forage harvester Model 492, 493 und 494
Performance measurement
Check the engine torque with Minidiag 2
Performance measurement
Check the engine torque with Star Diagnosis
Fuel low pressure measurement
Fuel system diagram OM 460 LA
Fuel system diagram OM 502 LA
Engine OM 502 LA
Engine OM 460 LA
Leak tests
Boost pressure measurement
Test boost pressure
Engine test sheet
OM 460 LA (242 kW) Forage harvester
OM 460 LA (242 kW) Forage harvester
OM 460 LA (260 kW) Forage harvester
OM 460 LA (260 kW) Forage harvester
OM 460 LA (295 kW) Forage harvester
OM 460 LA (295 kW) Forage harvester
OM 460 LA (315 kW) Forage harvester
OM 460 LA (315 kW) Forage harvester
OM 460 LA (335 kW) Forage harvester
OM 460 LA (335 kW) Forage harvester
OM 460 LA (360 kW) Forage harvester
OM 460 LA (360 kW) Forage harvester
Engine test sheet
OM 502 LA (350 kW) Forage harvester
OM 502 LA (350 kW) Forage harvester
OM 502 LA (390 kW) Forage harvester
OM 502 LA (390 kW) Forage harvester
OM 502 LA (420 kW) Combine harvester
OM 502 LA (420 kW) Combine harvester
OM 502 LA (480 kW) Forage harvester
OM 502 LA (480 kW) Forage harvester
Notes on fault codes
Important information on handling faults
ADM2/PLD-MR
ADM2 fault codes
Fault causes and remedies
PLD-MR fault codes
Fault causes and remedies
Overview of parameters


John Deere Repair Technical Manual PDF
John Deere Application List Component Technical Manual CTM106819 24AUG20


John Deere Repair Technical Manual PDF
&url=https://automanual.net/doc/john-deere-16-18-20-and-24hp-onan-engines-component-technical-manual-ctm2-19apr90/&media=https://automanual.net/wp-content/uploads/2023/08/john-deere-16-18-20-and-24hp-onan-engines-component-technical-manual-ctm2-19apr90-1.jpg)


John Deere Repair Technical Manual PDF
John Deere 16, 18, 20 and 24HP Onan Engines Component Technical Manual CTM2 (19APR90)


John Deere Repair Technical Manual PDF


John Deere Repair Technical Manual PDF
John Deere PowerTech M 10.5 L and 12.5 L Diesel Engines COMPONENT TECHNICAL MANUAL CTM100 10MAY11
John Deere Parts Catalog PDF
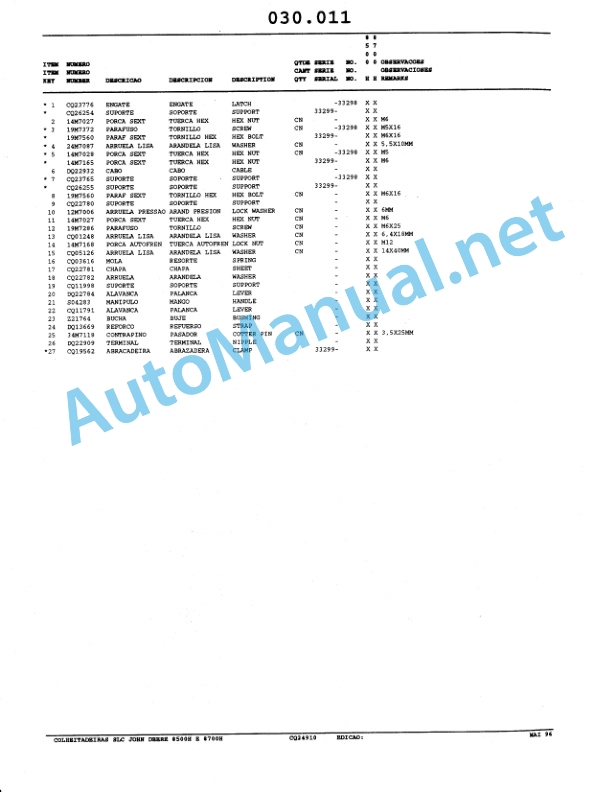
John Deere Harvesters 8500 and 8700 Parts Catalog CPCQ24910 Spanish


John Deere Repair Technical Manual PDF
John Deere 18-Speed PST Repair Manual Component Technical Manual CTM168 10DEC07
%20Interim%20Tier%204%20Stage%20III%20B%20Component%20Technical%20Manual%20CTM104754%2025%20July%202012%20Portuguese&url=https://automanual.net/doc/john-deere-powertech-m-6068-oem-diesel-engines-above-130-kw-174-hp-compo-technical-manual-ctm104754-25jul12-portuguese/&media=https://automanual.net/wp-content/uploads/2023/08/john-deere-powertech-6068-engines-above-130-kw-174-hp-interim-tier-4-stage-iii-b-component-technical-manual-ctm104754-25-july-2012-portuguese-1.jpg)

John Deere Repair Technical Manual PDF


John Deere Repair Technical Manual PDF
John Deere Transmission Control Unit Component Technical Manual CTM157 15JUL05
- Claas
- Grove
- New Holland
- Komatsu
- Kubota
- John Deere
- Linde
- Bomag
- CASE
- Clark
- JCB
- Jungheinrich
- Linde
- Yale
- Yanmar
- Manitou
- Manitowoc
- CNH
- Doosan
- Fiatagri
- Fiatallis
- Fiatallis Other Manual PDF
- Flexi Coil
- Ford New Holland
- Ford New Holland Other Manual PDF
- Huyndai
- Hypac
- Hyster
- Hyster Service Manual PDF
- Isuzu
- Kobelco
- Kohler
- Krupp
- Lombardini
- Mahindra
- Nuvera
- Perkins
- Sperry New Holland
- Utilev
- Versatile
- ZF