- Claas
- Grove
- New Holland
- Komatsu
- Kubota
- John Deere
- Linde
- Bomag
- CASE
- Clark
- JCB
- Jungheinrich
- Linde
- Yale
- Yanmar
- Manitou
- Manitowoc
- CNH
- Doosan
- Fiatagri
- Fiatallis
- Fiatallis Other Manual PDF
- Flexi Coil
- Ford New Holland
- Ford New Holland Other Manual PDF
- Huyndai
- Hypac
- Hyster
- Hyster Service Manual PDF
- Isuzu
- Kobelco
- Kohler
- Krupp
- Lombardini
- Mahindra
- Nuvera
- Perkins
- Sperry New Holland
- Utilev
- Versatile
- ZF
 Baler Repair Manual ES 1")
 Baler Repair Manual ES 2")
%20Baler%20Repair%20Manual%20ES&url=https://automanual.net/doc/claas-quadrant-4000-773-baler-repair-manual-es/&media=https://automanual.net/wp-content/uploads/2024/04/claas-quadrant-4000-773-baler-repair-manual-es-1.jpg)
Claas Quadrant 4000 (773) Baler Repair Manual ES
$200.00
- Model: Quadrant 4000 (773) Baler
- Type Of Manual: Repair Manual
- Language: ES
- Format: PDF(s)
- Size: 130 MB
File List:
00 0300 259 0.pdf
00 0300 259 0.pdf:
QUADRANT 4000
Introduction
General information
Using the manual
Texts and figures
Index with the structure of constructive groups
Search and find
Direction signs
Abbreviations
Technicalities
Application of this manual
General repair instructions
Technical instructions
Cause of the fault
Replacement parts
Welding work
Steel roller chains
connecting link
Tapered ring joints
Disassembly
Mounting
Head key joints
Disassembly
Mounting
Self-locking screws
Liquid screw insurance
Bearings with tension ring
Disassembly
Mounting
Bearings with tensioner sleeve
Disassembly
Mounting
Threadings with adjustment ring
Screw in
Non-tight joint with adjusting ring
Threaded joints with progressive ring in hydraulic pipes
Screw connections with sealing cone
Hydraulic hoses
Laying of hoses
Indications for correct repair
Tightening torques
Tightening torques for normal metric threads
Tightening torques for metric fine threads
Tightening torques for hydraulic threads with adjusting ring DIN 3861
Tightening torques for hydraulic threads and air conditioning threads with sealing cone and O-ring DIN 3865
Tightening torques for threaded fittings of the SDS hydraulic system
Tightening torques for threaded fittings of the SDE hydraulic system with adjustable direction
Tightening torques for oscillating hydraulic threadings
Tightening torques for hollow screws DIN 7643
Tightening torques for brake line joints
Tightening torques for helical thread clamps
Tightening torques for spring-loaded helical thread clamps
Wheel tightening torques
Technical data
Lubricants
CCN Explanation
CCN (CLAAS Component Number)
General indications
Electrical regulations
Hydraulic regulations
CCN Index
Security
General information
Especially important
Signage of warning and danger indications
General safety and accident prevention rules
Leave the machine
Adjustment and maintenance work
Risk of injury from hydraulic fluid
pressure accumulator
First aid
Place the machine on the lifting arm
Disconnect the machine
Basic operations
Pressing system
Pressing piston at front dead center
Tying system
Start a tie manually
02 Gears / clutch / cardan shaft
0230 Mechanical gear
main transmission box
Overview
Remove the main transmission case
Install the main transmission box
Displacement of the main transmission box arms
Overview
Remove the piston arms
Move the left arm of the box
Move the right arm of the box
Install piston arms
Check the position of the pressing channel filling indicator sensors B057 and B058*
Adjust the position of the pressing channel fill indicator sensors B057 and B058*
Top Angle Drive Box
Overview
Move the upper box crank
Remove the crank from the upper case
Remove the upper angle transmission case
Install the top angle transmission box
Install the upper box crank
Bottom Angle Gear Box
Overview
Remove the axle from the carrier arms
Remove the chain coupling
Remove the lower angle transmission case
Install the lower angle transmission box
Install the carrier arm shaft
Install the chain coupling
Carrier torque limiter
Overview
Remove the torque limiter from the carrier
Install the carrier torque limiter
Adjust the coupling in the correct position
Check the position of the coupling
Adjust coupling position
Install the carrier torque limiter
Adjust the hauler speed sensor
0260 Cardan shaft
Cardan shaft of knotters
Overview
Remove the cardan shaft
Install the cardan shaft
Particular case:
Remove the cardan shaft
Install the cardan shaft
03 Chassis
0310 Axle
single axis
Overview
wheel hub
Remove a wheel hub
Install a wheel hub
04 Brake
0410 Trailed machine service brake
brake mechanism
Fixing the braking elements
brake control lever
Adjust the brake control lever
Air brake*
General view of the pneumatic brake cylinder
Technical characteristics of pneumatic brake cylinders
Remove a pneumatic brake cylinder
Install a pneumatic brake cylinder
Overview of the pneumatic brake system
Hydraulic brake *
Hydraulic brake cylinder overview
Remove a hydraulic brake cylinder
Install a hydraulic brake cylinder
Hydraulic safety brake overview*
0415 Parking brake
Parking break
Overview
Adjust the parking brake
07 Towing device
0725 Spear
Overall view of the rudder head
Remove the rudder head
Install the rudder head
Overview of the sear
09 Hydraulic
0900 General instructions for the hydraulic installation
Damage to the hydraulic installation
General rules
0905 Hydraulic oil tank
Hydraulic Oil Tank – Overview
Remove the hydraulic oil tank
Install the hydraulic oil tank
0910 Bombs
Hydraulic pump (2036)
Overview
0920 Valves
Pressing pressure limiter (Y050)
Overview
20 Reception of the harvest
2020 Pickup
Overview
Remove the pick-up
Install the pick-up
2025 Pick holder / elastic picks
Overview
Remove a spike
Install a spike
21 Power set
2130 Carrier
Overview
Remove the carrying comb
Remove the right carry arm
Remove the right arm from the carrier
Assemble the right arm of the carrier
Install the right carry arm
Remove the left protective covers
Remove the drive chain from the pick-up
Remove the left arm from the carrier
Remove the left arm of the carrier
Assemble the left arm of the carrier
Install the left carry arm
Install the pick-up drive chain
Install the left protective covers
Install the carrier comb
Carrier braces
Overview
Remove the carry strap
Remove the tie rod
Install the tie rod
Install the carrier tie rod
Adjust the height of the carrying comb
Curved feed channel slats
Overview
Remove the curved slats
Install the curved slats
Remove the sleeper
Install the sleeper
Feed channel bottom plate
Overview
Remove the bottom plate
Remove the bottom plate
Install the bottom plate
Assemble the bottom plate
Basic Carrier Settings
45 Pressing device
4505 Pressing chamber
Pressing channel pressure plates
Overview
Remove the upper pressure plate
Electric release
mechanical trigger
Install the upper pressure plate
Electric release
mechanical trigger
4510 Pressing piston
Pressing piston bearing rollers
Overview
Remove a bearing roller
Install a bearing roller
Adjust bearing rollers
Single roller adjustment
Multi-roller adjustment
pressing piston
Overview
Remove the raceway scrapers
Front scraper
Back scratcher
Install raceway scrapers
Front scraper
Back scratcher
Remove a scraper insert
Install a scraper insert
Remove the side brackets
Install the side brackets
Remove the piston blades
Install piston blades
Overview of the bedknife
Check the position of the bed knife
Adjust the bed knife
Overall view of the piston connecting rods
Remove the piston rods
Install the piston connecting rods
Remove the sliding bands
Install the sliding strips
Remove the piston
Install the piston
Check the alignment of the piston in the pressing channel
Correct alignment
Incorrect alignment
Adjust the alignment of the piston in the pressing channel
Correct alignment
Incorrect alignment
Incorrect alignment
Piston raceways
Overview
Control of raceways
Remove raceways
Install raceways
Pressing piston locking control (needle safety)
Overview
Remove the piston locking knob
Install piston locking knob
Adjust the piston lock control
Pressing piston lock (needle safety)
Overview
Remove the piston lock
Install piston lock
Adjust the position of the safety levers
46 Tying system
4605 Tying material
Thread compartment
Overview
Pivot Thread Box – Maintenance Access Position
Swinging the thread box – Working position
Remove the thread box
Remove the handle from the thread box
Remove the thread brake
Install the thread brake
Adjust the thread brake
Install the thread box handle
Install the thread box
Adjust the thread box
4620 Knotter
Overview
Remove a knotter
Install a knotter
Adjust the knotters
Knotting pick pusher springs
Thread clamp plate springs
Knotter Links
Thread guide finger
Knotter shoe
Overview
Remove a knotter shoe
Removing a knotter shoe
Assembling a knotter shoe
Install a knotter shoe
knotter body
Overview
Disassemble the knotter body
Assemble the knotter body
Intermediate shaft of knotters
Overview
Remove the handles from the carrier
Install the carrier cranks
Remove the intermediate shaft
Install the intermediate shaft
knotter shaft
Overview
Remove the brake
Remove the brake
Install the brake
Install the brake
Adjust the brake
Remove the knotter shaft bearings
Install the knotter shaft bearings
Remove the knotter shaft
Dismantle the knotter shaft
Assemble the knotter shaft
Install the knotter shaft
Thread guide drive shaft
Overview
Remove the thread guide drive shaft
Install the thread guide drive shaft
Check the position of the lever
Adjust lever position
Thread shortage indicator
Overview
Remove the thread shortage indicator
Remove the antenna support
Assemble the antenna support
Install the thread shortage indicator
Tying trigger device
Overview
Remove the control lever
Remove the control lever
Remove the control lever
Assemble the control lever
Install the control lever
Remove the gearmotor assembly
Remove the gearmotor assembly
Disassemble the gearmotor assembly
Assemble the gear motor assembly
Install the gear motor assembly
Check the stroke of the control lever
Remove the trip sensor from the bundle
Install the tying trigger sensor
Adjust the tying trigger sensor
Tying drive
Overview
Remove the tying drive
Remove the trigger block
Assemble the trigger block
Remove the freewheel
Install the freewheel
Install the tying drive
Angle transmission
Overview
Remove angle transmission
Disassemble the angle transmission
Mount the angle transmission
Angle transmission adjustment
Install angle transmission
Adjust the tying speed sensor
Overview
Remove a needle
Disassemble a needle
Assemble a needle
Install a needle
Adjust the needles
Position of the needles on the piston
Needle pressure on the knotter
Needle height
High dead center of the needles
Needle/piston position
Modify the position of the cardan shaft of the knotters
Check the coating of the needles
Needle sleeper
Overview
Remove the crossbar from the needles
Install the needle crossbar
Needle rockers
Overview
Remove a needle brake
Disassembling a needle brake
Install a needle brake
Install a needle brake
Adjust the needle brake
Remove a needle stay
Install a needle stay
Remove a needle rocker
Install a needle rocker
Knotting bellows
Overview
Remove the bellows from the knotters
Dismantle the bellows of the knotters
Assemble the bellows of the knotters
Install the bellows
Basic settings of the tying system
Checking the coating of the needles
Needle rocker brake
Knotter shaft brake
Brake and thread tensioner
60 Deposit the material / deposit the straw
6040 Bale unloading
Bale unloading ramp
Overview
Remove the bale unloading ramp
Remove the sliding bale unloading ramp
Assemble the sliding bale unloading ramp
Remove the 3-roller bale unloading ramp
Remove the rear roller protection
Remove the rollers
Assemble the 3-roller bale unloading ramp
Assemble the rollers
Install the rear roller protection
Install the bale unloading ramp
75 Central lubrication
7505 Container, pump
Centralized lubrication pump
Overview
Remove the grease pump
Install the grease pump
7510 Distributor
Automatic lubrication distribution diagrams
Distributor overview
Main distributor
piston distributor
Knotting distributor
Needle distributor
Manual centralized lubrication distribution diagrams
Distributor overview
Main distributor
piston distributor
Knotting distributor
Needle distributor
80 Attached parts, machine casing
8025 Coverings / hoods
Side gates
Overview
Open the side doors
Close the side doors
Remove the side doors
Install the side gates
Top front cover
Overview
Remove the top front cover
Install the top front cover
Bottom front cover
Overview
Open the bottom front cover
Close the bottom front cover
Remove the lower front cover
Install the lower front cover
Knotter Cover
Overview
Open the cover of the knotters
Close the knotter cover
Remove the cover from the knotters
Install the knotter cover
Mudguard
Overview
Remove the fenders
Install the fenders


John Deere Repair Technical Manual PDF


John Deere Repair Technical Manual PDF
&url=https://automanual.net/doc/john-deere-16-18-20-and-24hp-onan-engines-component-technical-manual-ctm2-19apr90/&media=https://automanual.net/wp-content/uploads/2023/08/john-deere-16-18-20-and-24hp-onan-engines-component-technical-manual-ctm2-19apr90-1.jpg)


John Deere Repair Technical Manual PDF
John Deere 16, 18, 20 and 24HP Onan Engines Component Technical Manual CTM2 (19APR90)


John Deere Repair Technical Manual PDF
%20Component%20Technical%20Manual%20CTM205%20February%202015%20Russian&url=https://automanual.net/doc/john-deere-diesel-engines-4-5l-and-6-8l-component-technical-manual-ctm205-01feb15-russian/&media=https://automanual.net/wp-content/uploads/2023/08/john-deere-diesel-engines-45-l-and-68-l-primary-engine-component-technical-manual-ctm205-february-2015-russian-1.jpg)


John Deere Repair Technical Manual PDF

John Deere Repair Technical Manual PDF
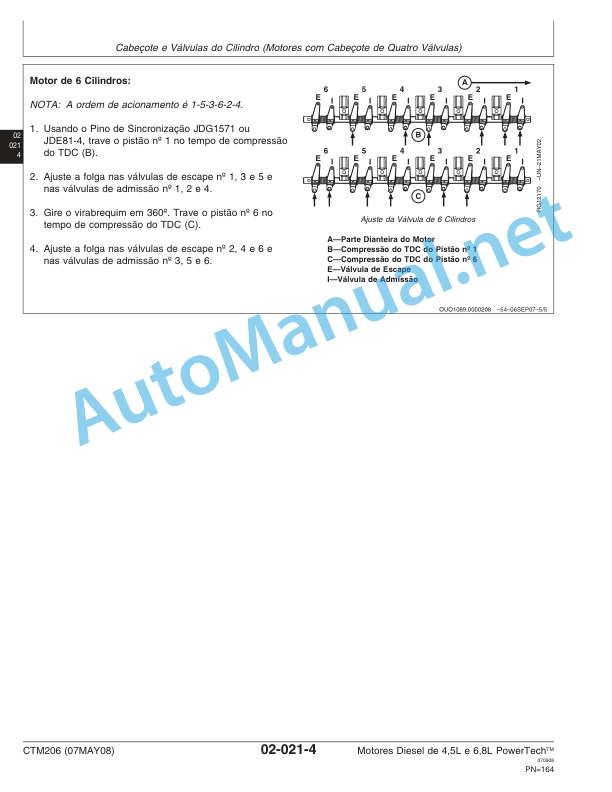
John Deere Diesel Engines PowerTech 4.5L and 6.8L – Motor Base Technical Manual 07MAY08 Portuguese
John Deere Repair Technical Manual PDF


John Deere Repair Technical Manual PDF
%20Portuguese&url=https://automanual.net/doc/john-deere-tractors-6300-6500-and-6600-parts-catalog-cq26564-29set05/&media=https://automanual.net/wp-content/uploads/2023/08/john-deere-tractors-6300-6500-and-6600-parts-catalog-cq26564-29set05-portuguese-1.jpg)


John Deere Parts Catalog PDF
John Deere Tractors 6300, 6500, and 6600 Parts Catalog CQ26564 (29SET05) Portuguese


John Deere Repair Technical Manual PDF
- Claas
- Grove
- New Holland
- Komatsu
- Kubota
- John Deere
- Linde
- Bomag
- CASE
- Clark
- JCB
- Jungheinrich
- Linde
- Yale
- Yanmar
- Manitou
- Manitowoc
- CNH
- Doosan
- Fiatagri
- Fiatallis
- Fiatallis Other Manual PDF
- Flexi Coil
- Ford New Holland
- Ford New Holland Other Manual PDF
- Huyndai
- Hypac
- Hyster
- Hyster Service Manual PDF
- Isuzu
- Kobelco
- Kohler
- Krupp
- Lombardini
- Mahindra
- Nuvera
- Perkins
- Sperry New Holland
- Utilev
- Versatile
- ZF