- Claas
- Grove
- New Holland
- Komatsu
- Kubota
- John Deere
- Linde
- Bomag
- CASE
- Clark
- JCB
- Jungheinrich
- Linde
- Yale
- Yanmar
- Manitou
- Manitowoc
- CNH
- Doosan
- Fiatagri
- Fiatallis
- Fiatallis Other Manual PDF
- Flexi Coil
- Ford New Holland
- Ford New Holland Other Manual PDF
- Huyndai
- Hypac
- Hyster
- Hyster Service Manual PDF
- Isuzu
- Kobelco
- Kohler
- Krupp
- Lombardini
- Mahindra
- Nuvera
- Perkins
- Sperry New Holland
- Utilev
- Versatile
- ZF
 Digital Solutions Operator Manual ES 1")
 Digital Solutions Operator Manual ES 2")
 Digital Solutions Operator Manual ES 3")
 Digital Solutions Operator Manual ES 4")
 Digital Solutions Operator Manual ES 5")
 Digital Solutions Operator Manual ES 6")
 Digital Solutions Operator Manual ES 7")
 Digital Solutions Operator Manual ES 8")
 Digital Solutions Operator Manual ES 9")
%20Digital%20Solutions%20Operator%20Manual%20ES&url=https://automanual.net/doc/claas-gps-pilot-hydraulic-b85-digital-solutions-operator-manual-es/&media=https://automanual.net/wp-content/uploads/2024/04/claas-gps-pilot-hydraulic-b85-digital-solutions-operator-manual-es-1.jpg)
Claas Gps Pilot – Hydraulic (B85) Digital Solutions Operator Manual ES
$50.00
- Model: Gps Pilot – Hydraulic (B85) Digital Solutions
- Type Of Manual: Operator Manual
- Language: ES
- Format: PDF(s)
- Size: 310 MB
File List:
00 1400 639 3.pdf
00 1402 656 2.pdf
00 1402 657 1.pdf
00 1402 803 1.pdf
00 1405 165 7.pdf
00 1405 185 7.pdf
00 1420 029 4.pdf
00 1420 057 2.pdf
00 1400 639 3.pdf:
COPILOT S7 GPS
1. Introduction
1.1 General information
1.1.1 Validity of the manual
1.1.2 Information about this instruction manual
1.1.3 Symbols and indications
1.1.4 Optional equipment
1.1.5 Qualified specialized workshop
1.1.6 Maintenance instructions
1.1.7 Information regarding warranty
1.1.8 Spare parts and technical questions
1.2 Proper application of the machine
1.2.1 Suitable GPS COPILOT application
1.2.2 Logically foreseeable erroneous application GPS COPILOT
2 Security
2.1 Recognize warning signs
2.1.1 Danger symbols
2.1.2 Keyword
2.2 Safety instructions
2.2.1 Importance of the instruction manual
2.2.2 Terminal software update
2.2.3 Observe graphic danger symbols and warning instructions
2.2.4 Requirements for all people who work with the product
2.2.5 Construction modifications
2.2.6 Optional equipment and spare parts
2.2.7 Using USB devices
2.2.8 Operation only in accordance with statutory commissioning
2.2.9 Technical status
2.2.10 Dangers when driving on the road and on terrain
Road traffic
Field trip
2.2.11 Electrical shock from electrical equipment
2.2.12 Maintenance work and repair work
3 Product Description
3.1 Summary and operation
3.1.1 COPILOT GPS Summary
3.1.2 S7 terminal overview
3.1.3 Summary corrective signals
EGNOS / WAAS / MSAS
3.1.4 Antenna summary
GNSS antenna
3.2 Optional equipment
3.2.1 GLONASS*
3.3 Identification plates and identification numbers
3.3.1 COPILOT S7 GPS identification plate
3.3.2 Terminal identification plate
4 Control and display instruments
4.1 S7 terminal overview
4.1.1 Button and prompt representation conventions
4.2 GPS COPILOT menu structure
4.2.1 Initial menu
4.2.2 Main menu, summary
4.2.3 Summary of DGPS visualizations
4.2.4 Menu
4.2.5 Menu
4.2.6 Menu
4.2.7 Menu
4.2.8 Menu
4.2.9 Menu
4.2.10 Menu
4.2.11 Menu
4.2.12 Menu
4.2.13
4.2.14 Menu
4.2.15 Menu
4.2.16 Menu
4.2.17 Menu
4.2.18 Menu
4.2.19 Menu
Menu
Menu
5 Technical data
5.1 GPS COPILOT
5.1.1 Corrective signal accuracy
5.1.2 COPILOT GPS Specification
5.2 S7 Terminal
5.2.1 Specification
6 Prepare the product
6.1 Turn off the machine and secure it
6.1.1 Turn off the machine and secure it
6.2 Perform before commissioning
6.2.1 Perform before the first commissioning of GPS COPILOT
6.2.2 Perform GPS COPILOT before each start-up
6.3 First start-up of the machine
6.3.1 Create vehicle profile
6.4 First start-up of the working device
6.4.1 Create device profile checklist
6.4.2 Create device profile
6.4.3 Select the type of coupling
6.4.4 Enter the measurements of the devices
Adjust the width of the device
Particularity in LEXION and TUCANO in MONTANA version
Adjust the overlap or gap
Working width
Adjust the movement of the device in the longitudinal direction
Adjust the movement of the device in the transverse direction
6.5 First start-up of the correction signal
6.5.1 First commissioning of the GNSS signal
6.5.2 Select the E-DIF correction type
6.5.3 Select the type of SBAS correction
6.6 Adjust subscriptions
6.6.1 Enter codes
7 Management
7.1 Checklists
7.1.1 Prepare field work
7.1.2 Carry out field work
7.2 GPS COPILOT
7.2.1 Turn on the terminal
Starting screen
7.2.2 Turn off the terminal
7.2.3 Manage control elements
Manage the keyboard
Operate the numeric keypad
Handle buttons with attached list
7.2.4 Direction direction indicator
7.2.5 GPS status
7.2.6 Connect USB data memory
7.3 GPS settings
7.3.1 Adjust BEIDOU
7.3.2 Adjust GNSS
7.3.3 Adjust NMEA broadcast
Limit NMEA broadcast to GPS signal
Record entries
Continue using the GNSS signal
7.3.4 Adjust E-DIF
Set reference point
Update reference point
7.3.5 Adjust SBAS
7.4 System settings
7.4.1 Adjust vision
Zoom in and out
Adjust the display mode
Adjust perspective
Hide buttons
View the buttons
7.4.2 Setting the language
7.4.3 Set units
7.4.4 Set the time
GMT Offset
7.4.5 Exchange control elements
7.4.6 Connect or disconnect the worked surface signal
7.4.7 Adjust day and night mode
7.4.8 Adjust screen brightness
7.4.9 Adjust the direction indicator
Sensitivity
7.4.10 Adjust the matrix
7.5 Vehicle settings
7.5.1 Load vehicle profile
7.5.2 Process vehicle profile
7.5.3 Export vehicle profiles
7.5.4 Import vehicle profiles
7.5.5 Delete vehicle profiles
7.6 Device settings
7.6.1 Load vehicle profile
7.6.2 Process device profile
7.6.3 Export device profiles
7.6.4 Import the device profile
7.6.5 Delete device profiles
7.7 Order processing
7.7.1 Create job
Create a new job from the initial menu
Create a new job from job management
7.7.2 Process notes
7.7.3 Load job
7.7.4 End the job
7.7.5 Continue the last used job
7.7.6 Export job
7.7.7 Import job
7.7.8 Delete job
7.7.9 Create template
7.7.10 Use model
7.7.11 Delete templates
7.8 Field trip with COPILOT GPS
7.8.1 Summary of types of field trips
7.9 Boundaries and markers
7.9.1 Use a surface counter
Record the parcel boundary
Interrupt recording
Plot boundary as a reference footprint
7.9.2 Set marker
User-defined bookmarks
Set user-defined bookmarks
7.9.3 Drive to markers
Select bookmark
Drive to bookmarks
7.10 Straight line guide
7.10.1 Straight line guide
7.10.2 Create reference fingerprint
7.10.3 Fix point B again
7.10.4 Straight line guide with angle (angle A=B)
7.10.5 Work the plot
Commutation
7.10.6 Load lines A=B
7.10.7 Process the naming of a line A=B
7.10.8 Move line A=B
7.11 Guide by circular lines
7.11.1 Guide service through circular lines
7.11.2 Create reference footprint
7.11.3 Work the plot
7.11.4 Load the circular footprint
7.11.5 Move the circular footprint
7.12 Guidance by contour lines
7.12.1 Using contour line guidance
7.12.2 Record reference fingerprint
Record new reference fingerprint
7.12.3 Work the plot
Commutation
Padlock function
7.13 Display of partial widths
7.13.1 Activate and deactivate the display of partial widths
7.13.2 Adjust the display of partial widths
Enter the number of partial widths of the attached device
Adjust the width of the individual sections of the attached device
Adjust the allowed overlap
Set the connection time
Set the shutdown time
7.13.3 Using the display of partial widths
8 Incident and solution
8.1 Errors and measures to take
8.1.1 Starting the COPILOT GPS system
8.1.2 Defective GNSS signal
8.1.3 EGNOS/WAAS/MSAS corrective signal
8.1.4 Error in footprint guidance
8.2 S7 Terminal
8.2.1 Take screenshots
8.3 Diagnosis
8.3.1 GPS-Setup
8.3.2 GPS Status
8.3.3 E-DIF Status
9 Maintenance
9.1 Summary of maintenance intervals
9.1.1 Every 100 hours of service or monthly
10 Decommissioning and waste disposal
10.1 General information
10.1.1 Decommissioning and waste disposal
11 EC declaration of conformity
11.1 GPS COPILOT
11.1.1 EC declaration of conformity
12 Technical dictionary and abbreviations
12.1 GPS COPILOT
12.1.1 Abbreviations
12.1.2 Units
00 1402 657 1.pdf:
COPILOT GPS Quick Start Guide
General indications
Contour mode
Changing the working width
Change of signal type
Surface measurement
Automatic movement of lines A-B
00 1405 165 7.pdf:
GPS PILOT
1. Introduction
1.1 General information
1.1.1 Validity of the manual
1.1.2 Information about this instruction manual
1.1.3 Symbols and indications
1.1.4 Optional equipment
1.1.5 Qualified specialized workshop
1.1.6 Maintenance instructions
1.1.7 Information regarding warranty
1.1.8 Spare parts and technical questions
1.1.9 Road traffic permit
Model report
No objection certificate
General circulation permit
1.2 Proper application of the machine
1.2.1 Compliant use
1.2.2 Logically foreseeable non-conforming uses
2 Security
2.1 Recognize warning signs
2.1.1 Danger symbols
2.1.2 Keyword
2.2 Safety instructions
2.2.1 Meaning of the instruction manual
2.2.2 Terminal software update
2.2.3 Requirements for all people who work with the product
2.2.4 Danger zones
Danger zones
2.2.5 Interaction between the terminal and the machine or tractor
2.2.6 Construction modifications
2.2.7 Optional equipment and spare parts
2.2.8 Using USB devices
2.2.9 Operation only in accordance with statutory commissioning
2.2.10 Technical status
2.2.11 Danger from damage to the product
2.2.12 Comply with technical limit values
Comply with technical limit values
2.2.13 Prepare a product for road circulation
2.2.14 Dangers when traveling on the road with an ISOBUS coupled device
Turn on the terminal while driving on the road
2.2.15 Dangers when driving on the road and in the countryside
2.2.16 Electrical shock from electrical equipment
2.2.17 Fatal electric shock due to overhead lines
2.2.18 Liquids under pressure
2.2.19 Maintenance work and repair work
2.2.20 Driving with GPS PILOT
Road traffic
Field trip
2.2.21 Working with Task Control* and Section Control*
3 Product Description
3.1 Summary and operation
3.1.1 Summary GPS PILOT – Hydraulic
3.1.2 Summary GPS PILOT – Steer ready
3.1.3 GPS PILOT FLEX Summary
3.1.4 Factory GPS PILOT Summary
3.1.5 S10 terminal summary
3.1.6 Navigation computer summary (ECU)
3.1.7 Electric steering wheel
3.1.8 Summary corrective signals
EGNOS / WAAS / MSAS
Omnistar HP/XP/G2
RTK FIELD BASE and BASELINE HD
RTK FARM BASE
3.1.9 Module summary
BASELINE HD
RTK FIELD BASE
RTK (Motorola)
RTK FARM BASE
3.2 Safety devices
3.2.1 Automatic disconnection when exceeding the maximum speed
3.2.2 Automatic disconnection when the minimum speed is not reached
3.2.3 Seat contact switch
3.2.4 Manual overexcitation
electric steering wheel
3.3 Optional equipment
3.3.1 GPS L2*
3.3.2 GLONASS*
3.3.3 TURN IN*
3.3.4 AUTO TURN*
3.3.5 Task Control*
Task Control Basic*
Task Control Geo*
3.3.6 Section Control*
3.4 Identification plates and identification numbers
3.4.1 GPS PILOT identification plate
3.4.2 Terminal identification plate
3.4.3 Navigation computer identification plate
4 Control and display instruments
4.1 GPS PILOT
4.1.1 Main switch and start switch
Main switch
Main switch
4.2 S10 terminal summary
4.2.1 Button and prompt representation conventions
4.3 GPS PILOT menu structure
4.3.1 Initial menu
Initial menu without Task Control*
Initial menu with Task Control*
4.3.2 Summary menu
4.3.3 Indicator cell summary
Loss of corrective signal
4.3.4
4.3.5 Menu
4.3.6 Menu
4.3.7 Menu
Menu
Menu
Menu
4.3.8 Menu
4.3.9 Menu
4.3.10 Menu
Menu
4.3.11
4.3.12 Menu
4.3.13 Menu
4.3.14 Menu
4.3.15 Menu
4.3.16 Menu
4.3.17 Menu
4.3.18 Menu
4.3.19
4.3.20
4.3.21 Menu
4.3.22 Menu


John Deere Repair Technical Manual PDF
John Deere Diesel Engines POWERTECH 2.9 L Component Technical Manual CTM126 Spanish


John Deere Repair Technical Manual PDF


John Deere Repair Technical Manual PDF
John Deere Transmission Control Unit Component Technical Manual CTM157 15JUL05


John Deere Repair Technical Manual PDF


John Deere Repair Technical Manual PDF

John Deere Repair Technical Manual PDF
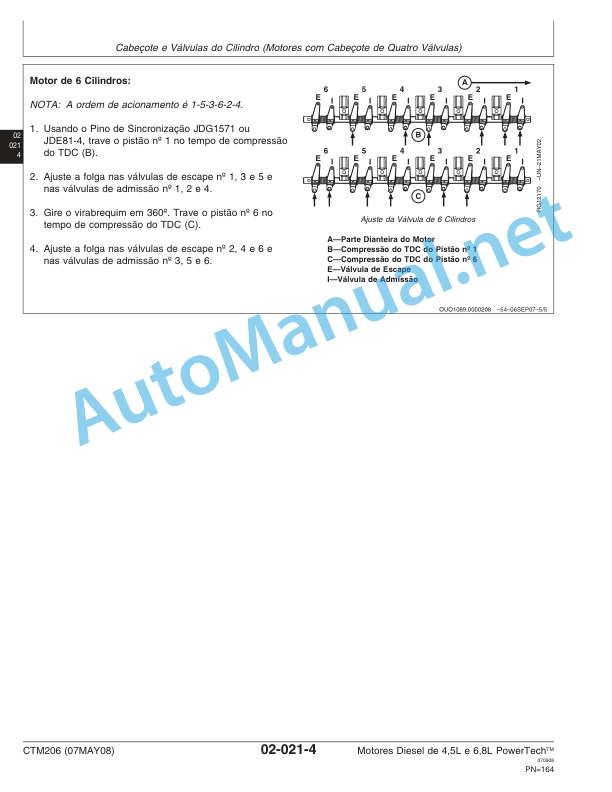
John Deere Diesel Engines PowerTech 4.5L and 6.8L – Motor Base Technical Manual 07MAY08 Portuguese
John Deere Repair Technical Manual PDF
%20Portuguese&url=https://automanual.net/doc/john-deere-tractors-6300-6500-and-6600-parts-catalog-cq26564-29set05/&media=https://automanual.net/wp-content/uploads/2023/08/john-deere-tractors-6300-6500-and-6600-parts-catalog-cq26564-29set05-portuguese-1.jpg)


John Deere Parts Catalog PDF
John Deere Tractors 6300, 6500, and 6600 Parts Catalog CQ26564 (29SET05) Portuguese
%20Interim%20Tier%204%20Stage%20III%20B%20Component%20Technical%20Manual%20CTM104754%2025%20July%202012%20Portuguese&url=https://automanual.net/doc/john-deere-powertech-m-6068-oem-diesel-engines-above-130-kw-174-hp-compo-technical-manual-ctm104754-25jul12-portuguese/&media=https://automanual.net/wp-content/uploads/2023/08/john-deere-powertech-6068-engines-above-130-kw-174-hp-interim-tier-4-stage-iii-b-component-technical-manual-ctm104754-25-july-2012-portuguese-1.jpg)

John Deere Repair Technical Manual PDF


John Deere Repair Technical Manual PDF
John Deere Application List Component Technical Manual CTM106819 24AUG20
- Claas
- Grove
- New Holland
- Komatsu
- Kubota
- John Deere
- Linde
- Bomag
- CASE
- Clark
- JCB
- Jungheinrich
- Linde
- Yale
- Yanmar
- Manitou
- Manitowoc
- CNH
- Doosan
- Fiatagri
- Fiatallis
- Fiatallis Other Manual PDF
- Flexi Coil
- Ford New Holland
- Ford New Holland Other Manual PDF
- Huyndai
- Hypac
- Hyster
- Hyster Service Manual PDF
- Isuzu
- Kobelco
- Kohler
- Krupp
- Lombardini
- Mahindra
- Nuvera
- Perkins
- Sperry New Holland
- Utilev
- Versatile
- ZF