- Claas
- Grove
- New Holland
- Komatsu
- Kubota
- John Deere
- Linde
- Bomag
- CASE
- Clark
- JCB
- Jungheinrich
- Linde
- Yale
- Yanmar
- Manitou
- Manitowoc
- CNH
- Doosan
- Fiatagri
- Fiatallis
- Fiatallis Other Manual PDF
- Flexi Coil
- Ford New Holland
- Ford New Holland Other Manual PDF
- Huyndai
- Hypac
- Hyster
- Hyster Service Manual PDF
- Isuzu
- Kobelco
- Kohler
- Krupp
- Lombardini
- Mahindra
- Nuvera
- Perkins
- Sperry New Holland
- Utilev
- Versatile
- ZF
 Combines Operator Manual EN 1")
 Combines Operator Manual EN 2")
 Combines Operator Manual EN 3")
 Combines Operator Manual EN 4")
%20Combines%20Operator%20Manual%20EN&url=https://automanual.net/doc/claas-conspeed-6-medion-909-combines-operator-manual-en/&media=https://automanual.net/wp-content/uploads/2024/04/claas-conspeed-6-medion-909-combines-operator-manual-en-1.jpg)
Claas Conspeed 6 Medion (909) Combines Operator Manual EN
$50.00
- Model: Conspeed 6 Medion (909) Combines
- Type Of Manual: Operator Manual
- Language: EN
- Format: PDF(s)
- Size: 28.9 MB
File List:
00 0298 345 8.pdf
00 0301 051 0.pdf
00 0303 482 0.pdf
00 0298 345 8.pdf:
1 Introduction
Introduction
Validity
CONSPEED 12-75 C – LEXION CONSPEED 12-70 C – LEXION Type 913 from serial no. 913 0 1001
CONSPEED 8-80 FC – LEXION CONSPEED 8-75 FC – LEXION CONSPEED 8-70 FC – LEXION Type 907 from serial no. 907 0 1001
CONSPEED 8-75 FC – LEXION CONSPEED 8-75 F – LEXION CONSPEED 8-70 FC – LEXION CONSPEED 8-70 F – LEXION Type 912 from serial no. 912 0 1001
CONSPEED 6-80 FC – LEXION CONSPEED 6-75 FC – LEXION CONSPEED 6-70 FC – LEXION Type 908 from serial no. 908 0 1001
CONSPEED 6-80 FC – LEXION CONSPEED 6-80 F – LEXION CONSPEED 6-75 FC – LEXION CONSPEED 6-75 F – LEXION CONSPEED 6-70 FC – LEXION Type 911 from serial no. 911 0 1001
CONSPEED 6-75 C – LEXION CONSPEED 6-70 C – LEXION Type 919 from serial no. 919 0 1001
CONSPEED 6-80 FC – MEDION / MEGA CONSPEED 6-80 F – MEDION / MEGA CONSPEED 6-75 FC – MEDION / MEGA CONSPEED 6-70 FC – MEDION / MEGA CONSPEED 6-70 F – MEDION / MEGA Type 914 from serial no. 914 0 1001
CONSPEED 6-75 C – LEXION CONSPEED 6-70 C – LEXION Type 909 from serial no. 909 0 1001
2 Contents
3 Preface
Special care
Identification plate
Transport on public roads
Special note for CONSPEED C (non-folding)
Transport CONSPEED 12 C
In order to transport the front attachment with the CLAAS transport waggon, proceed as follows:
Protective equipment for road transport
Driving lights during road transport
Additional weights
MEDION/MEGA:
4 Safety rules
Identification of warning and danger signs
Intended use
General safety and safety precaution instructions
Safety prop
Safety decals with pictorials
5 Specifications
CONSPEED 12-75 C
CONSPEED 12-70 C
CONSPEED 8-80 FC
CONSPEED 8-75 FC
CONSPEED 8-75 F
CONSPEED 8-70 FC
CONSPEED 8-70 F
CONSPEED 6-80 FC
CONSPEED 6-80 F
CONSPEED 6-75 FC
CONSPEED 6-75 F
CONSPEED 6-75 C
CONSPEED 6-70 FC
CONSPEED 6-70 F
CONSPEED 6-70 C
6 Prior to operation
Check and observe the following before putting into operation
Loading/unloading the maize picker
Initial mounting of the maize picker
Fit the driving lights and the switch for maize picker folding to the combine harvester (only with LEXION)
Driving lights during road transport
Switching over the driving lights (up to serial no….)
Switching over the driving lights (from serial no….)
Driving lights – additional headlights and switch for folding maize picker
Fitting – parts 00 496 070 0
Fitting additional headlights and switching device
Fitting the push button for the switching device
Fitting additional headlights on both sides
Adjusting the additional headlights
Mounting the maize picker – LEXION
Preparing the combine harvester for mounting the maize picker
Changing the right hand guard cladding
Mounting to a combine harvester without Auto Contour System
Mounting on to a combine harvester with Auto Contour System
Mounting the maize picker
Locking the maize picker
Connect the quick release coupling
Connect snapper plate position display
Fitting drive shafts
Connecting the constant velocity joint
Removing the maize picker – LEXION
Unlocking the maize picker
Mounting the maize picker – MEDION/ Mega
Preparing the combine harvester for mounting the maize picker
Removing angle bars
Mounting on to a combine harvester with Auto Contour System
Mounting to a combine harvester without Auto Contour System
Mounting the maize picker
Locking the maize picker
Connect the hydraulic hoses
Connecting the power supply
Fitting drive shafts
Connecting the universal drive shafts
Removing the maize picker – MEDION/ MEGA
Unlocking the maize picker
Engaging the chopper
Sheet metal covers
Mounting and adjusting the gathering points
Height adjustment of the gathering points
Rough adjustment:
Final adjustment of central gathering points:
Final adjustment of outer gathering points:
Stop gathering points (only CONSPEED – 8 rows folding)
Locking and unlocking the sheet metal covers
Raising the sheet metal covers
Snapper plates
Adjusting the limit stops of the snapper plates
MEDION/MEGA:
Learning the end stops:
Other adjustments:
7 Operation
Using the maize picker
Work and transport position
Working position
MEDION/MEGA:
Transport position
LEXION 470 Montana / 430 Montana:
MEDION/MEGA:
Adjusting the snapper plates hydraulically
MEDION/MEGA:
Engaging/disengaging the chopper
Cut-out clutch for reaper unit drive
OPTIONAL EQUIPMENT
CLAAS Autopilot (LEXION) (R05 0050, R05 0060)
CLAAS Auto-Contour (R09 0010) (only CONSPEED model 907/908/909/911/912/914)
Additional lighting – combine harvester (R07 0010)
St07 0040)
Down maize auger (only for LEXION) (B05 0020)
Intake auger attachment
Cover elevation (B07 0030)
Rubber ram stops
Rubber ram stop screw mounting
Rubber ram stop plug mounting
Gathering point slides
Slide height extension
For use on very stony ground, additional height exten sions can be mounted on the slides (24).
Stop plates
For use on very stony ground, additional stop plates (25)can be mounted on the stripper bars.
Stripper angles
Stripper kit (hybrid rollers) (B07 0100)
Shear bar for chopper (B07 0080)
Fitting kit – Montana (M04 0100)
For fitting the CONSPEED Model 908/911 (6 rows) to the LEXION 470 Montana / 430 Montana the fitting kit is required.
Sprocket 74 teeth (B07 0090)
CONSPEED – speed matching
8 Maintenance
Important Maintenance Instructions
Spare Parts
Hydraulic system
Lubrication
Drive systems
Angle drive gearbox
Oil level check of upper angle drive gearbox:
Oil level check of lower angle drive gearbox:
Special note for CONSPEED C (non-folding)
The oil filler cap is under the first sheet metal cover from the outside. Proceed as follows to add oil to the bottom angle drive:
Picker and chopper gearbox
Oil change:
Check oil level
Drive shaft
Clutches
Overload clutches
Universal drive shaft
General information concerning universal drive shafts
Universal drive shaft – fitting LEXION 470 / 430 Montana
Cleaning the finger chains
Tensioning the finger chains
Lubricating the drive chain
Tensioning the drive chain
Scraper plates
Adjusting the scraper plates
Snapping rolls
Cleaning the picker rollers
Attaching the picker rollers
Checking the setting of the picker roller knives.
Wear limits for the snapping roll knives
Snapper plates
Basic adjustment of snapper plates
Perform basic adjustment as follows:
Chopper knife
Changing the chopper knife
Changing the knives:
Wear limits for the forage cutters
The forage cutters must be replaced in the following cases:
Wear limits for forage cutter attachment
The forage cutter securing screws must be replaced in the following cases:
The securing nuts must be replaced in the following cases:
The protective caps must be replaced in the following cases:
Wear limits for the knife carriers / carrier plate
Wear limits for the ledger plate
Hydraulic system
Hydraulic hose connections
Swivel device for sheet metal covers
Screw connections
Knife carriers
Connection elements
Cleaning and care
Winter Storage
Lubricant table
Malfunctions
9 Lubrication chart
Safety rules
Lubricants
Lubrication
00 0301 051 0.pdf:
PROFI CAM 3
Table of contents
1 Introduction
1.1 Notes on the manual
1.1.1 Validity of manual
1.1.2 Information about this Operator’s Manual
1.1.3 Symbols and notes
1.1.4 Optional equipment
1.1.5 Qualified specialist workshop
1.1.6 Maintenance information
1.1.7 Warranty notes
1.1.8 Spare parts and technical questions
1.2 Intended use
1.2.1 Intended use
1.2.2 Reasonably foreseeable misuse
2 Safety
2.1 Identifying warnings
2.1.1 Hazard signs
2.1.2 Signal word
2.2 Safety rules
2.2.1 Meaning of Operator’s Manual
2.2.2 Observing safety decals and warnings
2.2.3 Optional equipment and spare parts
3 Product description
3.1 Overview and method of operation
3.1.1 How the PROFI CAM works
3.2 Identification plates and identification number
3.2.1 Position of identification plates
3.2.2 Explanation of PROFI CAM identification plate
3.3 Information on the product
3.3.1 CE marking
4 Operating and control elements
4.1 Camera system
4.1.1 Camera system monitor
4.2 Menu structure
4.2.1 Main menu
4.2.2
4.2.3
4.2.4
4.2.5
4.2.6
5 Technical specifications
5.1 PROFI CAM
5.1.1 Monitor
5.1.2 Camera
5.1.3 Switch box
5.1.4 Degree of protection against foreign bodies and water
6 Preparing the product
6.1 Shutting down and securing the machine
6.1.1 Switching off and securing the machine
6.2 Prior to operation
6.2.1 Carry out prior to operation
6.2.2 Installing the sun protection
6.2.3 Aligning the camera
6.2.4 Connecting the camera electrics
7 Operation
7.1 Monitor
7.1.1 Switching on the monitor
7.1.2 Calling up the menu
7.1.3 Setting a menu item
7.1.4 Setting the image orientation
7.1.5 Setting automatic screen darkening
7.1.6 Image mirroring
7.1.7 Setting the trigger view
7.1.8 Setting the follow-up time for trigger view
7.1.9 Setting the display mode
7.1.10 Activating/deactivating a display mode
8 Faults and remedies
8.1 Electrical and electronic system
8.1.1 Overview of problems on PROFI CAM camera system
8.1.2 Replacing the switch box fuse
9 Maintenance
9.1 Maintenance intervals
9.1.1 Every 10 operating hours or daily
9.2 Camera system
9.2.1 Checking the camera system for dirt
9.2.2 Cleaning the camera
9.2.3 Cleaning the switch box
9.2.4 Cleaning the monitor
10 Placing out of operation and disposal
10.1 General Information
10.1.1 Putting out of operation and disposal
11 Technical terms and abbreviations
11.1 Abbreviations
11.1.1 Units
11.1.2 Abbreviations
11.1.3 Technical terms
00 0303 482 0.pdf:
PROFI CAM 4
Table of contents
1 Introduction
1.1 Notes on the manual
1.1.1 Validity of manual
1.1.2 Information about this Operator’s Manual
1.1.3 Symbols and notes
1.1.4 Optional equipment
1.1.5 Qualified specialist workshop
1.1.6 Maintenance information
1.1.7 Notes on warranty
1.1.8 Spare parts and technical questions
1.2 Intended use
1.2.1 Intended use
1.2.2 Reasonably foreseeable misuse
2 Safety
2.1 Identifying warnings
2.1.1 Hazard signs
2.1.2 Signal word
2.2 Safety rules
2.2.1 Meaning of Operator’s Manual
2.2.2 Structural changes
2.2.3 Optional equipment and spare parts
2.2.4 Operation only following proper putting into operation
2.2.5 Technical status
2.2.6 Respecting technical limit values
Respecting technical limit values
2.2.7 Hazards when driving on roads and fields
3 Product description
3.1 Overview and method of operation
3.1.1 How the PROFI CAM works
3.2 Identification plates and identification number
3.2.1 Identification plates
3.3 Information on the product
3.3.1 CE marking
4 Operating and display elements
4.1 Camera system
4.1.1 Camera system monitor
4.1.2 CEBIS
4.2 Menu structure
4.2.1 Main menu
4.2.2
4.2.3
4.2.4
4.2.5
4.2.6
5 Technical specifications
5.1 PROFI CAM
5.1.1 Monitor
5.1.2 Camera
5.1.3 Switch box
6 Preparing the product
6.1 Switching off and securing the machine
6.1.1 Switching off and securing the machine
6.2 Prior to putting into operation
6.2.1 Carry out prior to operation
6.2.2 Installing the sun protection
6.2.3 Aligning the camera
7 Operation
7.1 Monitor
7.1.1 Switching on the monitor
7.1.2 Calling up the menu
7.1.3 Setting a menu item
7.1.4 Setting the image orientation
7.1.5 Setting automatic screen darkening
7.1.6 Image mirroring
7.1.7 Setting the trigger view
7.1.8 Setting the follow-up time for trigger view
7.1.9 Setting the display mode
7.1.10 Activating/deactivating a display mode
8 Faults and remedies
8.1 Electric and electronic system
8.1.1 Overview of problems on PROFI CAM camera system
9 Maintenance
9.1 Maintenance intervals
9.1.1 Every 10 operating hours or daily
9.2 Camera system
9.2.1 Checking the camera system for dirt
9.2.2 Cleaning the camera
9.2.3 Cleaning the switch box
9.2.4 Cleaning the monitor
10 Putting out of operation and disposal
10.1 General information
10.1.1 Putting out of operation and disposal
11 Technical terms and abbreviations
11.1 Abbreviations
11.1.1 Units
11.1.2 Abbreviations
11.1.3 Technical terms


John Deere Repair Technical Manual PDF
John Deere Diesel Engines POWERTECH 2.9 L Component Technical Manual CTM126 Spanish


John Deere Repair Technical Manual PDF
%20Portuguese&url=https://automanual.net/doc/john-deere-tractors-6300-6500-and-6600-parts-catalog-cq26564-29set05/&media=https://automanual.net/wp-content/uploads/2023/08/john-deere-tractors-6300-6500-and-6600-parts-catalog-cq26564-29set05-portuguese-1.jpg)


John Deere Parts Catalog PDF
John Deere Tractors 6300, 6500, and 6600 Parts Catalog CQ26564 (29SET05) Portuguese
John Deere Parts Catalog PDF
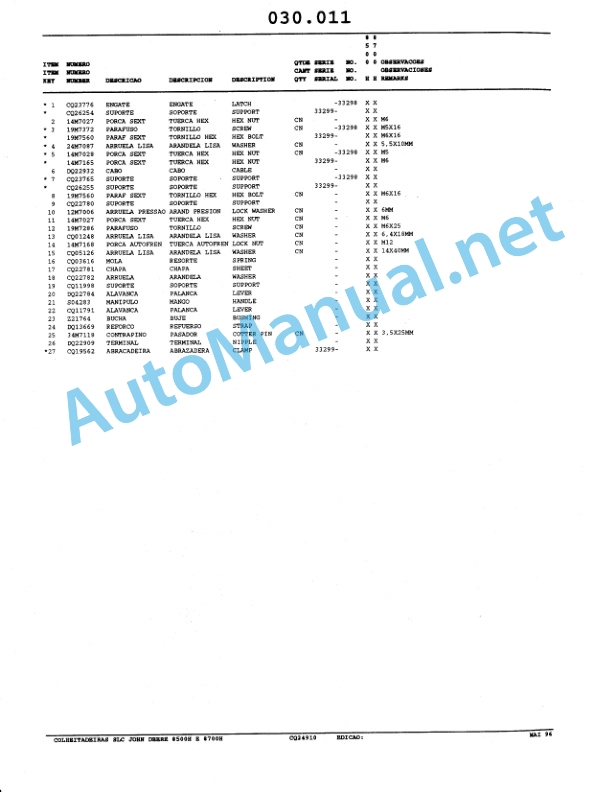
John Deere Harvesters 8500 and 8700 Parts Catalog CPCQ24910 Spanish


John Deere Repair Technical Manual PDF
John Deere Application List Component Technical Manual CTM106819 24AUG20


John Deere Repair Technical Manual PDF
John Deere PowerTech M 10.5 L and 12.5 L Diesel Engines COMPONENT TECHNICAL MANUAL CTM100 10MAY11
%20Component%20Technical%20Manual%20CTM205%20February%202015%20Russian&url=https://automanual.net/doc/john-deere-diesel-engines-4-5l-and-6-8l-component-technical-manual-ctm205-01feb15-russian/&media=https://automanual.net/wp-content/uploads/2023/08/john-deere-diesel-engines-45-l-and-68-l-primary-engine-component-technical-manual-ctm205-february-2015-russian-1.jpg)


John Deere Repair Technical Manual PDF
%20Interim%20Tier%204%20Stage%20III%20B%20Component%20Technical%20Manual%20CTM104754%2025%20July%202012%20Portuguese&url=https://automanual.net/doc/john-deere-powertech-m-6068-oem-diesel-engines-above-130-kw-174-hp-compo-technical-manual-ctm104754-25jul12-portuguese/&media=https://automanual.net/wp-content/uploads/2023/08/john-deere-powertech-6068-engines-above-130-kw-174-hp-interim-tier-4-stage-iii-b-component-technical-manual-ctm104754-25-july-2012-portuguese-1.jpg)

John Deere Repair Technical Manual PDF


John Deere Repair Technical Manual PDF
John Deere Transmission Control Unit Component Technical Manual CTM157 15JUL05
John Deere Repair Technical Manual PDF
- Claas
- Grove
- New Holland
- Komatsu
- Kubota
- John Deere
- Linde
- Bomag
- CASE
- Clark
- JCB
- Jungheinrich
- Linde
- Yale
- Yanmar
- Manitou
- Manitowoc
- CNH
- Doosan
- Fiatagri
- Fiatallis
- Fiatallis Other Manual PDF
- Flexi Coil
- Ford New Holland
- Ford New Holland Other Manual PDF
- Huyndai
- Hypac
- Hyster
- Hyster Service Manual PDF
- Isuzu
- Kobelco
- Kohler
- Krupp
- Lombardini
- Mahindra
- Nuvera
- Perkins
- Sperry New Holland
- Utilev
- Versatile
- ZF