- Claas
- Grove
- New Holland
- Komatsu
- Kubota
- John Deere
- Linde
- Bomag
- CASE
- Clark
- JCB
- Jungheinrich
- Linde
- Yale
- Yanmar
- Manitou
- Manitowoc
- CNH
- Doosan
- Fiatagri
- Fiatallis
- Fiatallis Other Manual PDF
- Flexi Coil
- Ford New Holland
- Ford New Holland Other Manual PDF
- Huyndai
- Hypac
- Hyster
- Hyster Service Manual PDF
- Isuzu
- Kobelco
- Kohler
- Krupp
- Lombardini
- Mahindra
- Nuvera
- Perkins
- Sperry New Holland
- Utilev
- Versatile
- ZF
 Balers Assembly Instruction EN 1")
 Balers Assembly Instruction EN 2")
 Balers Assembly Instruction EN 3")
 Balers Assembly Instruction EN 4")
 Balers Assembly Instruction EN 5")
 Balers Assembly Instruction EN 6")
 Balers Assembly Instruction EN 7")
 Balers Assembly Instruction EN 8")
 Balers Assembly Instruction EN 9")
 Balers Assembly Instruction EN 10")
 Balers Assembly Instruction EN 11")
 Balers Assembly Instruction EN 12")
Claas Quadrant 2200 Rc (735) Balers Assembly Instruction EN
$50.00
- Model: Quadrant 2200 Rc (735) Balers
- Type Of Manual: Assembly Instruction
- Language: EN
- Format: PDF(s)
- Size: 51.9 MB
File List:
00 0290 143 2.pdf
00 0292 437 0.pdf
00 0293 013 0.pdf
00 0296 036 1.pdf
00 0296 048 0.pdf
00 0296 050 0.pdf
00 0296 052 0.pdf
00 0299 079 0.pdf
00 0299 491 1.pdf
00 0300 374 1.pdf
00 1325 214 4.pdf
00 0293 013 0.pdf:
Verstrkungssatz Knoterrahmen
Inhalt – Contents – Contenu – INDEX
Kennzeichnung von Warn- und Gefahren- hinweisen
Allgemeine Sicherheits- und Unfallverhtungs-Vorschriften
Verlassen der Maschine
Einleitung
Ihr CLAAS-Kundendienst
Teileumfang (841 788.0)
Vor dem Schweien
Vor dem Anbringen der Knotenbleche
Knotenbleche schweien
berlastsicherung einstellen
Claas Communicator einschalten und Pressdruck (D) laut Betriebsanleitung einstellen.
Reinforcement kit knotter frame
Marking of warning and danger notes
General safety and accident prevention regulations
Leaving the machine
Introduction
Scope of parts (841 788.0)
Before welding
Before welding the sng
Adjusting the overload protection valve
Switch on the Claas Communicator.
Strengthening kit for the new body
Characterization of the indications on the dangers
General signs for safety and prevention of accidents
Stationing of the machine
Introduction
Your Aprs Vente Service CLAAS
Lot of pieces (841 788.0)
Avant de souder
Soudure de remplisage
Soudure des plats
Rglage de la vanne de surchage
Allumer le Claas Communicator. Adjust the pressure (D) after the notice of use.
Juego de refuerzo para le marque de la nudador
Characteristics of warning and warning indications
General rules relating to safety and accident prevention
Abandon the machine
Introduction
About CLAAS Technical Service
Cantidad de piezas (841 788.0)
Before the soldier
Before assembling the naked chapas
Soltar the naked chapas
Adjust the overcharge safety
Switch the Claas Communicator and adjust the holding pressure (D) according to the instructions to …
Knotter frame reinfor Marking of warning and danger notices
General safety and accident prevention regulations
Leave the car
Introduction
Your CLAAS assistance service
Quantity of pieces (841 788.0)
Before welding
Before applying the tissues
Welding of gussets
Recording of overload protection
Insert the Claas Communicator and adjust the pressure force (D) according to the instructions…
00 0296 036 1.pdf:
Anbauanleitung
Pickup-Sttzrder
Instructions
Kennzeichnung von Warn- und Gefahrenhinweisen
Allgemeine Sicherheits- und Unfallverhtungsvorschriften
Abstellen der Maschine
Bestimmungsgeme Verwendung
Lieferumfang (0845 079.0)
ROLLANT 240/250/254/255 VARIANT 260/280
QUADRANT 2100/2200
Assembly instructions
Pick-up wheels
Introduction
Marking of warning and danger notes
General safety regulations and instructions for the avoidance of accidents
Leaving the machine
Intended use
Scope of parts (0845 079.0)
QUADRANT 2100/2200
Installation instructions
Pickup wheels
Introduction
Characterization of hazard indications
General safety and accident prevention instructions
Machine parking
Use as intended
Parts set (0845 079.0)
ROLLANT 240/250/254/255 VARIANT 260/280
QUADRANT 2100/2200
00 0299 491 1.pdf:
Sicherheitshinweise
Anbauanleitung
Vorbereitung der Maschine 19
Turbofan vormontieren 25
Turbofan anbauen 26
Sicherheitshinweise
Besonders zu beachten
Kennzeichnung von Warn- und Gefahrenhinweisen
Allgemeine Sicherheits- und Unfall_x0004_verhtungs-Vorschriften
Verlassen der Maschine
Bestimmungsgeme Verwendung
Anbauanleitung
Einleitung
Teileumfang
Vorbereitung der Maschine
Maschinen mit Kompressor
Kompressor turns off
Luftfilter turns off
Druckluftleitung abbauen
Maschinen ohne Kompressor
Druckluftleitung abbauen
Oberen Druckluftbehlter und Spann abbauen
Einfachzahnradpumpe abbauen
Turbofan vormontieren
Hydraulische Vormontage des Behlters
Vormontage am Hydrauliklmotor
Druckausgang
Turbofan anbauen
Doppelzahnradpumpe vormontieren und anbauen
Hydrauliklschluche anbauen
Vordere Hydrauliklleitungen anbauen
New Hydrauliklschluche anbauen
Obere Gelenkwelle abbauen
Querbleche und Getriebehalter abbauen
Turbogeblse anbauen
Ventil anbauen
Seitliche Hydrauliklleitungen anbauen
Gelenkwelle anbauen
Turbogeblseschutze anbauen
Hydraulikltanks full
Behlter des hydraulischen Kreislaufs fllen
Getriebel auffllen
Probelauf vorbereiten und durchfhren
Safety regulations
Installation instructions
Machine preparations 19
Pre-fitting turbofan 25
Turbofan fitting 26
Safety regulations
Important notes
Marking of warning and danger notes
General safety reguallation instructions
Introduction
Scope of parts
Machine preparations
Machines with compressor
Removing the compressor
Remove the air filter
Remove air line
Machines without compressor
Remove air line
Remove the top compressed air reservoir and the clamping belts
Remove air line with nozzles
Remove single gear pump
Turbofan pre-fitting
Hydraulic pre-fitting of tank
Pre-fitting on hydraulic oil motor
Pressure outlet
Turbofan fitting
Pre-assemble and mountthe duplex gear pump
Attach hydraulic oil hoses
Attach front hydraulic oil lines
Attach new hydraulic oil hoses
Remove the top propshaft
Remove the side guards and the gear bracket
Attach turbo blower
Attach valve
Attach hydraulic oil lines from the side
Assemble the propshaft
Fitting turbo fan guards
Fill hydraulic oil tanks
Filling hydraulic circuit tank
Top up gear oil
Prepare and perform a test run
Security signs
Assembly instructions
Preparation of the machine 19
Preassembly of the turbofan 25
Montage of the turbofan 26
Security signs
Characterization of the indications on the dangers
General signs for safety and prevention of accidents
Stationing of the machine
Usage compliant with destination
Assembly instructions
Introduction
Lot of pieces (0841781.1)
Preparation of the machine
Machines with compressor
Disassembly of the compressor
Remove the air filter
Dpose de la conduite pneumatique
Machines without compresser
Dpose de la conduite pneumatique
Remove the upper compressed air reservoir and the tightening rings
Stop driving tires with buses
Remove the pump for simple assembly
Preassembly of the turbofan
Hydraulic pre-assembly of the reservoir
Pre-assembly at the level of the hydraulic motor
Pressure relief
Montage of the turbon
Pre-assembly and assembly of the double-engin Assembly of hydraulic hoses
Assembly of front hydraulic conduits
Assembly of new hydraulic hoses
Place the shaft on the upper cardan
Place the transversal tles and the box supports
Montage of the Turbofan
Montage du bloc hydraulique
Assembly of lateral hydraulic conduits
Montage of the cardan shaft
Assembly of the Turbofan protection plates
Refilling the Turbofan’s hydraulic fluid reservoir
Refilling the hydraulic circuit reservoir
Remise niveau de l’oile de transmission
Function test
Safety instructions
Assembly instructions
Preparing the machine 19
Pre-assemble the Turbofan 25
Mount the Turbofan 26
Safety instructions
Important warnings
Marking of warning and danger notices
General safety and accident prevention regulations
Leave the car
Intended use
Assembly instructions
Introduction
Quantity of pieces
Preparing the machine
Machines with compressor Disassembly of the compressor
Removing ther
Dismantling the compressed air line
Machines without compressor
Dismantling the compressed air line
Removing the top compressed air tank and clamping straps
Dismantling the compressed air pipeline with nozzles
Disassembly of the simple gear pump
Pre-assemble the Turbofan
Hydraulic pre-assembly of the tank
Pre-assembly in the hydraulic motor
Pressure outlet
Mount the Turbofan
Pre-assembly and assembly of the double gear pump
Fit the hydraulic hoses
Fitting the front hydraulic lines
Fitting new hydraulic hoses
Removing the upper articulated shaft
Removal of the transverse plates and the mechanism support
Assembly of the turbofan
Valve assembly
Installation of the lateral hydraulic pipes
Mounting the knuckle shaft
Fit the turbofan fitting
Refilling the hydraulic tanks
Fill the hydraulic circuit tank
Topping up oil for mechanisms
Preparation and execution of a test run
Safety instructions
Instructions for assembly
Preparing the machine 19
Preassembly of Turbofan 25
Install the Turbofan 26
Safety instructions
Important note
Characteristics of warning and warning indications
General rules relating to safety and accident prevention
Abandon the machine
Proper use of the machine
Instructions for assembly
Introduction
Cantidad de piezas
Preparing the machine
Machines with compressor
Disassemble the compressor
Remove the air filter
Disassemble the compressed air tube
Machines without understanding
Disassemble the compressed air tube
Remove the upper pressure air storage and the suction straps
Remove the compressed air tube together with the tubes
Disassemble the simple gear bomb
Turbofan pre-assembly
Hydrulico preassembly of the warehouse
Installation on the hydraulic power motor
Salida de presin
Install the Turbofan
Pre-aemble the duplex toothed wheel bomb and assemble it
oses for the hydraulic oil
Fit the hinged tubes for the hydraulic oil
Install new hoses for the hydraulic oil
Remove the upper transmission shaft
Disassemble the transversal chapas and the attachment support
Install the turbocharger
Fit the valve
Fit the side tubes for the hydraulic oil
Mount the transmission shaft
Installation of the turbocharger protections
Remove the hydraulic oil stores
Load the hydraulic circuit storage
Repost aceite para engranajes
Prepare and carry out a functional test


%20Balers%20Assembly%20Instruction%20EN&url=https://automanual.net/doc/claas-quadrant-2200-rc-735-balers-assembly-instruction-en/&media=https://automanual.net/wp-content/uploads/2024/04/claas-quadrant-2200-rc-735-balers-assembly-instruction-en-1.jpg)

John Deere Repair Technical Manual PDF
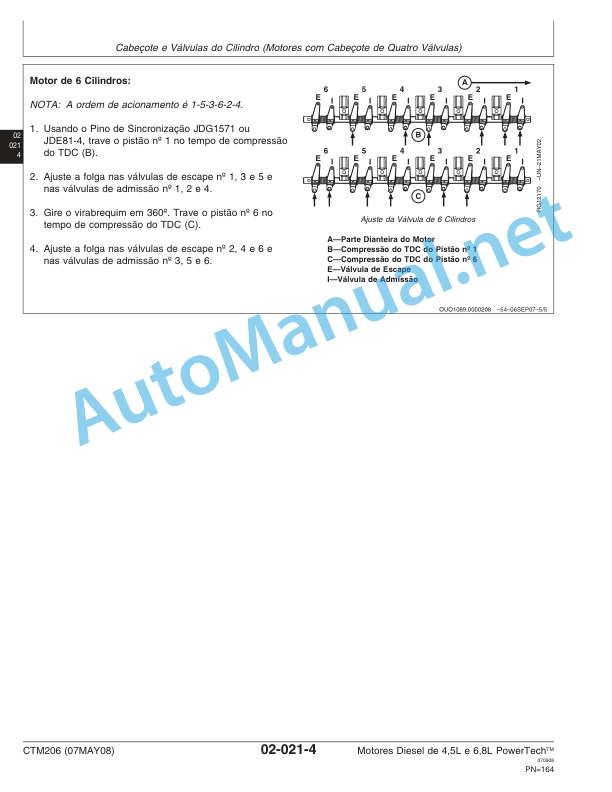
John Deere Diesel Engines PowerTech 4.5L and 6.8L – Motor Base Technical Manual 07MAY08 Portuguese
%20Interim%20Tier%204%20Stage%20III%20B%20Component%20Technical%20Manual%20CTM104754%2025%20July%202012%20Portuguese&url=https://automanual.net/doc/john-deere-powertech-m-6068-oem-diesel-engines-above-130-kw-174-hp-compo-technical-manual-ctm104754-25jul12-portuguese/&media=https://automanual.net/wp-content/uploads/2023/08/john-deere-powertech-6068-engines-above-130-kw-174-hp-interim-tier-4-stage-iii-b-component-technical-manual-ctm104754-25-july-2012-portuguese-1.jpg)

John Deere Repair Technical Manual PDF


John Deere Repair Technical Manual PDF


John Deere Repair Technical Manual PDF
John Deere 18-Speed PST Repair Manual Component Technical Manual CTM168 10DEC07


John Deere Repair Technical Manual PDF


&url=https://automanual.net/doc/john-deere-16-18-20-and-24hp-onan-engines-component-technical-manual-ctm2-19apr90/&media=https://automanual.net/wp-content/uploads/2023/08/john-deere-16-18-20-and-24hp-onan-engines-component-technical-manual-ctm2-19apr90-1.jpg)


John Deere Repair Technical Manual PDF
John Deere 16, 18, 20 and 24HP Onan Engines Component Technical Manual CTM2 (19APR90)


John Deere Parts Catalog PDF
John Deere Tractors 7500 Parts Catalog CPCQ26568 30 Jan 02 Portuguese
John Deere Repair Technical Manual PDF
- Claas
- Grove
- New Holland
- Komatsu
- Kubota
- John Deere
- Linde
- Bomag
- CASE
- Clark
- JCB
- Jungheinrich
- Linde
- Yale
- Yanmar
- Manitou
- Manitowoc
- CNH
- Doosan
- Fiatagri
- Fiatallis
- Fiatallis Other Manual PDF
- Flexi Coil
- Ford New Holland
- Ford New Holland Other Manual PDF
- Huyndai
- Hypac
- Hyster
- Hyster Service Manual PDF
- Isuzu
- Kobelco
- Kohler
- Krupp
- Lombardini
- Mahindra
- Nuvera
- Perkins
- Sperry New Holland
- Utilev
- Versatile
- ZF