- Claas
- Grove
- New Holland
- Komatsu
- Kubota
- John Deere
- Linde
- Bomag
- CASE
- Clark
- JCB
- Jungheinrich
- Linde
- Yale
- Yanmar
- Manitou
- Manitowoc
- CNH
- Doosan
- Fiatagri
- Fiatallis
- Fiatallis Other Manual PDF
- Flexi Coil
- Ford New Holland
- Ford New Holland Other Manual PDF
- Huyndai
- Hypac
- Hyster
- Hyster Service Manual PDF
- Isuzu
- Kobelco
- Kohler
- Krupp
- Lombardini
- Mahindra
- Nuvera
- Perkins
- Sperry New Holland
- Utilev
- Versatile
- ZF
 Balers Operator Manual EN 1")
 Balers Operator Manual EN 2")
 Balers Operator Manual EN 3")
 Balers Operator Manual EN 4")
 Balers Operator Manual EN 5")
 Balers Operator Manual EN 6")
 Balers Operator Manual EN 7")
 Balers Operator Manual EN 8")
 Balers Operator Manual EN 9")
Claas Quadrant 3400 (740) Balers Operator Manual EN
$50.00
- Model: Quadrant 3400 (740) Balers
- Type Of Manual: Operator Manual
- Language: EN
- Format: PDF(s)
- Size: 108 MB
File List:
00 0288 014 3.pdf
00 0292 625 4.pdf
00 0293 009 9.pdf
00 0295 951 4.pdf
00 0296 876 0.pdf
00 0301 051 0.pdf
00 2348 408 0.pdf
00 2348 427 0.pdf
00 0288 014 3.pdf:
EASY on board app
Table of contents
1 Introduction
1.1 General information
1.1.1 Validity of the manual
1.1.2 Information about this Operator’s Manual
1.1.3 Symbols and notes
1.1.4 Qualified specialist workshop
1.1.5 Maintenance notes
1.1.6 Notes on warranty
1.1.7 Spare parts and technical questions
1.1.8 Technical requirements
1.2 Intended use
1.2.1 Intended use
1.2.2 Reasonably foreseeable misuse
2.1 Identifying warnings
2.1.1 Hazard signs
2.1.2 Signal word
2.2 Safety rules
2.2.1 Meaning of Operator’s Manual
2.2.2 Requirements made on all persons working with the product
2.2.3 Hazard areas
2.2.4 Check interactions with self-propelled machines / tractors and implements
2.2.5 Structural changes
2.2.6 Optional equipment and spare parts
2.2.7 Technical status
2.2.8 Hazard caused by damage to the product
2.2.9 Visibility of work area
2.2.10 Glare and reflections
2.2.11 Unintentional triggering of functions
2.2.12 Hazards caused by signal tones
2.2.13 Unauthorised use
2.2.14 Use of mobile terminal outside the cab
2.2.15 Follow the safety instructions
2.2.16 Respecting technical limit values
2.2.17 Preparing the product for road travel
2.2.18 Hazards when driving on the road and on the field
2.2.19 Hazards when driving on the road with an ISOBUS implement
2.2.20 Switching off the mobile terminal while driving
2.2.21 Hazards from disturbance of WLAN environment
2.2.22 Hazards from covering up the App
2.2.23 Hazards caused by malfunctions of the app
2.2.24 Raised machine parts and loads
3 Product description
3.1 Overview and method of operation
3.1.1 Overview of CWI
3.1.2 Functions of CWI
3.2 Identification plates and identification numbers
3.2.1 CWI identification plate
3.3 Information on the product
3.3.1 Factory settings
3.3.2 Software and hardware version
3.3.3 Seal on the CWI
4 Operating and display elements
4.1 CLAAS Wireless Interface (CWI)
4.1.1 CWI operating elements
4.2 CWI Setup App
4.2.1 Overview of screen
4.2.2 Buttons
4.2.3
4.2.4
4.2.5
5 Technical specifications
5.1 CLAAS Wireless Interface (CWI)
5.1.1 Specification
6 Preparing the product
6.1 Installing the product
6.1.1 Installing the CWI Setup app
6.1.2 Installing the EASY on board app
6.1.3 Connecting the tablet
7 Operation
7.1 Initial operation
7.1.1 Establishing the WLAN connection for the first time
7.1.2 Changing factory settings
7.1.3 Establishing the WLAN connection
7.2 CWI Setup App
7.2.1 Calling up menus
7.2.2 Establishing a secure data connection
7.2.3 Deleting a secure data connection
7.2.4 Displaying the software version
7.3 CWI Setup – Settings
7.3.1 Changing settings
7.3.2 Switching LEDs on and off
7.4 CWI setup – Advanced settings
7.4.1 Deleting the connection partner in CWI
7.4.2 Deleting the connection partner on the tablet
7.4.3 Resetting the CWI to factory settings
7.4.4 Resetting the tablet to factory settings
7.4.5 Switching the CAN filter on and off
7.5 EASY on board App
7.5.1 Launching Operator’s Manual
8 Faults and remedies
8.1 Overview of problems
8.1.1 CWI faults
8.1.2 Fault message: USB charging connection was disconnected
8.1.3 Fault message: Tablet outside WLAN reception area
8.1.4 Fault message: Screen locked
9 Maintenance
9.1 Maintenance schedules
9.1.1 Daily
9.2 Tablet
9.2.1 Cleaning the tablet
9.2.2 Downloading software updates
9.2.3 Updating the operating system
10 Putting out of operation and disposal
10.1 General information
10.1.1 Decommissioning and disposal
11 EC declaration of conformity
11.1 CLAAS Wireless Interface (CWI)
11.1.1 EU Declaration of conformity
12 Technical terms and abbreviations
12.1 Terms and explanations
12.1.1 Abbreviations
12.1.2 Technical terms
00 0292 625 4.pdf:
COMMUNICATOR II
Table of contents
1 Introduction
1.1 Notes on the manual
1.1.1 Validity of manual
1.1.2 Information about this Operator’s Manual
1.1.3 Symbols and notes
1.1.4 Optional equipment
1.1.5 Qualified specialist workshop
1.1.6 Maintenance notes
1.1.7 Notes on warranty
1.1.8 Spare parts and technical questions
1.2 Intended use
1.2.1 Intended use
1.2.2 Reasonably foreseeable misuse
2.1 Identifying warnings
2.1.1 Hazard signs
2.1.2 Signal word
2.2 Safety rules
2.2.1 Meaning of Operator’s Manual
2.2.2 Requirements made on all persons working with the product
2.2.3 Hazard areas
Hazard areas
2.2.4 Interaction between the control terminal and the machine or tractor
2.2.5 Structural changes
2.2.6 Optional equipment and spare parts
2.2.7 Technical status
2.2.8 Danger from damage to the machine
2.2.9 Complying with technical limit values
2.2.10 Preparing the product for road travel
2.2.11 Hazards when driving on the road and in the field
2.2.12 Hazards when driving on the road with an ISOBUS implement
2.2.13 Switching off the terminal while driving
2.2.14 Electrocution by electrical system
2.2.15 Only carry out work on the machine when it is stopped
2.2.16 Maintenance operations and repair work
2.2.17 Raised machine parts and loads
2.2.18 Welding work prohibited
3 Product description
3.1 Overview and method of operation
3.1.1 Overview of COMMUNICATOR II
3.1.2 Function of COMMUNICATOR II
3.2 Identification plates and identification numbers
3.2.1 Identification plate of COMMUNICATOR II
4 Operating and display elements
4.1 COMMUNICATOR II
4.1.1 Terminal
4.1.2 Terminal program
4.2 Universal terminal menu structure (service)
4.2.1 Main menu of universal terminal
4.2.2
4.2.3
4.2.4
4.2.5
4.3 Job processing (task) menu structure
4.3.1 Job processing main menu
4.3.2
4.3.3
4.3.4
4.3.5
4.3.6
5 Technical specifications
5.1 COMMUNICATOR II
5.1.1 Specification
6 Preparing the product
6.1 Switching off and securing the machine
6.1.1 Shut down and secure the machine
7 Operation
7.1 Switching COMMUNICATOR II on/off
7.1.1 Switching COMMUNICATOR II on
7.1.2 Selecting the application
7.1.3 Switching off COMMUNICATOR II
7.2 Programmable keys
7.2.1 Displaying the key assignment
7.2.2 Creating a key assignment
Step 1: Selecting the control and the key
00 0293 009 9.pdf:
QUADRANT 3400 RotoFeedQUADRANT 3400 RotoCut
Table of contents
1 To this operator’s manual
1.1 General Information
1.1.1 Manual validity
1.1.2 Using the manual
1.1.3 Technical specifications
2.1 General Information
2.1.1 General points
2.1.2 Using in line with intended usage
2.1.3 Reasonably foreseeable improper usage
2.1.4 Safety advice
2.1.5 Definition of hazard information
2.1.6 Driving on the road
2.1.7 Accident prevention
2.1.8 Waste disposal
2.1.9 Residual risks
2.2 Safety decals
2.2.1 Description
2.2.2 Location of safety stickers
2.3 Safety equipment
2.3.1 Indicator lights
2.3.2 Reflective equipment
2.3.3 Jack stand
2.3.4 Chocks
2.3.5 Parking brake
2.3.6 Flywheel brake
2.3.7 Locking the pick-up
2.3.8 Warning beacon
3 Machine description
3.1 Existing models
3.1.1 Machine description
3.2 Overview and functions
3.2.1 Left-hand side
3.2.2 Right-hand side
3.3 Working and service areas
3.3.1 General points
3.3.2 Front section of the baler
3.3.3 Upper section of the baler
3.4 Identification plate and serial number
3.4.1 Replacement parts and technical information
3.4.2 Position of identification plates
3.4.3 Machine identification plate
3.4.4 Drawbar identification plate
3.5 General operating principle
3.5.1 Baling cycle
3.6 Control terminal
3.6.1 Control terminal
3.6.2 ICT – Implement Controls Tractor
3.6.3 ISOBUS connection
3.7 Transmission and drive
3.7.1 Power transmission
3.7.2 Slip clutch
3.7.3 Main drive
3.7.4 Rotor drive
3.7.5 Feed rake drive
3.7.6 Knotter drive
3.8 Crop feeding
3.8.1 Pick-up
3.8.2 Flattening rollers
3.9 Feeder unit
3.9.1 Rotor
3.9.2 RotoCut cutting unit (option)
3.9.3 Precompression chamber
3.9.4 Feed rake
3.10 Baling system
3.10.1 Piston and bale chamber
3.11 Tying system
3.11.1 Tying process
3.11.2 Twine boxes
3.11.3 Twine fault indicator
3.11.4 Needles
3.11.5 Knotters
3.11.6 Turbofan
3.11.7 Compressed air cleaning device (Option)
3.12 Bale discharge
3.12.1 2-way valve
3.12.2 Bale ramp
3.12.3 Bale ramp position detector
3.12.4 Bale discharge sensor (option)
3.12.5 Moisture sensor (option)
3.12.6 Bale ejector
3.13 Central lubrication
3.13.1 Automatic central lubrication
3.13.2 Extra lubrication
3.14.1 General points
3.14.2 Bogie axle
3.14.3 Steered bogie axle
3.15 Service brake
3.15.1 General points
3.15.2 Pneumatic brakes
3.15.3 Hydraulic brakes
3.15.4 Active hydraulic brakes
3.16 Hydraulic system
3.16.1 Hydraulic oil reservoir
3.16.2 Load Sensing
3.17 Equipment
3.17.1 Ladder
3.17.2 Front ladder support
3.17.3 Storage cabinet (option)
3.17.4 Electronic module
3.17.5 12 V socket
4 Operating and control elements
4.1 CLAAS COMMUNICATOR
4.1.1 Presentation
4.1.2 Description of the CLAAS COMMUNICATOR Use menus
4.2 CLAAS OPERATOR
4.2.1 Presentation
4.3 ISOBUS terminal
4.3.1 Presentation
4.3.2 General points
5 Technical specifications
5.1.1 General points
5.1.2 Dimensions
5.1.3 Weight
5.1.4 Hitching
5.1.5 Universal drive shaft
5.1.6 Feeding and baling
5.1.7 Tying device
5.1.8 Wheels
5.1.9 Braking
5.1.10 Hydraulic circuit
5.1.11 Greasing and lubrication
5.1.12 Bolt tightening torques
5.1.13 Noise level
5.2 Safety devices
5.2.1 Shear bolts
5.2.2 Overload clutch
5.3 Tractor
5.3.1 Power required
5.3.2 Power take-off
5.3.3 Hitching
5.3.4 Electrical connections
5.3.5 Hydraulic connections
5.3.6 Hydraulic oil and circuit
5.3.7 Braking
6 Machine preparation
6.1 General Information
6.1.1 Before first use
6.1.2 Checking the equipment
6.2 Universal drive shaft
6.2.1 Safety advice
6.2.2 Overlap of the universal drive shaft
6.2.3 Adapting the length of the universal drive shaft
6.2.4 Double articulation wide angle universal drive shaft
6.2.5 Fitting the universal drive shaft
6.3 Coupling frame
6.3.1 Recommendations
6.3.2 Coupling types
6.3.3 Securing the coupling
6.3.4 Adapting jaw drawbar/swinging drawbar
6.3.5 Hitching the baler to the tractor
6.3.6 Fitting the universal drive shaft
6.4 Hydraulic connections
6.4.1 Hose identification
6.4.2 Jack stand and pick-up
6.4.3 Tractor fitted with a Load Sensing hydraulic system with Power Beyond socket
6.4.4 Tractor equipped with a hydraulic system with constant output and Tractor fitted with a Load Sensing hydraulic system without Power Beyond socket
6.4.5 Tractor fitted with a hydraulic system with constant pressure
6.4.6 Steered bogie axle (option)
6.5 Electrical connections
6.5.1 Identifying the electrical cables
6.5.2 Lighting
6.5.3 Battery cable (optional)
6.5.4 Power supply for the baler and the CLAAS COMMUNICATOR
6.5.5 Power supply for the baler and the CLAAS COMMUNICATOR – Baler equipped with the TELEMATICS on Implement option
6.5.6 Power supply for the baler using the ISOBUS cable
6.6 Service brake
6.6.1 Hydraulic brakes
6.6.2 Active hydraulic brakes
6.6.3 Pneumatic brakes
6.7.1 Twine quality
6.7.2 Preparation
6.7.3 Adjusting the twine tensioner
6.7.4 Fitting the twine
6.7.5 Fitting the twine in the knotters
6.7.6 Checking the settings
6.8 Cutting unit
6.8.1 Safety advice
6.8.2 Checking
6.8.3 Fitting the knives
6.8.4 Fitting the dummy knives (optional)
6.8.5 Unused knives and dummy knives
6.9 Loading the machine
6.9.1 Raising the baler
6.9.2 Lashing the baler
7 Operation
7.1 General Information
7.1.1 Baler user
7.1.2 Opening the doors and housings
7.2 Travelling with the baler
7.2.1 Checking the equipment
7.2.2 Preparing for transportation
7.2.3 Travelling on the road
7.2.4 Arriving at the field
7.2.5 Driving in fields
7.2.6 Parking
7.3 Before each usage
7.3.1 Reminders
7.3.2 Universal drive shaft
7.3.3 Baler maintenance
7.4 Commissioning in the field
7.4.1 User advice
7.4.2 Starting the machine
Universal drive shaft
Crop conveying system
After a machine stoppage
7.4.3 Bale ramp
7.4.4 Bale ejector
7.4.5 Steered axle (option)
7.5 Pick-up
7.5.1 Important
7.5.2 Pivoting pick-up wheels
7.5.3 Folding pick-up wheels
7.5.4 Pick-up height
7.5.5 Flattening rollers
7.6 Cutting unit
7.6.1 RotoCut cutting unit (option)
7.7 Bale parameters
7.7.1 Baler settings
7.8 CLAAS COMMUNICATOR
7.8.1 Baling process
7.8.2 Baling pressure (RotoCut option)
7.8.3 Bale length
7.8.4 Precompression chamber retention force
7.8.5 Feed rake load
7.8.6 Crop conveying system
7.8.7 Cutting unit (option)
7.8.8 Selecting the number of knives
7.8.9 Automatic knife cleaning (depending on equipment)
7.8.10 Cutting frame
7.8.11 Bale chamber filling indicator (option)
7.8.12 Manually activating the tying process
7.8.13 Automatic lubrication
7.8.14 Pick-up rotation speed
7.8.15 Counters Menu
Resetting the maintenance indicator
7.8.16 Choice of job
7.8.17 Job name
7.8.18 Printing the customer or job data
7.8.19 TELEMATICS on Implement (optional)
7.8.20 Task management (option)
7.8.21 Faults
7.8.22 ICT – Interface status
7.8.23 ICT CRUISE PILOT (option)
7.8.24 ICT Auto PTO Stop (option)
7.8.25 ICT camera (option)
7.8.26 Functions that can be assigned to softkeys
7.9 Unblocking the baler
7.9.1 How can blockages be avoided?
7.9.2 Safety advice
7.9.3 Pick-up blockages
7.9.4 Rotor blockages
7.10 After use
7.10.1 Reminders
7.10.2 Securing the baler
7.10.3 Unhitching the baler
7.10.4 Daily checks
7.10.5 Daily cleaning
8 Faults and remedies
8.1.1 Causes of tying faults
8.1.2 Solutions of tying faults
8.2 Central lubrication
8.2.1 Solutions for central lubrication faults
8.3 Control terminal
8.3.1 Faults displayed on the control terminal
8.3.2 Main drive and system
8.3.3 Conveying system
8.3.4 Hydraulic system
8.3.5 Bale ramp
8.3.6 No twine
8.3.7 Tying faults
8.3.8 ICT – CRUISE PILOT faults
8.3.9 ICT – Auto PTO Stop faults
8.4 Electrical / Electronic equipment
8.4.1 Electric circuit
9 Maintenance
9.1 General maintenance Information
9.1.1 Maintenance and safety advice
9.1.2 Wheels and tyres
9.1.3 Brakes
9.1.4 Hydraulic circuit
9.1.5 V-belts
9.1.6 Chains
9.1.7 Baling and tying device
9.1.8 Universal drive shaft
9.1.9 Hitching
9.1.10 Cutting unit
9.1.11 Safety devices
9.1.12 Bolts and nuts
9.1.13 Lubrication and greasing
9.1.14 Inductive sensors
9.1.15 Welding work
9.1.16 Replacement parts
9.2 Lubricants charts
9.2.1 Lubricants
9.3 Maintenance schedules
9.3.1 Maintenance operations before gathering crop
9.3.2 Maintenance operations after the first 10 hours of operation
9.3.3 Maintenance operations after the first 50 hours of operation
9.3.4 Maintenance operations after the first 100 hours of operation
9.3.5 Maintenance operations after the first 250 hours of operation
9.3.6 Maintenance operations every 10 hours of operation or every day
9.3.7 Maintenance operations every 50 hours of operation
9.3.8 Maintenance operations every 100 hours of operation
9.3.9 Maintenance operations every 250 hours of operation
9.3.10 Maintenance operations annually or every 500 hours of operation
9.3.11 Maintenance operations every 15,000 bales
9.3.12 Maintenance operations if necessary
9.4 Basic operations
9.4.1 Manually running the machine
9.4.2 Baling piston at front dead centre
9.4.3 Manually starting tying
9.5 Basic settings
9.5.1 Baler basic settings
Machine timing check
Knotter shaft timing
Setting the feed rake control cylinder control
Setting the round needle tie rods control
Setting the flat needle tie rods control
Feed rake shaft setting
Feed rake timing
9.5.2 Feed rake timing
9.5.3 Feed rake control and position
Feed rake control levers
Setting the feed rake control levers
Feed rake position
Adjusting the position of the feed rake
9.5.4 Feed rake control cylinder
Feed rake control cylinder check
Adjusting the feed rake control cylinder
9.5.5 Sensors
9.5.6 Counter-knives
9.5.7 Setting the feed rake drive gearbox stop
9.6 Maintenance operations gearbox
9.6.1 Main gearbox
9.6.2 Main drive gearbox mounting
9.6.3 Drawbar angle drive gearbox
9.6.4 Rotor drive gearbox
9.6.5 Feed rake drive gearbox
9.6.6 Knotter drive gearbox
9.6.7 V-belts
9.6.8 Flywheel brake
9.7 Maintenance operations clutch
9.7.1 Slip clutch
9.7.2 Main drive shear bolt
9.7.3 Feed rake drive shear bolt
9.7.4 Feed rake drive connecting bolt
9.7.5 Knotter shaft drive shear bolt
9.8 Maintenance operations axle and wheels
9.8.1 Bogie axle
9.8.2 Steered bogie axle
9.8.3 Checking the wheel tightness
9.8.4 Changing the wheels
9.8.5 Wheel hub
9.8.6 Checking the tyres
9.9 Maintenance operations brake
9.9.1 Hydraulic brakes and active hydraulic brakes
9.9.2 Pneumatic brakes
9.9.3 Replacing the brake linings
9.10 Maintenance operations hydraulic system
9.10.1 Hydraulic reservoir
9.10.2 Protection from pressure overload
9.10.3 Hydraulic pressure accumulator
9.11 Maintenance operations pick-up
9.11.1 Pick-up
9.12 Maintenance operations tying
9.12.1 Needles
9.12.2 Changing the needle brake pads
Removing a needle brake
Disassembling a needle brake
Assembling a needle brake
Fitting a needle brake
9.12.3 Adjusting the twine tensioner
9.12.4 Adjusting the needle eyes
9.12.5 Knotter settings
9.12.6 Tying release setting
9.12.7 Changing the knotter brake pads
Removing the knotter brake
Disassembling the knotter brake
Assembling the knotter brake
Fitting the knotter brake
9.12.8 Turbofan
9.12.9 Knotter cleaning device (Optional)
9.12.10 Knotter cleaning device air tank
9.13 Maintenance operations hitch
9.13.1 Check the hitch coupling mounting
9.13.2 Checking the drawbar head mounting
9.14 Maintenance operations central lubrication system
9.14.1 Automatic central lubrication
9.15 Lubrication chart
9.15.1 Lubrication intervals
9.15.2 Universal drive shaft
9.15.3 Lubrication points – 10 h
9.15.4 Lubrication points – 50 h
9.15.5 Lubrication points – 100 h
9.16 Winter storage
9.16.1 General points
9.16.2 Cleaning
9.16.3 Lubricating
9.16.4 Maintenance
9.16.5 Storage
10 Placing out of operation and disposal
10.1 General Information
10.1.1 Putting out of operation and disposal
11 EC-declaration of conformity
11.1 General Information
11.1.1 Declaration of Conformity for EC
11.1.2 Declaration of Conformity for EC
00 0296 876 0.pdf:
QUADRANT 3400 RotoFeedQUADRANT 3400 RotoCut
Table of contents
1 To this Operator’s Manual
1.1 General Information
1.1.1 Manual validity
2 Machine description
2.1 Control terminal
2.1.1 ICT – Implement Controls Tractor
3 Operating and control elements
3.1 CLAAS COMMUNICATOR
3.1.1 Description of the CLAAS COMMUNICATOR Use menus
4 Operation
4.1 CLAAS COMMUNICATOR
4.1.1 Baling process
4.1.2 Baling pressure (RotoCut option)
4.1.3 Bale length
4.1.4 Precompression chamber retention force
4.1.5 Feed rake load
4.1.6 Crop conveying system
4.1.7 Cutting unit (option)
4.1.8 Selecting the number of knives
4.1.9 Automatic knife cleaning (depending on equipment)
4.1.10 Cutting frame
4.1.11 Bale chamber filling indicator (option)
4.1.12 Manually activating the tying process
4.1.13 Automatic lubrication
4.1.14 Pick-up rotation speed
4.1.15 Counters Menu
Resetting the maintenance indicator
4.1.16 Choice of job
4.1.17 Job name
4.1.18 Printing the customer or job data
4.1.19 TELEMATICS on Implement (optional)
4.1.20 Task management (option)
4.1.21 Faults
4.1.22 ICT – Interface status
4.1.23 ICT CRUISE PILOT (option)
4.1.24 ICT Auto PTO Stop (option)
4.1.25 ICT camera (option)
4.1.26 Functions that can be assigned to softkeys
5 Faults and remedies
5.1 Control terminal
5.1.1 ICT – CRUISE PILOT faults
5.1.2 ICT – Auto PTO Stop faults
00 0301 051 0.pdf:
PROFI CAM 3
Table of contents
1 Introduction
1.1 Notes on the manual
1.1.1 Validity of manual
1.1.2 Information about this Operator’s Manual
1.1.3 Symbols and notes
1.1.4 Optional equipment
1.1.5 Qualified specialist workshop
1.1.6 Maintenance information
1.1.7 Warranty notes
1.1.8 Spare parts and technical questions
1.2 Intended use
1.2.1 Intended use
1.2.2 Reasonably foreseeable misuse
2.1 Identifying warnings
2.1.1 Hazard signs
2.1.2 Signal word
2.2 Safety rules
2.2.1 Meaning of Operator’s Manual
2.2.2 Observing safety decals and warnings
2.2.3 Optional equipment and spare parts
3 Product description
3.1 Overview and method of operation
3.1.1 How the PROFI CAM works
3.2 Identification plates and identification number
3.2.1 Position of identification plates
3.2.2 Explanation of PROFI CAM identification plate
3.3 Information on the product
3.3.1 CE marking
4 Operating and control elements
4.1 Camera system
4.1.1 Camera system monitor
4.2 Menu structure
4.2.1 Main menu
4.2.2
4.2.3
4.2.4
4.2.5
4.2.6
5 Technical specifications
5.1 PROFI CAM
5.1.1 Monitor
5.1.2 Camera
5.1.3 Switch box
5.1.4 Degree of protection against foreign bodies and water
6 Preparing the product
6.1 Shutting down and securing the machine
6.1.1 Switching off and securing the machine
6.2 Prior to operation
6.2.1 Carry out prior to operation
6.2.2 Installing the sun protection
6.2.3 Aligning the camera
6.2.4 Connecting the camera electrics
7 Operation
7.1 Monitor
7.1.1 Switching on the monitor
7.1.2 Calling up the menu
7.1.3 Setting a menu item
7.1.4 Setting the image orientation
7.1.5 Setting automatic screen darkening
7.1.6 Image mirroring
7.1.7 Setting the trigger view
7.1.8 Setting the follow-up time for trigger view
7.1.9 Setting the display mode
7.1.10 Activating/deactivating a display mode
8 Faults and remedies
8.1 Electrical and electronic system
8.1.1 Overview of problems on PROFI CAM camera system
8.1.2 Replacing the switch box fuse
9 Maintenance
9.1 Maintenance intervals
9.1.1 Every 10 operating hours or daily
9.2 Camera system
9.2.1 Checking the camera system for dirt
9.2.2 Cleaning the camera
9.2.3 Cleaning the switch box
9.2.4 Cleaning the monitor
10 Placing out of operation and disposal
10.1 General Information
10.1.1 Putting out of operation and disposal
11 Technical terms and abbreviations
11.1 Abbreviations
11.1.1 Units
11.1.2 Abbreviations
11.1.3 Technical terms
00 2348 408 0.pdf:
Table of contents
1 Introduction
1.1 General information
1.1.1 Validity of the manual
1.1.2 Information about this Operator’s Manual
1.1.3 Symbols and notes
1.2 Intended use
1.2.1 Intended use
1.2.2 Reasonably foreseeable misuse
2.1 Safety rules
2.1.1 General safety and accident prevention regulations
2.1.2 Interaction between terminal and machine or tractor
2.1.3 Electrocution by electrical system
3 Product description
3.1 Overview and method of operation
3.1.1 Overview of CEMIS 100
3.1.2 Function principle of CEMIS 100
3.2 Identification plates and identification numbers
3.2.1 Spare parts and technical questions
3.2.2 Identification plate of CEMIS 100
4 Operating and display elements
4.1 CEMIS 100
4.1.1 User interface for LINER
4.1.2 User interface for ROLLANT
4.1.3 User interface for UNIWRAP
5 Technical specifications
5.1 CEMIS 100
5.1.1 Specification
6 Operation
6.1 CEMIS 100
6.1.1 Operating the CEMIS 100
6.1.2 Switching CEMIS 100 on
6.1.3 Switching CEMIS 100 off
7 Maintenance
7.1 CEMIS 100
7.1.1 Daily
8 Putting out of operation and disposal
8.1 General information
8.1.1 Removal from service and disposal
9 Technical terms and abbreviations
9.1 Terms and explanations
9.1.1 Technical words
9.1.2 Abbreviations
00 2348 427 0.pdf:
Table of contents
1 Introduction
1.1 General information
1.1.1 Validity of the manual
1.1.2 Information about this Operator’s Manual
1.1.3 Symbols and notes
1.2 Intended use
1.2.1 Intended use
1.2.2 Reasonably foreseeable misuse
2.1 Safety rules
2.1.1 General safety and accident prevention regulations
2.1.2 Interaction between terminal and machine or tractor
2.1.3 Electrocution by electrical system
3 Product description
3.1 Overview and method of operation
3.1.1 Overview of CEMIS 700
3.1.2 Function principle of CEMIS 700
3.2 Identification plates and identification numbers
3.2.1 Spare parts and technical questions
3.2.2 Identification plate of CEMIS 700
4 Information on the product
4.1 Software version
5 Operating and display elements
5.1 CEMIS 700
5.1.1 User interface
5.1.2 Terminal program
6 Technical specifications
6.1 CEMIS 700
6.1.1 Specification
7 Operation
7.1 CEMIS 700
7.1.1 Operating the CEMIS 700
7.1.2 Switching CEMIS 700 on
7.1.3 Switching CEMIS 700 off
7.2 Terminal settings
7.2.1 Making settings
Making settings with the rotary button
Making settings with the touch function
7.2.2 Setting the screen lighting
Daytime mode
Nighttime mode
Activating automatic key lighting
7.2.3 Setting the time and date
7.2.4 Displaying diagnosis information
On-board power supply voltage display
Display of CLAAS ISOBUS ECU address and name
7.2.5 Setting the language and display formats
Setting the language
Setting display formats
7.2.6 Setting the volume
7.2.7 Deleting an ISOBUS implement
8 Maintenance
8.1 Maintenance
8.1.1 Daily
9 Putting out of operation and disposal
9.1 General information
9.1.1 Removal from service and disposal
10 Technical terms and abbreviations
10.1 Terms and explanations
10.1.1 Technical words
10.1.2 Abbreviations
John Deere Parts Catalog PDF
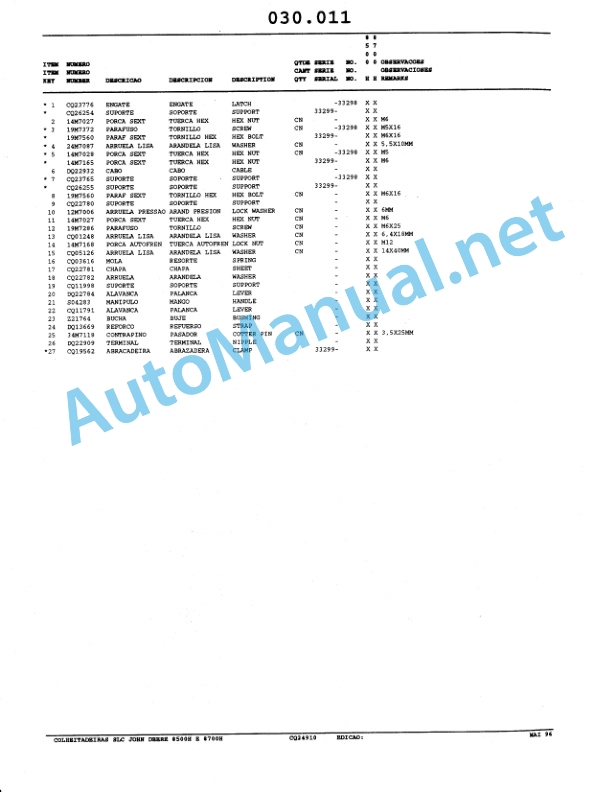
John Deere Harvesters 8500 and 8700 Parts Catalog CPCQ24910 Spanish


%20Balers%20Operator%20Manual%20EN&url=https://automanual.net/doc/claas-quadrant-3400-740-balers-operator-manual-en/&media=https://automanual.net/wp-content/uploads/2024/04/claas-quadrant-3400-740-balers-operator-manual-en-1.jpg)

John Deere Repair Technical Manual PDF
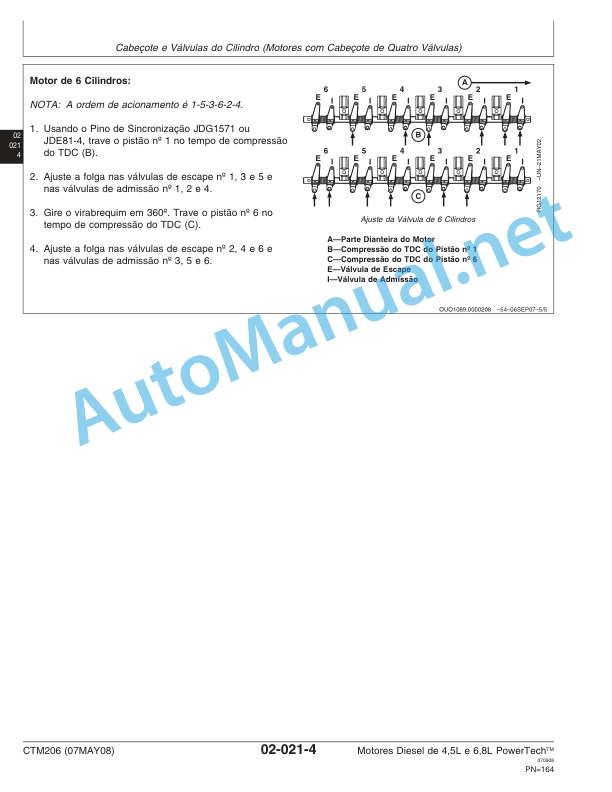
John Deere Diesel Engines PowerTech 4.5L and 6.8L – Motor Base Technical Manual 07MAY08 Portuguese


John Deere Parts Catalog PDF
John Deere Tractors 7500 Parts Catalog CPCQ26568 30 Jan 02 Portuguese


John Deere Repair Technical Manual PDF
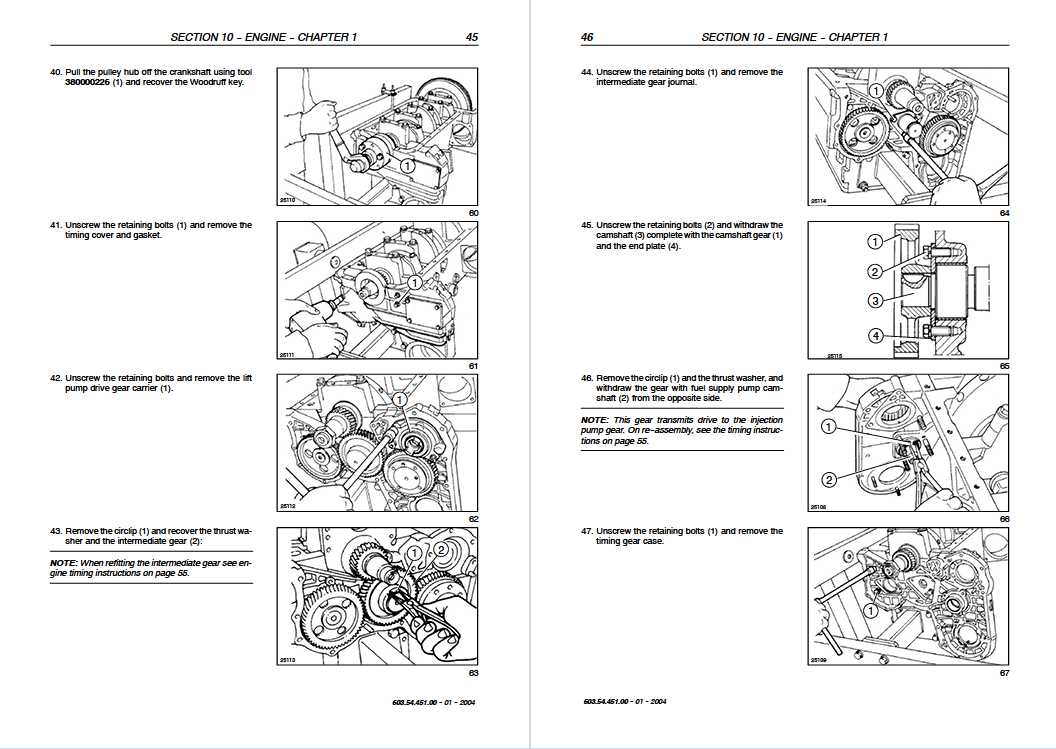
John Deere 18-Speed PST Repair Manual Component Technical Manual CTM168 10DEC07
%20Portuguese&url=https://automanual.net/doc/john-deere-tractors-6300-6500-and-6600-parts-catalog-cq26564-29set05/&media=https://automanual.net/wp-content/uploads/2023/08/john-deere-tractors-6300-6500-and-6600-parts-catalog-cq26564-29set05-portuguese-1.jpg)


John Deere Parts Catalog PDF
John Deere Tractors 6300, 6500, and 6600 Parts Catalog CQ26564 (29SET05) Portuguese


John Deere Repair Technical Manual PDF


John Deere Repair Technical Manual PDF

New Holland Service Manual PDF


John Deere Repair Technical Manual PDF
- Claas
- Grove
- New Holland
- Komatsu
- Kubota
- John Deere
- Linde
- Bomag
- CASE
- Clark
- JCB
- Jungheinrich
- Linde
- Yale
- Yanmar
- Manitou
- Manitowoc
- CNH
- Doosan
- Fiatagri
- Fiatallis
- Fiatallis Other Manual PDF
- Flexi Coil
- Ford New Holland
- Ford New Holland Other Manual PDF
- Huyndai
- Hypac
- Hyster
- Hyster Service Manual PDF
- Isuzu
- Kobelco
- Kohler
- Krupp
- Lombardini
- Mahindra
- Nuvera
- Perkins
- Sperry New Holland
- Utilev
- Versatile
- ZF