- Claas
- Grove
- New Holland
- Komatsu
- Kubota
- John Deere
- Linde
- Bomag
- CASE
- Clark
- JCB
- Jungheinrich
- Linde
- Yale
- Yanmar
- Manitou
- Manitowoc
- CNH
- Doosan
- Fiatagri
- Fiatallis
- Fiatallis Other Manual PDF
- Flexi Coil
- Ford New Holland
- Ford New Holland Other Manual PDF
- Huyndai
- Hypac
- Hyster
- Hyster Service Manual PDF
- Isuzu
- Kobelco
- Kohler
- Krupp
- Lombardini
- Mahindra
- Nuvera
- Perkins
- Sperry New Holland
- Utilev
- Versatile
- ZF
 Baler Operator Manual ES 1")
 Baler Operator Manual ES 2")
%20Baler%20Operator%20Manual%20ES&url=https://automanual.net/doc/claas-rollant-250-255-uniwrap-726-baler-operator-manual-es/&media=https://automanual.net/wp-content/uploads/2024/04/claas-rollant-250-255-uniwrap-726-baler-operator-manual-es-1.jpg)
Claas Rollant 250 255 Uniwrap (726) Baler Operator Manual ES
$50.00
- Model: Rollant 250 255 Uniwrap (726) Baler
- Type Of Manual: Operator Manual
- Language: ES
- Format: PDF(s)
- Size: 7.3 MB
File List:
00 0298 449 7.pdf
00 0298 449 7.pdf:
1. Introduction
Introduction
2 Summary
3 Road traffic
Road traffic
Note in particular the following
Identification plate/machine number
Identification lacquer (packer)
Machine serial number (packer)
Identification plate (bale winder)
Machine serial number (bale winder)
4 About security
For your security
Hazard information characteristics
Regulated use
General prescriptions on safety and accident prevention
Machine hitch
PTO shaft
Hydraulic system
Tires/brakes
Maintenance
Safety stickers with graphic danger symbols
5 Technical characteristics
Rollant 255 Roto Cut Uniwrap
Feeding organs
Hydraulic system
Hydraulic system required on the tractor
Hydraulic oil flow
Dimensions
Safety devices
bale wrapper
6 Working principle and structures
Power transmission
Cardan shaft with detachable cam limiter
Pick Up PU
cutting device
Hydraulic rotor reversal device
packaging chamber
Tying cycle
taping machine
Bale covering
Taping modes
Wrapping cycle
Electric vehicle lighting
Electrical hood electrical system
control box
Stop key/emergency stop switch
safety stirrup
Hydraulic control block
Tipper or tilter
taping table
Wrapping arm
film blade
Holder, replacement film roll
Box of plastic rolls (from machines no. 72600131)
braking circuit
Bale unloading mat (option)
Principle
Circulation on public roads
Prestretcher 82%
Protection shaft against the accumulation of material to be pressed
Work light (optional)
Bale turner (options)
7 Before start-up
To be checked and observed before commissioning
Hooking up the baler with bale wrapper
Attachment to flange or swing bar with lock nut
Screw/nut tightening torque
Attachment to the drawbar with locknut
Adjusting the drive fork arms
Traction eye adjustment
Attachment with locknut to the hitch
Adjusting the drive fork arms
Traction eye adjustment
Hooking eye
Adjustment of the labeled pivot coupling (only permitted in accordance with customary laws in…
Before hitching the baler
Install the rubber buffers
After hitching of the baler
Mounting the cardan shaft next to the tractor
Shorten the drive shaft
Mounting the cardan shaft next to the tractor
Connect the brake hoses
pneumatic brake
Maneuver the bale wrapper without a pneumatic brake.
Parking brake
electrical system
Control terminal
CLAAS COMMUNICATOR
Power supply
Lightning
Open the toggle shut-off valve.
Before transportation
Hydraulic system
Connections on the tractor
Used oil
Tractor with hydraulic system with constant performance or Load-Sensing system without Power-Beyond
Tractor with hydraulic system with constant pressure
Tractor with Load Sensing and a Power-Beyond pressure connection
8 Install the baler/bale wrapper
Picker, transport and tillage position
Picker working height adjustment
Picker working height adjustment
Pickup wheels
rebound plate
Roller retainer
Roller retainer adjustment
Adjustment of the roller retainer due to feeding problems of the material to be pressed
Moving the baler with roller retainer
Roller retainer jamming
cutting device
blind blade
Assembly and disassembly of the blades
Lock the blades
Blade holder and blind blades (optional)
Hydraulic pressure adjustment
recommendations
Pressure adjustment by oscillating segment
Adjust spring tension
Safety lock for rear hood
tied with mesh
Recommendation
Mesh placement
Adjustment of the number of mesh wrappings
Drive of the V-belt in mesh tying
Double tied with twine
Twine box
Threading the tying twine
Threading the thread on ROLLANT 255 equipped with the comfort model control
Adjusting the number of twine wraps at the twine box level
Baler with twine and mesh tying
Adjustment of the number of turns of the string
bale wrapper
Recommendation
Replacement taping film holder
plastic roll box
Insert the film roll into the stretching device
Place the film on the film knife
Bale covering adjustment
To the machines n˚ 726 01046
Dismantling the bale wrapper (depending on equipment)
Attach the wrapper to the baler
9 Using the control boxes and the taper
Introduction
Control terminal
Commissioning of the control terminal
Control terminal – synopsis
Tying and unloading of bales
Tying type adjustment
Automatic tying with twine and mesh
Automatic tying with twine
Automatic mesh tying
Manually activate tying
Delay tying
End of tying cycle
Eject the bale
Download the bale
With integrated bale winder
Without bale winder
Open/close the rear hod Raise/lower pickup
In/out rotation of blades
Baler clogging
Detachable cam limiter – cardan shaft
Rotor back-turning device
Procedure
Work data
Meaning of the most important symbols
Meaning of the most important symbols
Settings
Adjustment of the number of turns
Call up the User settings submenu
User settings
Adjustment of the delay time until automatic or manual tying with mesh
Adjustment of the automatic opening of the rear hood
Manual rear hood opening
Recharge pressure
Clean the blades
Choose language
Taping Machine Menu
Daily and total counter
Resetting the maintenance indication
Daily counter reset
special counter
Start special counter
Correct the number of bales
Replenishment of the order
Error indication
Error indication in text mode
Warning sound disconnection
Clear the error
bale wrapper
Manual unloading/taping control
Manual start/stop control
Choose the parameters
10 CLAAS COMMUNICATOR
Press with Claas Communicator control box
Connect the CLAAS COMMUNICATOR
Overview – CLAAS COMMUNICATOR
Incremental transmitter and keys
Incremental transmitter
Selection keys
Menu navigation keys
Main menu
Work menu
Work menu functions
Information window in the work menu
Setting menu
Call setting submenu
Baler adjustment
Bale Rewind Frame Adjustments
Operation of the bale rewind frame
Counters Menu
Main menu
Current order display window
Fault menu
System Information Menu
User settings
Baler adjustment
Select the type of tie
Adjust the number of network turns
Adjust the thread length
Adjust the delay time between the end of the bale and the start of the net tying
Adjust the automatic opening of the back cover
Adjust the recharging of the pressing pressure of the hydraulic cylinders
Blade cleaning
Activate bale rewind frame
Bale Rewind Frame Adjustments
Selection of rewind frame service mode
bale slide
Setting the number of foil layers
Settings in the counter menu
Select the order
Reset the order counter
Daily counter reset
Maintenance indication reset
Fault indicator
Main menu »Service«
Call service menu
System Information Menu
Screen adjustment menu
Adjust contrast
Adjust brightness
Time and date menu
Set the date or time
Memory management menu
Managing saved projects
Reduce conflicts between press and tractor
Language selection menu
Adjust the tongue
Aux menu
hosting function
collector
Activate the cutting device
Control of the position of the cutting device using a sensor
Standard machines Up to machine number 72601046, except 72600863 to 72600872
Active cutting device From machine number 72601047 and machine numbers 72600863…
Cutting device deactivated From machine nuer2601047 and machine numbers 726…
Recharging the pressing pressure from the first bale
How to activate the function from the first bale
Turn the rotor backwards
Pressing and binding
Automatic thread tying
Automatic net tying
Manual tying – thread tying and net tying
Unloading the bales onto the rewinding frame
Automatically open the back cover
Manually open the back cover
Wrapping and unloading the bales
Envelope
Automatic bale unloading
Manual bale unloading
Unloading bales with bale grouping
Direct unloading of unwrapped bales
Work light (optional)
States of the press
Tying with thread without reloading the pressure
Net tying without pressure refill
Net tying with pressure recharge
Rewind Frame States
11 Using the tape machine
Automatic control
Staged development of wrapping
Uniwrap Control Box – Description
Wrapping duty cycle
Increased number of wrapping arm rotations
Resumption of an interrupted taping
Unloading of wrapped bales
Automatic bale unloading
Manual bale unloading
Error messages
Manual rear hood opening to complete a taping cycle
Work light (optional)
Adjustable Menus
Adjustable parameters
Setting the operating mode
Language selection
Sensor test
Setting the film release time
Resetting the total counter
To machine n˚_x0011_726_x0011_01046
Resetting the daily counter
Bale unloading adjustment
Adjustment of the number of turns of the wrapping arms
Start/Stop key
Manual Control
Start of a new wrapping and unloading of bales
Manual raising/lowering of the dump truck
Manual raising/lowering of the wrapping table
Manual opening/closing of film blades
Manual rotation of the wrapping arms
12 Malfunction and remedy
tied with twine
tied with mesh
Enrubannage
13 After plowing
After the work
Hook the control terminal
Control terminal
Claas Communcator (option)
Disconnect the hydraulic hoses and cables
Deposit the cardan shaft
Pull the parking brake
Hydraulic brake
pneumatic brake
Place chock wedges in front
Unhooking the baler with the bale wrapper
Remove the film roll
Clean the stretching device
Storing film rolls
Clean the baler
Transport of round bales
Storage of round bales
14 Maintenance
Important maintenance warnings
Safety locking device for the rear hood
Wheels/Tires
Hydraulic installation
cutting device
Pneumatic brake:
Welding work
Proposals for preparing for winter
Lubricant table
Maintenance chart
Pickup drive shear screw
Rotor back-turning device shear screw
bevel gear
Oil level check
Taping arm drive
Tighten the fixing screws
Retensioning of transmission chains
Pickup drive chain tensioning (left side)
Tension the drive chain for the worm of the transverse conveyor (drive side)…
Chain tensioner adjustment
Flexible cylinder to drive the compression rollers – rear hood
Spring adjustment for the lower drive of the compression roller
Spring for front drive of the compression roller
Pickup traction spring tensioning
Tension spring tensioning for mesh coil brake caliper
Tension spring tension (F)
Adjustment of the tension spring for the mesh brake
Adjustment of the compression springs for the baling roller
String tensioner adjustment
Adjustment of the tensioning device for the mesh cutting blade
Adjust the string knife knob
Greasing systems
Automatic chain lubrication
Mechanical central lubrication for chains (optional)
General view of mechanical grease pump
Mechanical grease pump adjustment
Lubricant
Central lubrication system for greaseable bearings (optional)
Automatic central lubrication of the bearings (optional)
Flow adjustment
Grease pump stop adjustment
Filling the grease tank
cutting device
Hydraulic oil filter
Fire extinguisher (Rollant 255 option)
Cleaning the roller (Rollant 255)
Braking circuit/Tires
pneumatic brake
Pneumatic controlled filter
Clean the sieve filters
Evacuate water from the air tank
brake cylinder
Adjust the brake lever
brake linings
Check the tightening of the wheel nuts
Check the wheel hub bearing play
Adjust the bearing play
flat strap
Lay the straps flat
Repair flat belts
Bale Wrapper Settings
Adjust the safety stirrup
Adjust the winder arm sensors
Film knives, stretching device protection plate
Stretching device
Bale in bale elevator sensor
Tipper down sensor
Bale tilter roller
Wrapping table limit switch
Wrapping table sensor
Film blade opening angle
film blades
15 Greasing scheme
%20Component%20Technical%20Manual%20CTM147%2005JUN98&url=https://automanual.net/doc/john-deere-df-series-150-and-250-transmissions-analog-component-technical-manual-ctm147-05jun98/&media=https://automanual.net/wp-content/uploads/2023/08/john-deere-df-series-150-and-250-transmissions-analog-component-technical-manual-ctm147-05jun98-1.jpg)

John Deere Repair Technical Manual PDF
John Deere DF Series 150 and 250 Transmissions (ANALOG) Component Technical Manual CTM147 05JUN98


John Deere Parts Catalog PDF
John Deere Tractors 7500 Parts Catalog CPCQ26568 30 Jan 02 Portuguese
%20Interim%20Tier%204%20Stage%20III%20B%20Component%20Technical%20Manual%20CTM104754%2025%20July%202012%20Portuguese&url=https://automanual.net/doc/john-deere-powertech-m-6068-oem-diesel-engines-above-130-kw-174-hp-compo-technical-manual-ctm104754-25jul12-portuguese/&media=https://automanual.net/wp-content/uploads/2023/08/john-deere-powertech-6068-engines-above-130-kw-174-hp-interim-tier-4-stage-iii-b-component-technical-manual-ctm104754-25-july-2012-portuguese-1.jpg)

John Deere Repair Technical Manual PDF
%20Component%20Technical%20Manual%20CTM205%20February%202015%20Russian&url=https://automanual.net/doc/john-deere-diesel-engines-4-5l-and-6-8l-component-technical-manual-ctm205-01feb15-russian/&media=https://automanual.net/wp-content/uploads/2023/08/john-deere-diesel-engines-45-l-and-68-l-primary-engine-component-technical-manual-ctm205-february-2015-russian-1.jpg)


John Deere Repair Technical Manual PDF


John Deere Repair Technical Manual PDF

John Deere Repair Technical Manual PDF
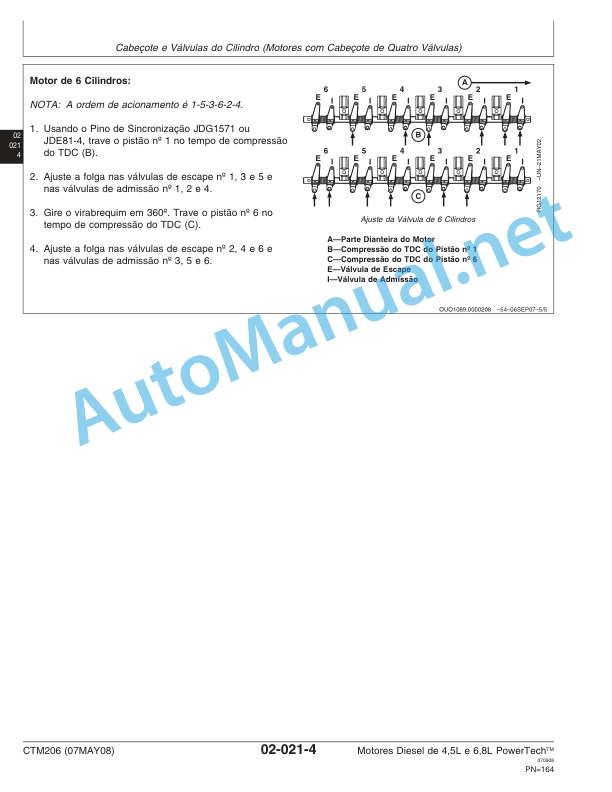
John Deere Diesel Engines PowerTech 4.5L and 6.8L – Motor Base Technical Manual 07MAY08 Portuguese
%20Portuguese&url=https://automanual.net/doc/john-deere-tractors-6300-6500-and-6600-parts-catalog-cq26564-29set05/&media=https://automanual.net/wp-content/uploads/2023/08/john-deere-tractors-6300-6500-and-6600-parts-catalog-cq26564-29set05-portuguese-1.jpg)


John Deere Parts Catalog PDF
John Deere Tractors 6300, 6500, and 6600 Parts Catalog CQ26564 (29SET05) Portuguese


John Deere Repair Technical Manual PDF


John Deere Repair Technical Manual PDF


John Deere Repair Technical Manual PDF
- Claas
- Grove
- New Holland
- Komatsu
- Kubota
- John Deere
- Linde
- Bomag
- CASE
- Clark
- JCB
- Jungheinrich
- Linde
- Yale
- Yanmar
- Manitou
- Manitowoc
- CNH
- Doosan
- Fiatagri
- Fiatallis
- Fiatallis Other Manual PDF
- Flexi Coil
- Ford New Holland
- Ford New Holland Other Manual PDF
- Huyndai
- Hypac
- Hyster
- Hyster Service Manual PDF
- Isuzu
- Kobelco
- Kohler
- Krupp
- Lombardini
- Mahindra
- Nuvera
- Perkins
- Sperry New Holland
- Utilev
- Versatile
- ZF