- Claas
- Grove
- New Holland
- Komatsu
- Kubota
- John Deere
- Linde
- Bomag
- CASE
- Clark
- JCB
- Jungheinrich
- Linde
- Yale
- Yanmar
- Manitou
- Manitowoc
- CNH
- Doosan
- Fiatagri
- Fiatallis
- Fiatallis Other Manual PDF
- Flexi Coil
- Ford New Holland
- Ford New Holland Other Manual PDF
- Huyndai
- Hypac
- Hyster
- Hyster Service Manual PDF
- Isuzu
- Kobelco
- Kohler
- Krupp
- Lombardini
- Mahindra
- Nuvera
- Perkins
- Sperry New Holland
- Utilev
- Versatile
- ZF
 Combines Repair Manual FR 1")
 Combines Repair Manual FR 2")
Claas Conspeed 6 Lexion (908) Combines Repair Manual FR
$200.00
- Model: Conspeed 6 Lexion (908) Combines
- Type Of Manual: Repair Manual
- Language: FR
- Format: PDF(s)
- Size: 21.1 MB
File List:
00 0294 211 0.pdf
00 0294 211 0.pdf:
CONSPEED 8-80 FC / 6-80 FCCONSPEED 8-75 FC / 6-75 FCCONSPEED 8-70 FC / 6-70 FCLEXION
Contents
Introduction
General informations
Use of the instructions
Validity of the notice
General repair tips
Technical specifications
Cause of damage
Spare parts
Fixing material
Welding work
Drive belt/drive chains
Tension steel roller chains
Assemblies using conical ring
Heel pin assemblies
Self-locking screws with micro-encapsulated glue
Liquid screw brake
Clamp ring bearing
Clamp sleeve bearing
Screwed connections with cutting ring on hydraulic lines
Progressive ring screw connections on hydraulic lines
Bicone screw connections on hydraulic lines
Hydraulic flexible lines
Tips for an economical repair
Tightening torques
Tightening torques for metric coarse threads
Tightening torques for metric fine pitch threads
Tightening torques for hydraulic connections with cutting ring DIN 3861
Tightening torques for hydraulic screw connections and air conditioning screw connections with sealing cone and O-ring DIN 3865
Tightening torques for hydraulic threaded couplings DIN 3901
Tightening torques for hydraulic swivel threaded couplings ISO 6149-2 / ISO 11926-2 (3)
Tightening torques for tangent screw clamps
Technical characteristics
Lubricants
Security
General informations
To respect
Marking of warning and danger instructions
General safety and accident prevention instructions
First aid measures
Exit the machine
Adjustment and maintenance work
Front-end tools
Risk of injury from hydraulic fluids
Pressure accumulator
Energy accumulator
Heavy parts
Cardan shafts
Unbalanced
Battery cut-off switch
Safety shoring
Install the safety support of the supply channel
Place the machine on jack stands
Take the machine out of service
CCN explanation
CCN (CLAAS Component Number)
Electrical standard
Summary table
Hydraulic standard
Summary table
CCN Index
02 Transmission – Clutch – Cardan shaft
0230 Mechanical gearbox
Overview of mechanical gearboxes
Remove the left side main gearbox
Remove the right side main gearbox
Disassemble the main gearbox
Main gearbox overview
Assemble the main gearbox
Install the main gearbox on the left side
Install the main gearbox on the right side
Main gearbox special tool
Install the main gearbox
Disassemble the main gearbox
Remove the left side transfer case
Remove the right side transfer case
Disassemble the transfer case
Transfer Case Overview
Assemble the transfer case
Install the transfer case on the left side
Install the transfer case on the right side
Transfer case special tool
Remove/install the transfer case
Disassemble the transfer case
Overview of the dog clutch – transfer case
Transfer case – remove the dogs
Transfer case – install the dogs
0260 Cardan shaft
Overview of cardan shafts
Remove the cardan shaft – left side entry
Install the cardan shaft – left side entry
Remove the cardan shaft – right side entry
Install the cardan shaft – right side entry
Remove the cardan shaft – left side main drive
Install the cardan shaft – left side main drive
Remove the cardan shaft – right side main drive
Install the cardan shaft – right side main drive
Remove the left side protection bell
Install the protective bell on the left side
Remove the right side protection bell
Install the protection bell on the right side
08 Orders
0808 Main command
Left side main drive overview
Right side main drive overview
Open/remove chain clutch
Exterior left side chain clutch
Chain clutch in the center left outer side
Chain clutch in the center left inner side
Chain clutch in the center right inner side
Chain clutch in the center right side outside
Install/close chain clutch
Exterior left side chain clutch
Chain clutch in the center left outer side
Chain clutch in the center left inner side
Chain clutch in the center right inner side
Chain clutch in the center right side outside
Remove the outer left side drive shaft
Install the outer left side drive shaft
Remove the drive shafts in the center left side
Install the drive shafts in the center left side
Remove the drive shafts in the center right side
Install the drive shafts in the center right side
Remove the outer right side drive shaft
Install the outer right side drive shaft
09 Hydraulic system
General informations
General precautionary instructions
0980 Hydraulic connection plan
Hydraulic diagram
0920 Valves
Overview of the distribution block
Special distribution block tool
Extract the valve packing
Unscrew the iron core
Remove the seal ring
0930 Cylinders
Overview of Hydraulic Cylinder Swing (3027)
Remove the hydraulic pivot cylinder (3027) on the left side
Install the hydraulic pivot cylinder (3027) on the left side
Remove the pivot hydraulic cylinder (3027) on the right side
Install the pivoting hydraulic cylinder (3027) on the right side
Overview of the hydraulic cylinder with folding covers (3029), adjustment of the picking plates (3030)
Disassemble hydraulic cylinders (3029, 3030)
Hydraulic cylinders (3029, 3030) assemble
Overview of Locking Hydraulic Cylinder (3073)
Special cylinder tool
Remove the seal ring
20 Harvest feeding
2005 Dividers
Overview poured corn auger
Remove the poured corn auger on the right side
Place the poured corn auger on the right side
Remove the poured corn auger on the left side
Place the poured corn auger on the left side
Poured corn auger – remove lower bearing
Poured corn auger – install the lower bearing
Poured corn auger – remove/install the socket
Poured corn auger – remove/install the universal disc joint
Remove the hydraulic motor (2040) on the right side
Install the hydraulic motor (2040) on the right side
Remove the hydraulic motor (2040) on the left side
Install the hydraulic motor (2040) on the left side
21 Power group
2140 Feed screw
Overview of the feed drum
Remove the right side feed drum
Install the right side feed drum
Remove the left side feed drum
Install the left side feed drum
Place the feed drum in the center
Place the feed drum in the center
Remove the right side feed drum clutch
Install the right side feed drum clutch
Remove left side feed drum clutch
Install the left side feed drum clutch
Drop the channel
Install the chain
Remove the upper sprocket
Install the upper pinion
Remove the chain tensioner
Install the chain tensioner
Remove the lower sprocket
Install the lower gear
Special tool feed drum
Remove/install the right side/left side feed drum
Remove the right side feed drum – outer bearing
Right side / left side feed drum – Remove inner bearing
Left side feed drum – remove outer bearing
Center feed drum – remove right side/left side bearing
Remove the drive cleat
Remove feed drum clutch
Install the feed drum clutch
24 Picking device
2405 Picking unit
Remove the sensor (B055) for adjusting the picking plates
Install the sensor (B055) for adjusting the picking plates
Remove the drive latch sensor (B055) from the header plate adjustment
Install the drive cleat sensor (B055) for adjusting the picking plates
Overview of picking plates
Place the picking plates
Install the picking plates
Adjust the picking plates
Overview of header plate adjustment
Remove the picking plate adjustment
Install the picking plate adjustment
Remove/install the adjusting rod bushings
Remove the adjustment shaft
Install the adjustment shaft
Remove/install the adjustment shaft bushings
Remove the hydraulic cylinder for adjusting the picking plates (3030)
Install the hydraulic header plate adjustment cylinder (3030)
Overview picker roller, scraper plates / thrust plates
Remove the scraper plates and thrust plates
Install the scraper plates and thrust plates
Adjust the scraper plates and thrust plates
Remove the skids from the header frame
Skids – install the picker frame
Overview of picker rollers
Remove the picker rollers
Install the picker rollers
Special picker roller tool
Remove the picker rollers
Auger – remove the picker rollers
Endless auger – install the picker rollers
Remove the picker roller knives
Install the picker roller knives
Adjust the picker roller knives
Wear thresholds – picker roller knives
Relax the power chain
Tighten the feed chain
Remove the power chain under the folding hood
Remove the power chain
Install the power chain
Install the power chain under the folding hood
Remove the front sprocket
Install the front sprocket
Remove the pinion bearing
Install the pinion bearing
Remove/install the plastic support from the front sprocket
Remove the rear sprocket
Install the rear sprocket
Remove/install the bracing piece
Remove the chain guide
Install the chain guide
Chopper Overview
Replace the chopper knives
Chopper knife wear thresholds
Wear thresholds for fixing the chopper knives
Remove the knife holder
Disassemble the knife holder
Assemble the knife holder
Install the knife holder
Wear thresholds – knife holder / support plate
Counterblade – remove the chopper
Counterblade – place the chopper
Wear thresholds – counterblade
Work steps before removing the header gearbox
Inner Right Side Center Picker Gearbox
Picker gearbox in center right side outside
Outer right side header gearbox
Inner Left Side Center Picker Gearbox
Outer left side center header gearbox
Outer left side header gearbox
Remove header gearbox
Disassemble the header gearbox
Header gearbox overview
Main drive overview
Overview of the chopper drive
Overview of the picker roller drive / feed chains
Assemble the picker gearbox
Picker roller drive
Main training
Primary set of teeth and bearing – picking roller drive
Feed chain drive
Pitch Backlash and Reach – Feed Chain Drive
Chopper training
Install header gearbox
Work steps after installation of the picker gearbox
Inner Right Side Center Picker Gearbox
Picker gearbox in center right side outside
Outer right side header gearbox
Inner Left Side Center Picker Gearbox
Outer left side center header gearbox
Outer left side header gearbox
Special tool picker gearbox
Remove/install header gearbox
Disassemble the header gearbox
Assemble the picker gearbox
Remove overload coupling – header gearbox
Inner Right Side Center Picker Gearbox
Picker gearbox in center right side outside
Outer right side header gearbox
Inner Left Side Center Picker Gearbox
Outer left side center header gearbox
Outer left side header gearbox
Overload coupling – seat header gearbox
Inner Right Side Center Picker Gearbox
Picker gearbox in center right side outside
Outer right side header gearbox
Inner Left Side Center Picker Gearbox
Outer left side center header gearbox
Outer left side header gearbox
Special overload coupling tool
Install the overload coupling – outer right side header gearbox
2410 Hoods / Tips
Remove the covers inside
Place the covers inside
Remove the exterior left side cover.
Install the exterior left side cover
Remove the exterior right side cover
Install the exterior right side cover
Remove the frame – exterior left side cover
Frame – install the cover on the left exterior side
Remove the frame – exterior right side cover
Install the frame – exterior right side cover
Remove / install the bushings – hood support
Remove the frame – interior covers
Install the frame – interior covers
Remove the gas shock absorber – inner covers
Install the gas shock absorber – inner covers
Remove the gas shock absorber – outer covers
Install the gas shock absorber – outer covers
Place the tips inside
Place the tips inside
Remove the tip on the left outer side
Place the tip on the left outer side
Remove the tip on the right outer side
Place the tip on the right side outside
Remove the frame – inner tip
Install the frame – interior point
Remove the frame – outer tip
Install the frame – outer tip
Adjust the tip stop
Remove the piston support rubber
Install the piston support rubbers
Remove the folding hood hydraulic cylinder (3029)
Install the hydraulic cylinder for the folding hoods (3029)
Adjust the hydraulic cylinders of the folding hoods (3029)
80 Assembly/body parts
8020 Balustrades / Safety devices
Overview of the security system
Remove left main drive safety device
Install the left main drive safety device
Remove the right side main drive safety device
Install the main drive safety device on the right side
Remove the right side safety device at the rear exterior
Install the safety device on the right rear exterior side
Remove the safety device in the center right side at the rear
Install the safety device in the center right side at the rear
Remove the safety device in the center left side at the rear
Install the safety device in the center left side at the rear
Remove the exterior rear left side safety device
Install the safety device on the left rear exterior side
Remove the rubber protection
Install the rubber protection
Remove the right side safety device at the front exterior
Install the safety device on the right side on the outside front
Remove the safety device in the center right side at the front
Install the safety device in the center on the right side at the front
Remove the safety device in the center left side at the front
Install the safety device in the center left side at the front
Remove the left front exterior safety device
Install the safety device on the left front exterior side
Remove the exterior left side safety device
Install the safety device on the left exterior side
Remove the exterior right side safety device
Install the safety device on the right exterior side
Remove the chopper safety device
Install the chopper safety device

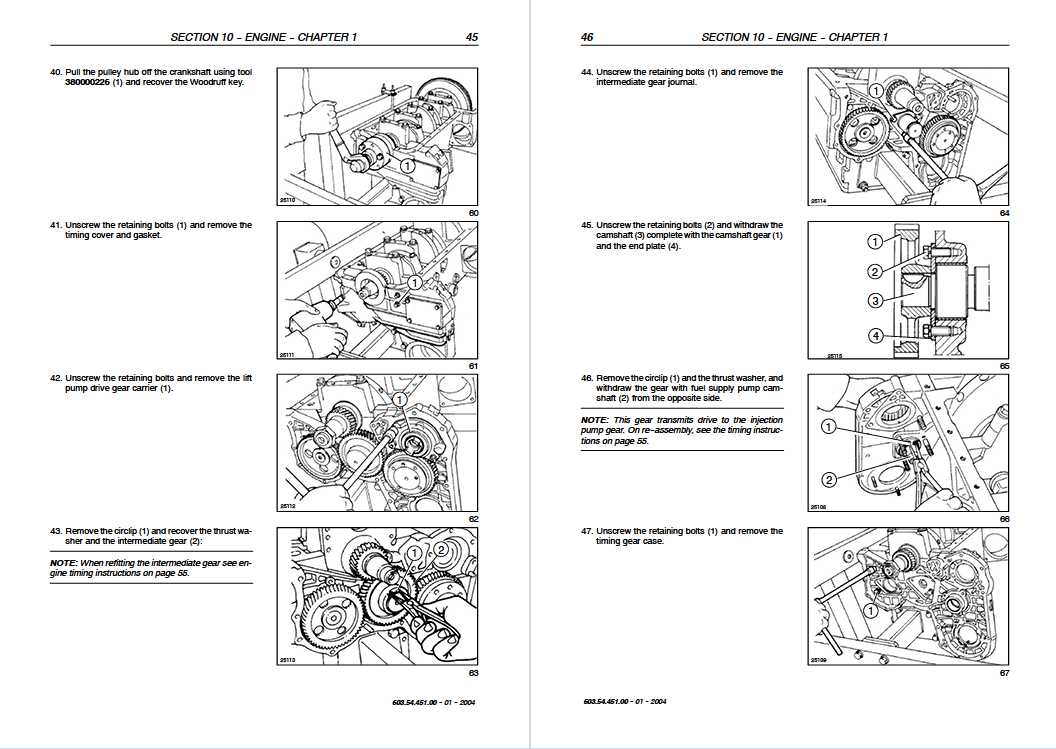
John Deere Repair Technical Manual PDF
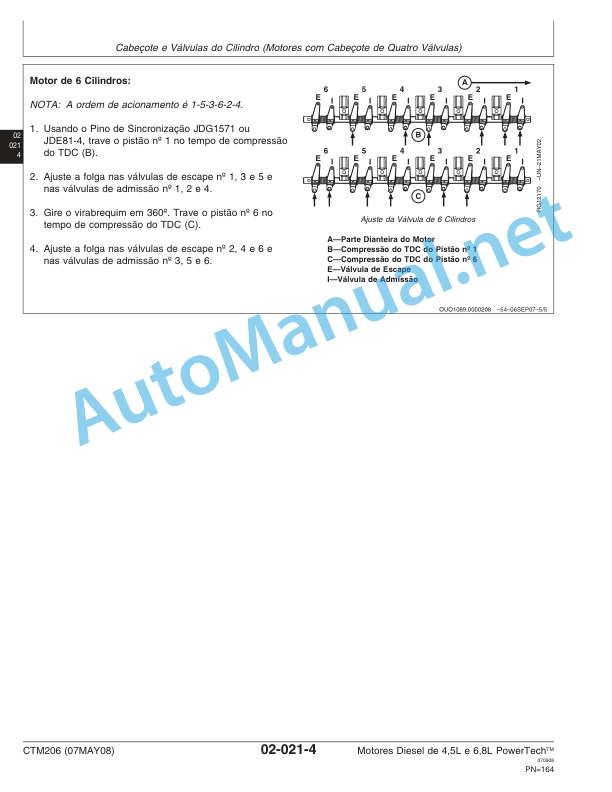
John Deere Diesel Engines PowerTech 4.5L and 6.8L – Motor Base Technical Manual 07MAY08 Portuguese


%20Combines%20Repair%20Manual%20FR&url=https://automanual.net/doc/claas-conspeed-6-lexion-908-combines-repair-manual-fr/&media=https://automanual.net/wp-content/uploads/2024/04/claas-conspeed-6-lexion-908-combines-repair-manual-fr-1.jpg)
%20Component%20Technical%20Manual%20CTM205%20February%202015%20Russian&url=https://automanual.net/doc/john-deere-diesel-engines-4-5l-and-6-8l-component-technical-manual-ctm205-01feb15-russian/&media=https://automanual.net/wp-content/uploads/2023/08/john-deere-diesel-engines-45-l-and-68-l-primary-engine-component-technical-manual-ctm205-february-2015-russian-1.jpg)


John Deere Repair Technical Manual PDF


John Deere Repair Technical Manual PDF


John Deere Repair Technical Manual PDF

New Holland Service Manual PDF


John Deere Repair Technical Manual PDF


John Deere Repair Technical Manual PDF
John Deere Application List Component Technical Manual CTM106819 24AUG20


John Deere Repair Technical Manual PDF
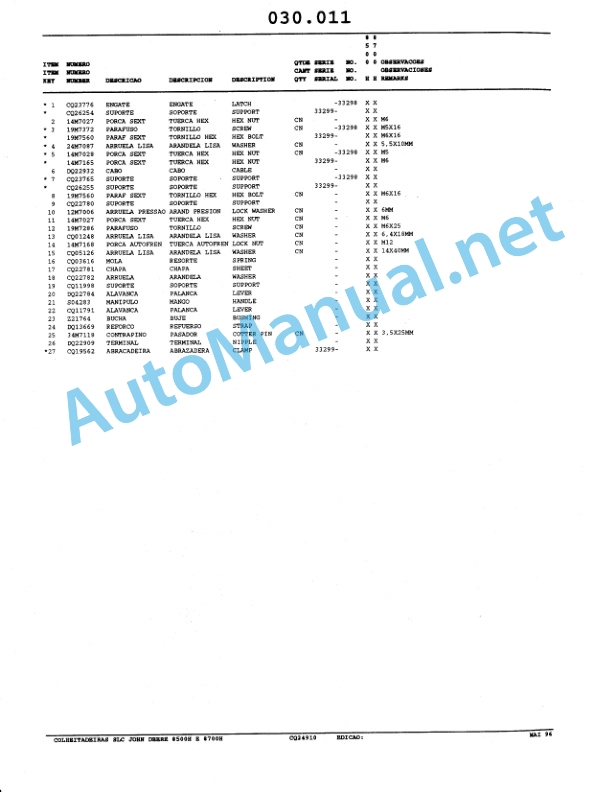
John Deere Parts Catalog PDF
John Deere Harvesters 8500 and 8700 Parts Catalog CPCQ24910 Spanish
- Claas
- Grove
- New Holland
- Komatsu
- Kubota
- John Deere
- Linde
- Bomag
- CASE
- Clark
- JCB
- Jungheinrich
- Linde
- Yale
- Yanmar
- Manitou
- Manitowoc
- CNH
- Doosan
- Fiatagri
- Fiatallis
- Fiatallis Other Manual PDF
- Flexi Coil
- Ford New Holland
- Ford New Holland Other Manual PDF
- Huyndai
- Hypac
- Hyster
- Hyster Service Manual PDF
- Isuzu
- Kobelco
- Kohler
- Krupp
- Lombardini
- Mahindra
- Nuvera
- Perkins
- Sperry New Holland
- Utilev
- Versatile
- ZF