Claas Arion 430-410 Cis (B21) Tractors Assembly Instruction EN
$50.00
- Model: Arion 430-410 Cis (B21) Tractors
 - Type Of Manual: Assembly Instruction
 - Language: EN
 - Format: PDF(s)
 - Size: 48.4 MB
 
File List:
00 0018 581 0.pdf
00 0289 109 1.pdf
00 0289 114 0.pdf
00 0290 143 2.pdf
00 0292 437 0.pdf
00 0300 374 1.pdf
00 1164 428 0.pdf
00 1172 052 1.pdf
00 1173 104 0.pdf
CLAAS universal mounting kit GPS PILOT.pdf
00 0289 109 1.pdf:
CTIC 2800 2.0CTIC 2.0
Table of contents
1 Introduction
  1.1 General information
    1.1.1 Validity of manual
    1.1.2 Information about these Fitting Instructions
    1.1.3 Symbols and notes
    1.1.4 Optional equipment
    1.1.5 Warranty information
    1.1.6 Qualified specialist workshop
    1.1.7 Spare parts and technical questions
  1.2 Tightening torques
    1.2.1 Tightening torques for metric ISO screw threads
    1.2.2 Tightening torques for metric fine thread screws
    1.2.3 Tightening torques for hydraulic fittings with ferrule
    1.2.4 Tightening torques for hydraulic male connectors SDS shape B and E
    1.2.5 Tightening torques for hydraulic male connectors SDE shape H, with adjustable direction
2 Safety
  2.1 Identifying warnings
    2.1.1 Hazard signs
    2.1.2 Signal word
  2.2 Safety rules
    2.2.1 Importance of Fitting Instructions
    2.2.2 Optional equipment and spare parts
    2.2.3 Danger due to damage to the tyre pressure control system
    2.2.4 Technical condition
    2.2.5 Complying with technical limit values
    2.2.6 Keeping protective devices functional
    2.2.7 Personal protective equipment
    2.2.8 Dangers when driving on the road and on the field
    2.2.9 Environmental protection and disposal
    2.2.10 Noise can damage your health
    2.2.11 Pressurised fluids
    2.2.12 Compressed air
    2.2.13 Hot surfaces
    2.2.14 Maintenance work and repair work
    2.2.15 Raised machine parts and loads
    2.2.16 Welding work prohibited
3 Installation guidelines
  3.1 Tyre pressure control system
    3.1.1 Approvals
    3.1.2 Compressor unit
      Load-carrying points
      Installation position and place of installation
    3.1.3 Hydraulic system
    3.1.4 Electric system
    3.1.5 Rotary transmission leadthroughs
      Fastening of brackets for rotors
      Position of drilled hole for filling and drain connections in the wheel rim
4 Package list
  4.1 Tyre pressure control system
    4.1.1 Delivery state
5 Installation
  5.1 Tyre pressure control system
    5.1.1 Checking the scope of delivery (trained personnel)
    5.1.2 Moving the compressor unit / control unit to the installation position
    5.1.3 Moving the compressor unit / control unit to the installation position
    5.1.4 Moving the compressor unit / control unit to the installation position
    5.1.5 Installing the control unit
    5.1.6 Fitting the base plate for trailer mode
    5.1.7 Fitting the base plate for trailer mode
    5.1.8 Installing the rotary transmission leadthroughs
      Installing the wheel rim connections
      Installing the rotary transmission leadthrough
    5.1.9 Installing the protective tube brackets and base plates
      Installing the protective tube bracket on the front axle
      Installing the protective tube bracket for the rear right wheel
      Installing the protective tube bracket for the rear left wheel
      Installing the protective tube bracket for the rear left wheel
    5.1.10 Installing the protective tube brackets and base plates
      Installing the protective tube bracket on the front axle – variant 1
      Installing the protective tube bracket on the front axle – variant 2
      Installing the protective tube bracket for the rear right wheel
      Installing the protective tube bracket for the rear left wheel
    5.1.11 Installing hose packages
      Installing the cover on the rotary transmission leadthrough
      Installing the cover on the rotary transmission leadthrough
    5.1.12 Connecting the hose packages
      Providing the air distribution of front wheels
      Providing the air distribution of rear wheels
      Installing the trailer air supply
      Connecting the lines of wheels and of trailer connection to the compressor unit
    5.1.13 Connecting the hose packages
      Providing the air distribution of front wheels
      Providing the air distribution of rear wheels
      Installing the trailer air supply
      Connecting the lines of wheels and of trailer connection to the compressor unit / control unit
    5.1.14 Installing the control valve block supply line
    5.1.15 Installing the control valve block supply line
    5.1.16 Installing the control valve block supply line
    5.1.17 Installing the air distribution supply line
    5.1.18 Fastening the compressor unit
    5.1.19 Fastening the compressor unit
    5.1.20 Fastening the compressor unit
      Installing the base plate for the right rear wheel and the handle
    5.1.21 Fastening the control unit
    5.1.22 Fastening the control unit
    5.1.23 Fastening the control unit
    5.1.24 Connecting the electric system
    5.1.25 Connecting the electric system
      Running the adapter cable wiring loom into the cab
      Installing the power supply wiring loom
      Installing the CAN Bus wiring loom
      Installing the trailer connection wiring loom
    5.1.26 Connecting the hydraulic system
      Connecting pressure line (P)
      Connecting the Load Sensing line (LS)
      Connecting the free return line (D)
      Connecting return line (T)
    5.1.27 Connecting the hydraulic system
      Connecting pressure line (P)
      Connecting the Load Sensing line (LS)
      Connecting the free return line (D)
      Connecting return line (T)
      Connecting return line (T)
    5.1.28 Connecting the hydraulic system
      Connecting pressure line (P)
      Connecting the Load Sensing line (LS)
      Connecting the free return line (D)
      Connecting return line (T)
    5.1.29 Settings in CDS
      Defining the compressor parameters
      Software
6 Putting into operation
  6.1 Tyre pressure control system
    6.1.1 Putting into operation and functional check
00 0289 114 0.pdf:
CTIC TI 2.0
Table of contents
1 Introduction
  1.1 General information
    1.1.1 Validity of manual
    1.1.2 Information about these Fitting Instructions
    1.1.3 Symbols and notes
    1.1.4 Optional equipment
    1.1.5 Warranty information
    1.1.6 Qualified specialist workshop
    1.1.7 Spare parts and technical questions
  1.2 Tightening torques
    1.2.1 Tightening torques for metric ISO screw threads
    1.2.2 Tightening torques for metric fine thread screws
    1.2.3 Tightening torques for hydraulic fittings with ferrule
    1.2.4 Tightening torques for hydraulic male connectors SDS shape B and E
    1.2.5 Tightening torques for hydraulic male connectors SDE shape H, with adjustable direction
2 Safety
  2.1 Identifying warnings
    2.1.1 Hazard signs
    2.1.2 Signal word
  2.2 Safety rules
    2.2.1 Importance of Fitting Instructions
    2.2.2 Optional equipment and spare parts
    2.2.3 Danger due to damage to the tyre pressure control system
    2.2.4 Technical condition
    2.2.5 Complying with technical limit values
    2.2.6 Keeping protective devices functional
    2.2.7 Personal protective equipment
    2.2.8 Dangers when driving on the road and on the field
    2.2.9 Environmental protection and disposal
    2.2.10 Compressed air
    2.2.11 Maintenance work and repair work
    2.2.12 Raised machine parts and loads
    2.2.13 Welding work prohibited
3 Installation guidelines
  3.1 Tyre pressure control system
    3.1.1 Approvals
    3.1.2 Tyre pressure control system on tractor vehicle
    3.1.3 Valve unit
      Installation position
    3.1.4 Rotary transmission leadthroughs
      Fastening of rotary couplings
      Position of drilled hole for filling and drain connections in the wheel rim
4 Package list
  4.1 Tyre pressure control system
    4.1.1 Delivery state
5 Installation
  5.1 Tyre pressure control system
    5.1.1 Checking the scope of delivery (trained personnel)
    5.1.2 Installing the valve unit
    5.1.3 Installing the rotary transmission leadthroughs
      Installing the wheel rim connections
      Installing the rotary transmission leadthrough
    5.1.4 Connecting the air distribution manifold
6 Putting into operation
  6.1 Tyre pressure control system
    6.1.1 Putting into operation and functional check
CLAAS universal mounting kit GPS PILOT.pdf:
CLAAS universal mounting kit
Table of contents
1 Introduction
  1.1 General Information
    1.1.1 Handling of manual
    1.1.2 Validity
    1.1.3 Warranty
2 Safety
  2.1 General Information
    2.1.1 To be observed in particular
    2.1.2 Intended use
  2.2 Safety rules
  2.3 Safety instructions in this manual
    2.3.1 Identification of warning and danger signs
3 Product description
  3.1 CLAAS universal mounting kit
4 Package list
  4.1 Overview
    4.1.2 Overview of electronics and accessories
    4.1.3 Overview of safety components
    4.1.4 Overview of cables
    4.1.5 Open Center steering valve and fittings
    4.1.6 LS steering valve and fittings
    4.1.7 Lock-up valve unit and screw-in adapters
    4.1.8 EGNOS components
    4.1.10 Overview of wiring loom / connections
      Abbreviations of connections
5 Mounting
  5.1 Hydraulic system
    5.1.1 Installation variants
      Non-reactive variant with Open Center
      Reactive variant with Open Center
      Non-reactive variant with LS
      Reactive variant with LS
    5.1.2 Hydraulic system installation
      LS steering valve connections
      OC steering valve connections
      Lock-up valve unit connections
      Installation examples
  5.2 Navigation computer
    5.2.1 Navigation computer
      Installation positions
      Installation examples
  5.3 Safety devices
    5.3.1 Seat contact switch
      Installation examples
    5.3.2 Overrider switch
      Installation examples
  5.4 Operating and control elements
    5.4.1 Terminal
      Installation examples
    5.4.2 Master switch
      Installation examples
  5.5 GPS antenna
    5.5.1 EGNOS
      EGNOS installation examples
  5.6 Cable routing
6 Technical terms and abbreviations
  6.1 GPS PILOT
John Deere Repair Technical Manual PDF
John Deere 18-Speed PST Repair Manual Component Technical Manual CTM168 10DEC07
John Deere Repair Technical Manual PDF
John Deere Diesel Engines POWERTECH 2.9 L Component Technical Manual CTM126 Spanish
John Deere Repair Technical Manual PDF
John Deere Transmission Control Unit Component Technical Manual CTM157 15JUL05
John Deere Parts Catalog PDF
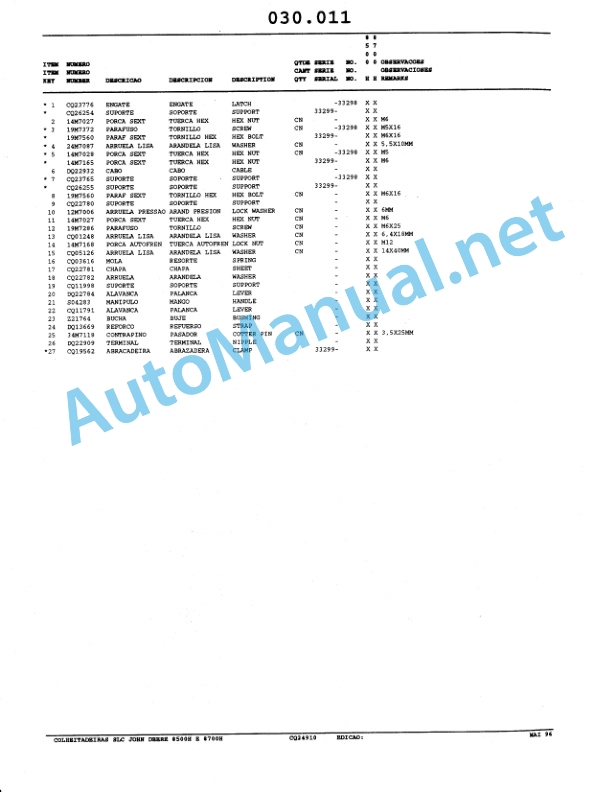
John Deere Tractors 6300, 6500, and 6600 Parts Catalog CQ26564 (29SET05) Portuguese
John Deere Repair Technical Manual PDF
John Deere PowerTech M 10.5 L and 12.5 L Diesel Engines COMPONENT TECHNICAL MANUAL CTM100 10MAY11


				