- Claas
- Grove
- New Holland
- Komatsu
- Kubota
- John Deere
- Linde
- Bomag
- CASE
- Clark
- JCB
- Jungheinrich
- Linde
- Yale
- Yanmar
- Manitou
- Manitowoc
- CNH
- Doosan
- Fiatagri
- Fiatallis
- Fiatallis Other Manual PDF
- Flexi Coil
- Ford New Holland
- Ford New Holland Other Manual PDF
- Huyndai
- Hypac
- Hyster
- Hyster Service Manual PDF
- Isuzu
- Kobelco
- Kohler
- Krupp
- Lombardini
- Mahindra
- Nuvera
- Perkins
- Sperry New Holland
- Utilev
- Versatile
- ZF
 Combines Assembly Instruction EN 1")
 Combines Assembly Instruction EN 2")
 Combines Assembly Instruction EN 3")
 Combines Assembly Instruction EN 4")
 Combines Assembly Instruction EN 5")
 Combines Assembly Instruction EN 6")
 Combines Assembly Instruction EN 7")
 Combines Assembly Instruction EN 8")
 Combines Assembly Instruction EN 9")
%20Combines%20Assembly%20Instruction%20EN&url=https://automanual.net/doc/claas-conspeed-8-lexion-912-combines-assembly-instruction-en/&media=https://automanual.net/wp-content/uploads/2024/04/claas-conspeed-8-lexion-912-combines-assembly-instruction-en-1.jpg)
Claas Conspeed 8 Lexion (912) Combines Assembly Instruction EN
$50.00
- Model: Conspeed 8 Lexion (912) Combines
- Type Of Manual: Assembly Instruction
- Language: EN
- Format: PDF(s)
- Size: 16.1 MB
File List:
00 0290 143 2.pdf
00 0292 437 0.pdf
00 0300 374 1.pdf
00 0905 732 0.pdf
00 0905 881 2.pdf
00 0998 238 1.pdf
00 0998 351 2.pdf
00 0998 972 4.pdf
00 0905 881 2.pdf:
Anbauanleitung
Zentralkupler
1 Einleitung
Einleitung
2 Inhalt
3 Allgemeine Hinweise
Besonders zu beachten
Kennzeichnung von Warn- und Gefahrenhinweisen
Bestimmungsgeme Verwendung
Sicherheitsaufkleber mit Warnbildzeichen
Allgemeine Sicherheitshinweise
4 Lieferumfang
Lieferumfang CONSPEED Zentralkupler fr Revision LEXION
Anbausatz 000 905 875 0
Lieferumfang CONSPEED Zentralkupler fr LEXION (Rearview CONSPEED Typ 907 / 908 auf CONSPEED Typ 911 / 912)
Anbausatz 000 905 688 0
5 Anbau Zentralkupler
Schnellkupplung demontieren
Zentralkupler mountieren
Vor Inbetriebnahme prfen und beachten!
6 Anbau Zentralkupler (Rckbau)
Schnellkupplung demontieren
Zentralkupler mountieren
Vor Inbetriebnahme prfen und beachten!
Fittingion
Introduction
2 Table of contents
3 General Information
Of special importance
Identification of warnings and dangers
Designated use
Safety decals with warning symbols
General safety instructions
4 Shipping package
Package list for CONSPEED central coupling for revision LEXION
Mounting kit 000 905 875 0
Package list CONSPEED central coupling for LEXION (dismantling CONSPEED model 907 / 908 on CONSPEED model 911 / 912)
Mounting kit 000 905 688 0
5 Attaching central coupling
Disassembly of quick release coupling
Installing central coupling
Check and observe the following before putting into operation
6 Mounting the central coupling (dismantling)
Disassembly of quick release coupling
Installing central coupling
Check and observe the following before putting into operation
Assembly notice
Central connection
1 Introduction
Introduction
2 Table of materials
3 General Consignments
Important
Identification of prescriptions concerning warnings and dangers
Usage compliant with the prescribed usage
Safety etiquette with danger pictograms
Signes de scurit gnrales
4 Pices fournies
Four pieces, central connection CONSPEED for new LEXION version
See transformation pieces 000 905 875 0
Four pieces, central connection CONSPEED pour LEXION (transformation CONSPEED, modle 907 / 908 into CONSPEED, modle 911 / 912)
See transformation pieces 000 905 688 0
5 Assembly of central connection
Rapid disassembly
Assembly of central connection
Check the relevant points before placing the machine in service!
6 Assembly of the central connection (transformation)
Rapid disassembly
Assembly of central connection
Check the relevant points before placing the machine in service!
Assembly instructions
Central graft
1. Introduction
Introduction
3 General indications
Important warnings
Symbols relating to warnings and danger notices
Rules for correct use
Decals with danger symbols
General safety instructions
4 Total susembly for LEXION overhaul
Mounting kit 000 905 875 0
CONSPEED central coupling supply assembly for LEXION (retrofit CONSPEED type 907 / 908 to CONSPEED type 911 / 912)
Mounting kit 000 905 688 0
5 Assembly of the central coupling
Removing the quick coupling
Assembly of the central coupling
Before fielding, check and observe!
6 Fitting the central clutch (retrofit)
Removing the quick coupling
Assembly of the central coupling
Before fielding, check and observe!
00 0998 351 2.pdf:
ANBAUANLEITUNG
CLAAS Auto-Contour
1 Instructions
Instructions
2 Inhalt
3 Allgemeine Hinweise
Besons on the beach
Kennzeichnung von Warn- und Gefahrenhinweisen
Sicherheitaveckleber mit Warnbildzeichen
Bestimmungsgeme Verwendung
Lieferumfang
Contact for MEDION/LEXION: 998 346.2
4 Lieferumfang
Lieferumfang Fortsetzung
Contact for MEDION/LEXION: 998 346.2
5 Anbau CLAAS Auto-Contour
Autokontur anbauen
Verlegen des Kabelbas
Anschluss CLAAtour rights
Anschluss CLAAS Auto-Contour links
Anschluss Versorgungskupplung bei LEXION
Electrical Anschluss in MEDION:
Cable befestigen
Fertigmontage CLAAS Auto-Contour
Instructions for CLAAS Auto-Contour
You can open the doors and the beaches!
FITTING INSTRUCTIONS
CLAAS Auto-Contour
1 Introduction
Introduction
2 Table of contents
3 General Information
Of special importance
Identification of warnings and dangers
Safety decal with warning symbol
Designated use
4 Package list
Package list
Mounting kit for MEDION/LEXION: 998 346.2
Package list continued
Mounting kit for MEDION/LEXION: 998 346.2
5 Mounting CLAAS Auto-Contour
Mounting the sensor
Routing the wiring harness
Connecting CLAAS Auto-Contour on the right
Connection of CLAAS Auto-Contour on the left
Connection of supply coupling on LEXION
Electrical connection in MEDION:
Attaching the cable
Final installation of CLAAS Auto-Contour
Setting the CLAAS Auto-Contour
Check and observe the following before putting into operation
INSTALLATION INSTRUCTIONS
CLAAS Auto-Contour
1 Introduction
Introduction
2 Table of contents
3 General remarks
Observe in particular
Identification of warning and hazard requirements
Adhesive safety labels with danger pictogram
Use as intended
4 pieces supplied
Parts supplied
Conversion parts set for MEDION/LEXION: 998 346.2
Parts supplied, continued
Conversion parts set for MEDION/LEXION: 998 346.2
5 Mounting the CLAAS Auto-Contour
Assembly of the Autokontur
Installing the Wiring Harness
Connecting the CLAAS Auto-Contour right side
Connecting the CLAAS Auto-Contour left side
Connecting the power connection for the LEXION
Electrical connection for the MEDION:
Cable fixing
Final assembly of the CLAAS Auto-Contour
Adjusting the CLAAS Auto-Contour
Check the following points before putting the machine into operation!
Mountain structure
CLAAS Auto-Contour
1 Introduction
Introduction
3 General information
Important warnings
Symbols concern warnings and warnings of pericolo
Decal with pericolo symbol
Norm per il corretto impiego
4 Complessivo di fornitura
Complete fornitura
Mounting kit for MEDION/LEXION: 998 346.2
Complete supply, continuation
Mounting kit for MEDION/LEXION: 998 346.2
5 Montaggio CLAAS Auto-Contour
Montare la Autokontur
Installation of matassa cavity
Collegamento CLAAS Auto-Contour a destra
Collegamento CLAAS Auto-Contour a disaster
Connection of the power supply for LEXION
Electrical connection for MEDION:
Fissare il cavo
Final Montaggio CLAAS Auto-Contour
Registration CLAAS Auto-Contour
First of all messes in the field, check and verify!
AANBOUWHANDLEIDING
CLAAS Auto-Contour
1 Inleiding
Inleiding
2 Inhoudsoopgave
3 Algemene aanwijzingen
Waar u bijzonder op moet letten
Aanduiding van waarschuwingen en gevaren
Veiligheidsstickers met gevarensymbolen
Gebruik volgens de bestemming
4 Omvang van de levering
Omvang van de levering
Contact details for MEDION/LEXION: 998 346.2
Omvang van de levering vervolg
Contact details for MEDION/LEXION: 998 346.2
5 CLAAS Auto-Contour assembly
Autokontur monteren
Plaatsen van de kabelboom
Aansluiting CLAAS Auto-Contour rights
Aansluiting CLAAS Auto-Contour links
Aansluiting voedingskoppeling bij LEXION
Electrical connections in MEDION:
Cable bevestigen
Eindmontage CLAAS Auto-Contour
Instelling CLAAS Auto-Contour
You need to control your equipment in a timely manner!
00 0998 972 4.pdf:
ANBAUANLEITUNG
Lagermaisschnecke
1 Instructions
Instructions
2 Inhalt
3 Allgemeine Hinweise
Besons on the beach
Kennzeichnung von Warn- und Gefahrenhinweisen
Sicherheitaveckleber mit Warnbildzeichen
Bestimmungsgeme Verwendung
Anbausatz 00 0995 112 1
Anbausatz 00 0995 112 1
Anbausatz 00 0995 112 1
4 Lieferumfang Lagermaisschnecke
Anbausatz 00 0995 112 1
Anbausat00 0995 112 1
Anbau95 112 1
5 Anbau Lagermaisschnecke
Montage of the Lagermaisschnecke
Hydraulic assembly
Rechte und linke klappbare Mulde bei CONSPEED 8-75 FC / F CONSPEED 8-70 FC / F CONSPEED 6-80 FC / F CONSPEED 6-75 FC / F CONSPEED 6-70 FC
Hydraulikplan CONSPEED + LEXION Typ 452 – 568
Hydraulikplan CONSPEED + LEXION Typ 580 – 589
Mulde links and rechts auen bei CONSPEED 6-75 C
Hydraulikplan CONSPEED 6-75 C + LEXION Typ 452 – 568
Hydraulikplan CONSPEED 6-75 C + LEXION Typ 580 – 589
Mulde – unten
Hydraulic valves mounted by CONSPEED bis Masch.Nr.: 91101393, CONSPEED bis Masch.Nr.: 91201185
Hydraulic valves mounted on CONSPEED + LEXION Type 580 – 589
Aufkleber montieren
You can open the doors and the beaches!
FITTING INSTRUCTIONS
Maize auger
1 Introduction
Introduction
2 Table of contents
3 General Information
Of special importance
Identification of warnings and dangers
Safety decl with warning symbol
Desed use
4 Shipping package maize auger
Mounting kit 00 0995 112 1
Mounting kit 00 0995 112 1
Mounting kit 00 0995 112 1
Mounting kit 00 0995 112 1
Mounting kit 00 0995 112 1
Mounting kit 00 0995 112 1
5 Attaching the maize auger
Assembly of the maize auger
Assembly of the hydraulic lines
Right and left folding trough on CONSPEED 8-75 FC / F CONSPEED 8-70 FC / F CONSPEED 6-80 FC / F CONSPEED 6-75 FC / F CONSPEED 6-70 FC
Hydraulics diagram CONSPEED + LEXION Model 452 – 568
Hydraulics diagram CONSPEED + LEXION Model 580 – 589
Outside left and right trough on CONSPEED 6-75 C
Hydraulics diagram CONSPEED 6-75 C + LEXION Model 452 – 568
Hydraulics diagram CONSPEED 6-75 C + LEXION Model 580 – 589
Trough – bottom
Attaching hydraulic connections for CONSPEED to machine no.: 91101393, CONSPEED to machine no.: 91201185
Assembling hydraulic connections on CONSPEED + LEXION Model 580 – 589
Attach decals
Check and observe the following before putting into operation
INSTALLATION INSTRUCTIONS
Corn auger
1 Introduction
Introduction
2 Table of contents
3 General remarks
Observe in particular
Identification of warning and hazard requirements
Adhesive safety labels with danger pictogram
Use as intended
4 Pieces supplied Corn auger
Transformation parts set 00 0995 112 1
Transformation parts set 00 0995 112 1
Transformation parts set 00 0995 112 1
Transformation parts set 00 0995 112 1
Transformation parts set 00 0995 112 1
Transformation parts set 00 0995 112 1
5 Mounting the corn auger
Mounting the corn auger
Installation of hydraulic pipes
Right and left folding buckets for CONSPEED 8-75 FC / F CONSPEED 8-70 FC / F CONSPEED 6-80 FC / F CONSPEED 6-75 FC / F CONSPEED 6-70 FC
CONSPEED + LEXION hydraulic diagram model 452 – 568
CONSPEED + LEXION hydraulic diagram model 580 – 589
Left and right exterior buckets for CONSPEED 6-75 C
Hydraulic diagram CONSPEED 6-75 C + LEXION model 452 – 568
Hydraulic diagram CONSPEED 6-75 C + LEXION model 580 – 589
Bucket – bottom
Installation of hydraulic fittings on CONSPEED for serial numbers up to: 91101393, CONSPEED for serial numbers up to: 91201185
Installation of hydraulic fittings on CONSPEED + LEXION model 580 – 589
Installing adhesive labels
Check the following points before putting the machine into operation!
Mountain structure
Coclea da mais allettato
1 Introduction
Introduction
3 General information
Important warnings
Symbols concern warnings and warnings of pericolo
Decal with pericolo symbol
Norm per il corretto impiego
4 Complessivo di fornitura Coclea da mais allettato
Mountain kit 00 0995 112 1
Mountain kit 00 0995 112 1
Mountain kit 00 0995 112 1
Mountain kit 00 0995 112 1
Mountain kit 00 0995 112 1
Mountain kit 00 0995 112 1
5 Montaggio della coclea da mais allettato
Montaggio della coclea da mais allettato
Montaggio delle tubazioni idrauliche
Tramoggia ribaltabile destra e sinistra con CONSPEED 8-75 FC / F CONSPEED 8-70 FC / F CONSPEED 6-80 FC / F CONSPEED 6-75 FC / F CONSPEED 6-70 FC
Hydraulic diagram CONSPEED + LEXION type 452 – 568
Hydraulic diagram CONSPEED + LEXION type 580 – 589
Tramoggia eternal and serious with CONSPEED 6-75 C
Hydraulic diagram CONSPEED 6-75 C + LEXION type 452 – 568
Hydraulic diagram CONSPEED 6-75 C + LEXION type 580 – 589
Tramoggia
Tramoggia – in basso
Montaggio dei connectori idraulici su CONSPEED fino a num. machine: 91101393, CONSPEED fino a num. machine: 91201185
Montaggio dei connectori didraulici su CONSPEED + LEXION type 580 – 589
Application of the decal
Prima della messa en campo, controllare et osservare!
AANBOUWHANDLEIDING
Snijmasschroef
1 Inleiding
Inleiding
2 Inhoudsoopgave
3 Algemene aanwijzingen
Waar ubijzonder op moet letten
Ading van waarschuwingen en gevaren
Veiligheidsstickers met gevarensymbolen
Gebruik volgens de bestemming
4 Leveringsomvang snijmasschroef
Aanbouwset 00 0995 112 1
Aanbouwset 00 0995 112 1
Aanbouwset 00 0995 112 1
Aanbouwset 00 0995 112 1
Aanbouwset 00 0995 112 1
Aanbouwset 00 0995 112 1
5 Aanbouw snijmasschroef
Montage van de snijmasschroef
Hydraulic installation in Leidingen
Rechter en linker inklapbare trog bij CONSPEED 8-75 FC / F CONSPEED 8-70 FC / F CONSPEED 6-80 FC / F CONSPEED 6-75 FC / F CONSPEED 6-70 FC
Hydraulic diagram CONSPEED + LEXION type 452 – 568
Hydraulic diagram CONSPEED + LEXION type 580 – 589
Trog links in right arms are placed in CONSPEED 6-75 C
Hydraulic diagram CONSPEED 6-75 C + LEXION type 452 – 568
Hydraulic diagram CONSPEED 6-75 C + LEXION type 580 – 589
Trog – wave
Hydraulic connections are mounted on CONSPEED tot machine nr.: 911013 CONSPEED tot machine n Hydraulic connections between CONSPEED + LEXION type 580 – 589
Sticker aanbrengen
You need to control your equipment in a timely manner!


John Deere Parts Catalog PDF
John Deere Tractors 7500 Parts Catalog CPCQ26568 30 Jan 02 Portuguese


John Deere Repair Technical Manual PDF
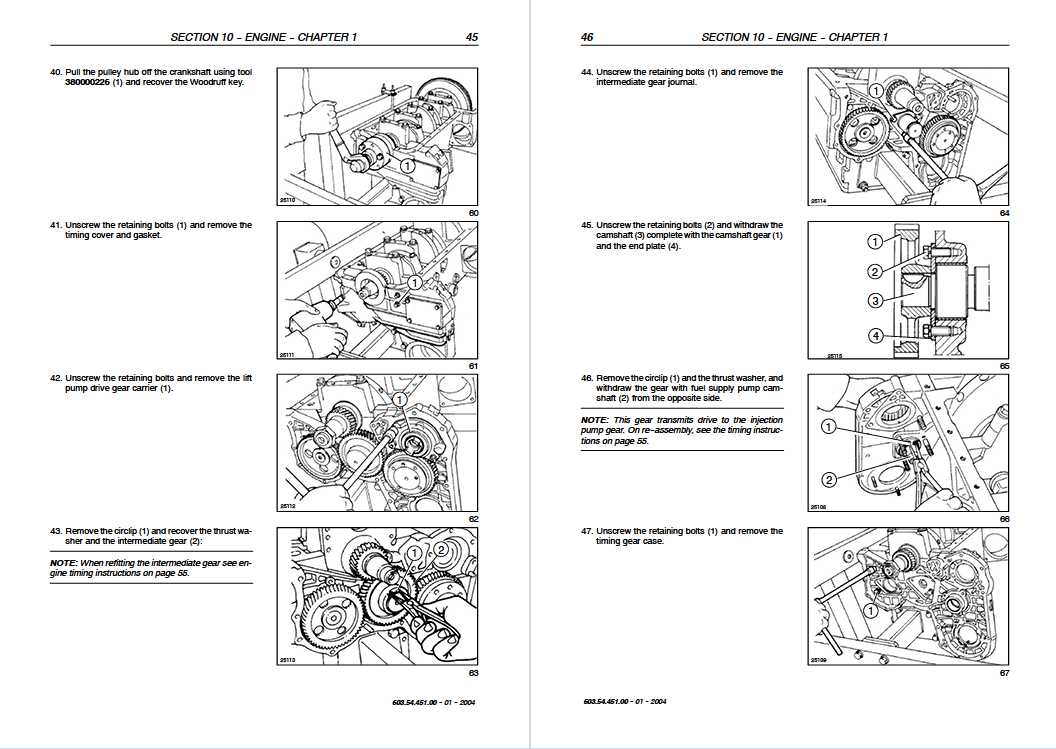
John Deere PowerTech M 10.5 L and 12.5 L Diesel Engines COMPONENT TECHNICAL MANUAL CTM100 10MAY11
John Deere Parts Catalog PDF
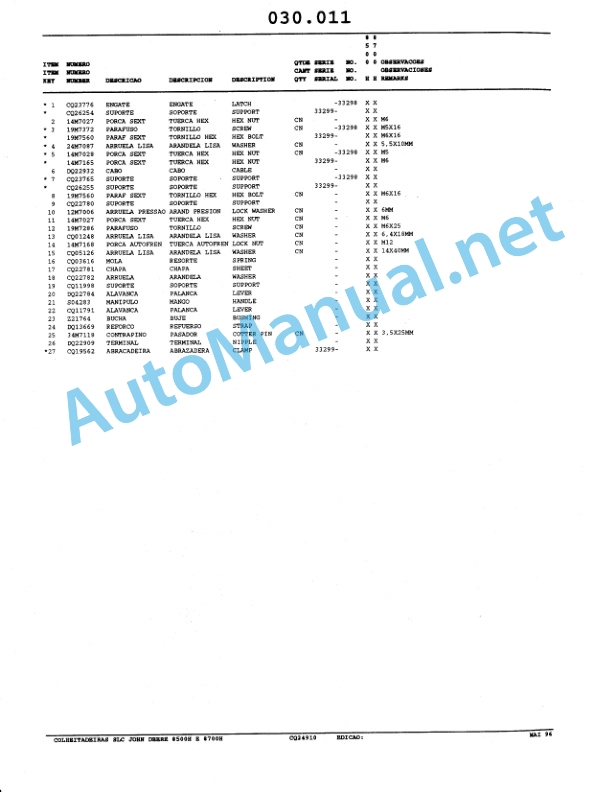
John Deere Harvesters 8500 and 8700 Parts Catalog CPCQ24910 Spanish


John Deere Repair Technical Manual PDF


John Deere Repair Technical Manual PDF


%20Interim%20Tier%204%20Stage%20III%20B%20Component%20Technical%20Manual%20CTM104754%2025%20July%202012%20Portuguese&url=https://automanual.net/doc/john-deere-powertech-m-6068-oem-diesel-engines-above-130-kw-174-hp-compo-technical-manual-ctm104754-25jul12-portuguese/&media=https://automanual.net/wp-content/uploads/2023/08/john-deere-powertech-6068-engines-above-130-kw-174-hp-interim-tier-4-stage-iii-b-component-technical-manual-ctm104754-25-july-2012-portuguese-1.jpg)

John Deere Repair Technical Manual PDF

New Holland Service Manual PDF


John Deere Repair Technical Manual PDF
John Deere Diesel Engines POWERTECH 2.9 L Component Technical Manual CTM126 Spanish


John Deere Repair Technical Manual PDF
John Deere Application List Component Technical Manual CTM106819 24AUG20
- Claas
- Grove
- New Holland
- Komatsu
- Kubota
- John Deere
- Linde
- Bomag
- CASE
- Clark
- JCB
- Jungheinrich
- Linde
- Yale
- Yanmar
- Manitou
- Manitowoc
- CNH
- Doosan
- Fiatagri
- Fiatallis
- Fiatallis Other Manual PDF
- Flexi Coil
- Ford New Holland
- Ford New Holland Other Manual PDF
- Huyndai
- Hypac
- Hyster
- Hyster Service Manual PDF
- Isuzu
- Kobelco
- Kohler
- Krupp
- Lombardini
- Mahindra
- Nuvera
- Perkins
- Sperry New Holland
- Utilev
- Versatile
- ZF