- Claas
- Grove
- New Holland
- Komatsu
- Kubota
- John Deere
- Linde
- Bomag
- CASE
- Clark
- JCB
- Jungheinrich
- Linde
- Yale
- Yanmar
- Manitou
- Manitowoc
- CNH
- Doosan
- Fiatagri
- Fiatallis
- Fiatallis Other Manual PDF
- Flexi Coil
- Ford New Holland
- Ford New Holland Other Manual PDF
- Huyndai
- Hypac
- Hyster
- Hyster Service Manual PDF
- Isuzu
- Kobelco
- Kohler
- Krupp
- Lombardini
- Mahindra
- Nuvera
- Perkins
- Sperry New Holland
- Utilev
- Versatile
- ZF
 Mower Operator Manual EN 1")
 Mower Operator Manual EN 2")
 Mower Operator Manual EN 3")
 Mower Operator Manual EN 4")
 Mower Operator Manual EN 5")
 Mower Operator Manual EN 6")
 Mower Operator Manual EN 7")
%20Mower%20Operator%20Manual%20EN&url=https://automanual.net/doc/claas-disco-8400-f54-mower-operator-manual-en/&media=https://automanual.net/wp-content/uploads/2024/04/claas-disco-8400-f54-mower-operator-manual-en-1.jpg)
Claas Disco 8400 (F54) Mower Operator Manual EN
$50.00
- Model: Disco 8400 (F54) Mower
- Type Of Manual: Operator Manual
- Language: EN
- Format: PDF(s)
- Size: 49.9 MB
File List:
00 0290 715 1.pdf
00 0290 716 1.pdf
00 0295 793 3.pdf
00 1329 399 0.pdf
00 2348 408 0.pdf
00 2348 427 0.pdf
00 0295 793 3.pdf:
DISCO 9100 C / RC Contour
DISCO 9100 Contour
DISCO 8400 C / RC Contour
DISCO 8400 Contour
Table of contents
1 To this operator’s manual
1.1 Notes on the manual
1.1.1 General instructions
1.1.2 Using the manual
Directions
1.1.3 Validity of manual
1.1.4 Symbols and notes
1.1.5 Technical specifications
2 Safety
2.1 Safety rules
2.1.1 Particularly important
2.1.2 Qualification of drivers and maintenance personnel
2.1.3 Intended use
2.1.4 Reasonably foreseeable misuse
2.1.5 Safety and accident prevention regulations
2.1.6 First aid measures
2.1.7 Danger of injury from hydraulic liquid
2.2 Safety decals on the machine
2.2.1 Safety decals
2.2.2 Positioning on the machine
3 Machine description
3.1 Overview and method of operation
3.1.1 Overview of DISCO 9100 C / 9100 RC / 8400 C / 8400 RC
3.1.2 Overview of DISCO 9100 / 8400
3.1.3 Function of DISCO 9100 C / 8400 C
3.1.4 Function of DISCO 9100 RC / 8400 RC
3.1.5 Function of DISCO 9100 / 8400
3.2 Optional machine equipment
3.2.1 Optional machine equipment
3.2.2 High-cut skids
3.2.3 Bolted wear skids
3.2.4 Lucerne bar protection
3.2.5 Crop spreader
3.2.6 CLAAS Standard Terminal
3.2.7 CLAAS COMMUNICATOR
3.2.8 5 metre ISOBUS connecting cable
3.2.9 3 metre ISOBUS connecting cable
3.2.10 Hydraulically folding safety guards
3.2.11 Hydraulic system connectors, 3-fold
3.2.12 Slip-on yoke for 8-piece universal drive shaft
3.2.13 Legal equipment for France
3.2.14 Lighting adapter for USA
3.3 Identification plate and vehicle identification number
3.3.1 Spare parts and technical questions
3.3.2 Position of identification plate
3.3.3 Position of identification no.
3.3.4 Explanation of machine identification plate
3.3.5 ISOBUS program version
4 Operating and control elements
4.1 CLAAS STANDARD TERMINAL
4.1.1 Overview of keys
4.1.2 Overview of LEDs
4.2 ISOBUS terminal
4.2.1 ISOBUS monitor
4.2.2 ISOBUS title bar
4.2.3 ISOBUS menu bar
4.2.4 ISOBUS softkey
4.2.5 ISOBUS data field
4.2.6 ISOBUS status bar
4.3 CLAAS COMMUNICATOR
4.3.1 Overview
4.3.2 Monitor
4.3.3 Title bar
4.3.4 Menu bar
4.3.5 Data field
4.3.6 Softkey
5 Technical specifications
5.1 DISCO 9100 C – type F57
5.1.1 Dimensions
5.1.2 Weights
5.1.3 Requirements on the tractor
5.1.4 Version
5.1.5 Sound pressure level
5.1.6 Lubricants
5.2 DISCO 9100 RC – Type F57
5.2.1 Dimensions
5.2.2 Weights
5.2.3 Requirements on the tractor
5.2.4 Version
5.2.5 Noise level
5.2.6 Lubricants
5.3 DISCO 9100 – type F55
5.3.1 Dimensions
5.3.2 Weights
5.3.3 Requirements on the tractor
5.3.4 Version
5.3.5 Noise level
5.3.6 Lubricants
5.4 DISCO 8400 C – type F56
5.4.1 Dimensions
5.4.2 Weights
5.4.3 Requirements on the tractor
5.4.4 Version
5.4.5 Noise level
5.4.6 Lubricants
5.5 DISCO 8400 RC – Type F56
5.5.1 Dimensions
5.5.2 Weights
5.5.3 Requirements on the tractor
5.5.4 Version
5.5.5 Noise level
5.5.6 Lubricants
5.6 DISCO 8400 – type F54
5.6.1 Dimensions
5.6.2 Weights
5.6.3 Requirements on the tractor
5.6.4 Version
5.6.5 Noise level
5.6.6 Lubricants
6 Machine preparation
6.1 Tractor preparation
6.1.1 Axle loads, minimum ballast, total weight
6.1.2 Calculating the minimum front ballast
6.1.3 Calculating the minimum rear ballast
6.1.4 Calculating the actual front axle load
6.1.5 Calculating the actual total weight
6.1.6 Calculating the actual rear axle load
6.1.7 Calculation table
6.1.8 Converting the Walterscheid upper link
6.1.9 Installing the CLAAS COMMUNICATOR
6.1.10 Connecting the CLAAS COMMUNICATOR on tractors with ISOBUS socket
6.1.11 Connecting the CLAAS COMMUNICATOR on tractors without ISOBUS socket
6.2 Shutting down and securing the machine
6.2.1 Switching off and securing the machine
6.2.2 Securing the raised machine
6.3 Adapting the machine
6.3.1 Universal drive shaft – Checking the length
6.3.2 Universal drive shaft – Adapting the length
6.3.3 Cut off the universal drive shaft guard
6.3.4 Fitting the universal drive shaft to the machine
6.3.5 Adapting the lower link / upper link category
6.3.6 Fitting the rope
6.3.7 Adjusting the outer swathing disc
6.4 Hitching the machine
6.4.1 Hitching up the attachable frame
6.4.2 Installing the universal drive shaft
6.4.3 Connecting the hydraulic hoses
6.4.4 Connecting the electrics
6.4.5 Raising the stands
6.4.6 Laying the rope
6.5 Unhitching the machine
6.5.1 Parking the machine safely
6.5.2 Lowering the stands
6.5.3 Removing the rope
6.5.4 Disconnecting the electric system
6.5.5 Storing the control terminal
6.5.6 Disconnecting the hydraulic hoses
6.5.7 Removing the universal drive shaft
6.5.8 Unhitching the attachable frame
6.6 Loading the machine
6.6.1 Loading / unloading the machine
7 Operation
7.1 General safety precautions
7.1.1 Prior to operation
7.2 Driving on the road
7.2.1 Road travel
7.3 Fieldwork settings
7.3.1 Adjusting the attachable frame
7.3.2 Adjusting the load relief of the mower units
7.3.3 Adjusting the cutting height
7.3.4 Adjusting the tine conditioner
7.3.5 Adjusting the roller conditioner
7.3.6 Setting the swath width
7.3.7 Adjusting the crop spreader*
7.3.8 Mowing without conditioner effect
7.3.9 Engaging the bump safeguard
7.3.10 Retensioning the bump safeguard
7.4 Fieldwork
7.4.1 Fieldwork
7.4.2 Swinging to transport position
7.4.3 Folding to working position
7.4.4 Machine use
Optimum PTO speed
7.4.5 Mowing methods
7.4.6 Turning area position
7.4.7 Instructions for mowing
7.4.8 Difficult conditions of use
7.4.9 Recommendation for environmental protection
7.5 CLAAS STANDARD TERMINAL
7.5.1 General warnings
7.6 Switching the CLAAS STANDARD TERMINAL on/off
7.6.1 Switching on the terminal
7.6.2 Switching off the terminal
7.6.3 Terminal – automatic shutdown
7.7 CLAAS STANDARD TERMINAL load relief
7.7.1 Adjusting the load relief of the mower units
7.8 CLAAS Standard Terminal automatic function
7.8.1 Activating the automatic function
7.8.2 Deactivating the automatic function
7.9 CLAAS STANDARD TERMINAL transport position
7.9.1 Swinging the mower unit to transport position
7.10 CLAAS Standard Terminal working position
7.10.1 Moving the mower unit to working position
7.11 CLAAS Standard Terminal turning area position
7.11.1 Lifting the mower units to the turning area position
7.12 CLAAS Standard Terminal mower unit individual lifting function
7.12.1 Activating the mower unit individual lift
7.13 ISOBUS control unit
7.13.1 Description
7.13.2 Notes on this chapter
7.13.3 Explanations regarding the ISOBUS terms
7.14 Switching the ISOBUS terminal on/off
7.14.1 Switching on the ISOBUS terminal
7.14.2 Starting the ISOBUS control program
7.14.3 Switching off the ISOBUS terminal
7.14.4 Changing the menu
7.15 ISOBUS transport position
7.15.1 Moving the mower units to transport position
7.16 ISOBUS working position
7.16.1 Moving the mower units to working position
7.17 ISOBUS fieldwork
7.17.1 Automatic function
7.17.2 Lifting the mower units to the turning area position
7.17.3 Activating the mower unit individual lift
7.17.4 Adjusting the load relief of the mower units
7.18 ISOBUS Information menu
7.18.1 Calling up the Information“ menu
7.18.2 Resetting service meter
7.19 CLAAS COMMUNICATOR
7.19.1 Notes on this chapter
7.19.2 Recommendations to achieve best possible use
7.20 Switching the CLAAS Communicator on/off
7.20.1 ihing the CLAAS COMMUNICATOR on
7.20.2 Switching the CLAAS COMMUNICATOR off
7.21 Operating the CLAAS Communicator
7.21.1 Select menu“ / cancel key (ESC)
7.21.2 Function keys
7.21.3 Select wheel – data selection and data input
7.21.4 Navigation in the data field
7.21.5 Software maintenance
7.22 CLAAS Communicator service program
7.22.1 Scope of functions
7.22.2 Calling up the service program
7.23 CLAAS Communicator menu descriptions
7.23.1 Changing the menu
7.23.2 Information menu
7.23.3 Brightness / contrast menu
7.23.4 Time and date menu
7.23.5 Memory administration menu
7.23.6 Diagnosis sub-menu
7.23.7 Country settings menu
8 Faults and remedies
8.1 Causes and remedies
8.1.1 Observe for troubleshooting
8.1.2 General trouble and remedy
8.1.3 Removing an ISOBUS sensor fault
9 Maintenance
9.1 Maintenance Information
9.1.1 General warnings
9.1.2 Electrical system
9.1.3 Protective guards
9.1.4 Spare parts
9.5 Ualance
9.1.6 Compressed air and water
9.1.7 Burn prevention
9.1.8 Oils
9.1.9 Fire prevention and explosion prevention
9.1.10 Lines, tubes and hoses
9.2 Overview maintenance intervalls
9.2.1 Handling of maintenance intervals
9.2.2 Before the harvest
9.2.3 After the first 10 operating hours
9.2.4 After the first 50 operating hours
9.2.5 Every 8 operating hours
9.2.6 Every 20 operating hours
9.2.7 Every 50 operating hours
9.2.8 Every 100 operating hours
9.2.9 Every 250 operating hours
9.2.10 Every 500 operating hours or annually
9.2.11 As needed
9.2.12 After the harvest
9.3 Maintenance operations in general
9.3.1 Clean machine
9.3.2 Preserve the machine
9.3.3 Fastening material
9.4 Maintenance operations gearbox
9.4.1 Check gearbox tightness
9.4.2 Check the main gearbox oil level
9.4.3 Changing the main gearbox oil
9.4.4 Cleaning the main transmission breather valve
9.4.5 Checking the angle drive oil level
9.4.6 Checking the angle drive oil level
9.4.7 Changing the angle drive oil
9.4.8 Changing the angle drive oil
9.4.9 Cleaning the angle drive breather valve
9.5 Maintenance operations clutch
9.5.1 Adjusting the friction clutch
9.5.2 Removing and installing the friction clutch
9.5.3 Venting the friction clutch
9.5.4 Replacing the friction discs
9.6 Maintenance operations drive shaft
9.6.1 Maintaining drive shafts
9.6.2 Pulling off the universal drive shaft angle drive
9.7 Maintenance operations hydraulic
9.7.1 Hydraulic system maintenance
9.7.2 Maintaining hydraulic hoses
9.7.3 Accumulator
9.7.4 Removing hydraulic cylinders
9.7.5 Fitting the load relief cylinders
9.8 Mower unit maintenance work
9.8.1 Checking the mower head oil level
9.8.2 Checking the mower head oil level
9.8.3 Changing the mower head oil
Topping up oil
9.8.4 Changing the mower head oil
Topping up oil
9.8.5 Removing the mower knife box
9.8.6 Observing the direction of rotation of cutting discs
9.8.7 Removing the fixing lever
9.8.8 Checking the knives
9.8.9 Replacing the knives
9.8.10 Checking the mower knife holder
9.8.11 Checking the cutting discs
9.8.12 Replacing the cutting discs
9.8.13 Installing the pinion units
9.8.14 Adjusting the anti-wrap guard
9.8.15 Adjusting the safety device
Rear safety guard holder
Front safety guard holder
Outer safety guard holder (DISCO 9100 C / 9100 RC / 9100)
9.9 Tine conditioner maintenance work
9.9.1 Tensioning the drive belt
9.9.2 Changing the drive belts
9.9.3 Attaching/removing the tines
9.10 Roller conditioner maintenance work
9.10.1 Tensioning the drive belt
9.10.2 Changing the drive belts
9.10.3 Adjusting the roller conditioner
Adjusting the tension spring
Adjusting synchronous running
Adjusting the roller clearance
9.11 Various components / Machine body
9.11.1 Marking of pressure gauge, setting aid, machine frame and arm
9.11.2 Installing the arm
9.11.3 Greasing the arm pins
9.11.4 Fitting the shock absorbers
9.11.5 Installing the adjusting aid
9.12 Lubrication chart
9.12.1 Greasing points to be greased every 8 operating hours
9.12.2 Greasing points to be greased every 20 operating hours
9.12.3 Greasing points to be greased every 100 operating hours
9.12.4 Greasing points to be greased every 250 operating hours
9.12.5 Greasing points to be greased every 500 operating hours or once a year
10 Placing out of operation and disposal
10.1 General Information
10.1.1 Putting out of operation and disposal
11 EC-declaration of conformity
11.1 DISCO 9100 C / 9100 RC / 9100 / 8400 C / 8400 RC / 8400
11.1.1 EC Declaration of Conformity
12 Technical terms and abbreviations
12.1 Terms and explanations
12.1.1 Technical terms
12.1.2 Abbreviations
00 2348 408 0.pdf:
CEMIS 100
Table of contents
1 Introduction
1.1 General information
1.1.1 Validity of the manual
1.1.2 Information about this Operator’s Manual
1.1.3 Symbols and notes
1.2 Intended use
1.2.1 Intended use
1.2.2 Reasonably foreseeable misuse
2 Safety
2.1 Safety rules
2.1.1 General safety and accident prevention regulations
2.1.2 Interaction between terminal and machine or tractor
2.1.3 Electrocution by electrical system
3 Product description
3.1 Overview and method of operation
3.1.1 Overview of CEMIS 100
3.1.2 Function principle of CEMIS 100
3.2 Identification plates and identification numbers
3.2.1 Spare parts and technical questions
3.2.2 Identification plate of CEMIS 100
4 Operating and display elements
4.1 CEMIS 100
4.1.1 User interface for LINER
4.1.2 User interface for ROLLANT
4.1.3 User interface for UNIWRAP
5 Technical specifications
5.1 CEMIS 100
5.1.1 Specification
6 Operation
6.1 CEMIS 100
6.1.1 Operating the CEMIS 100
6.1.2 Switching CEMIS 100 on
6.1.3 Switching CEMIS 100 off
7 Maintenance
7.1 CEMIS 100
7.1.1 Daily
8 Putting out of operation and disposal
8.1 General information
8.1.1 Removal from service and disposal
9 Technical terms and abbreviations
9.1 Terms and explanations
9.1.1 Technical words
9.1.2 Abbreviations
00 2348 427 0.pdf:
CEMIS 700
Table of contents
1 Introduction
1.1 General information
1.1.1 Validity of the manual
1.1.2 Information about this Operator’s Manual
1.1.3 Symbols and notes
1.2 Intended use
1.2.1 Intended use
1.2.2 Reasonably foreseeable misuse
2 Safety
2.1 Safety rules
2.1.1 General safety and accident prevention regulations
2.1.2 Interaction between terminal and machine or tractor
2.1.3 Electrocution by electrical system
3 Product description
3.1 Overview and method of operation
3.1.1 Overview of CEMIS 700
3.1.2 Function principle of CEMIS 700
3.2 Identification plates and identification numbers
3.2.1 Spare parts and technical questions
3.2.2 Identification plate of CEMIS 700
4 Information on the product
4.1 Software version
5 Operating and display elements
5.1 CEMIS 700
5.1.1 User interface
5.1.2 Terminal program
6 Technical specifications
6.1 CEMIS 700
6.1.1 Specification
7 Operation
7.1 CEMIS 700
7.1.1 Operating the CEMIS 700
7.1.2 Switching CEMIS 700 on
7.1.3 Switching CEMIS 700 off
7.2 Terminal settings
7.2.1 Making settings
Making settings with the rotary button
Making settings with the touch function
7.2.2 Setting the screen lighting
Daytime mode
Nighttime mode
Activating automatic key lighting
7.2.3 Setting the time and date
7.2.4 Displaying diagnosis information
On-board power supply voltage display
Display of CLAAS ISOBUS ECU address and name
7.2.5 Setting the language and display formats
Setting the language
Setting display formats
7.2.6 Setting the volume
7.2.7 Deleting an ISOBUS implement
8 Maintenance
8.1 Maintenance
8.1.1 Daily
9 Putting out of operation and disposal
9.1 General information
9.1.1 Removal from service and disposal
10 Technical terms and abbreviations
10.1 Terms and explanations
10.1.1 Technical words
10.1.2 Abbreviations


John Deere Repair Technical Manual PDF

John Deere Repair Technical Manual PDF
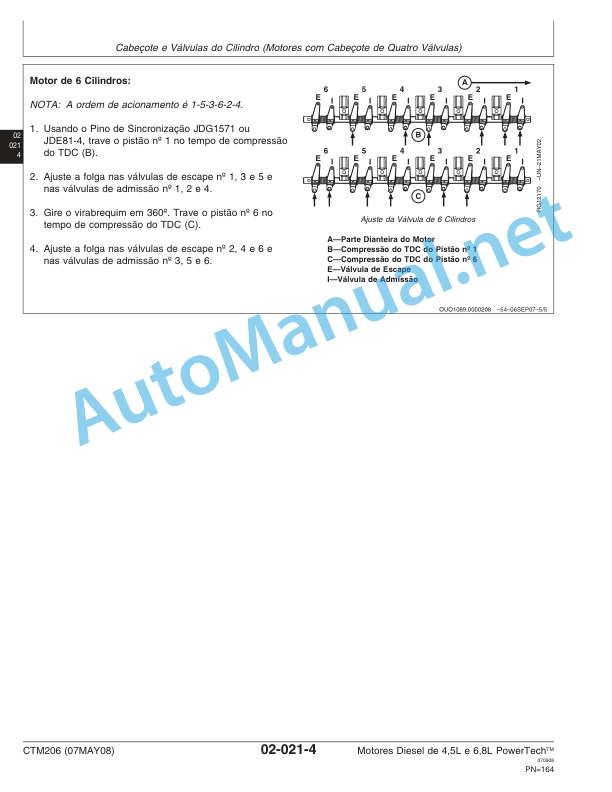
John Deere Diesel Engines PowerTech 4.5L and 6.8L – Motor Base Technical Manual 07MAY08 Portuguese


John Deere Repair Technical Manual PDF
John Deere Diesel Engines POWERTECH 2.9 L Component Technical Manual CTM126 Spanish
%20Portuguese&url=https://automanual.net/doc/john-deere-tractors-6300-6500-and-6600-parts-catalog-cq26564-29set05/&media=https://automanual.net/wp-content/uploads/2023/08/john-deere-tractors-6300-6500-and-6600-parts-catalog-cq26564-29set05-portuguese-1.jpg)


John Deere Parts Catalog PDF
John Deere Tractors 6300, 6500, and 6600 Parts Catalog CQ26564 (29SET05) Portuguese
John Deere Parts Catalog PDF
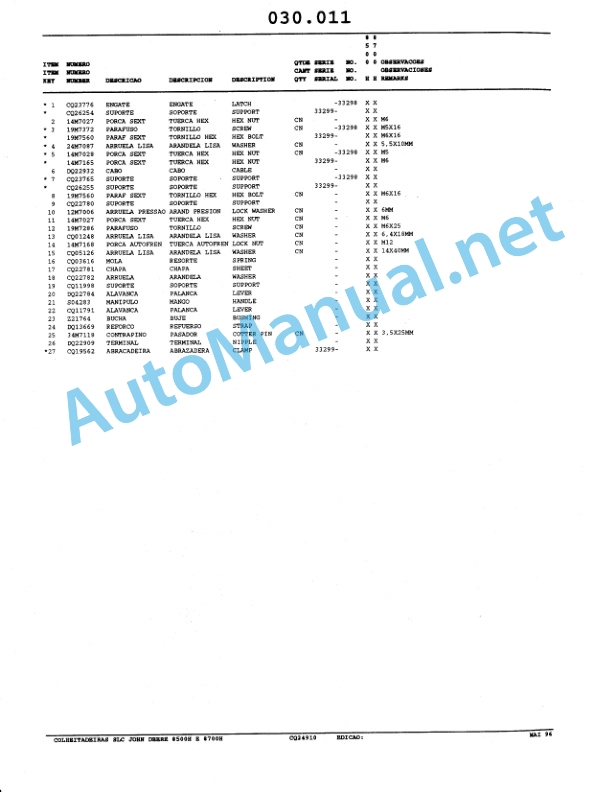
John Deere Harvesters 8500 and 8700 Parts Catalog CPCQ24910 Spanish


John Deere Repair Technical Manual PDF


John Deere Repair Technical Manual PDF


John Deere Repair Technical Manual PDF


John Deere Repair Technical Manual PDF


John Deere Repair Technical Manual PDF
John Deere Transmission Control Unit Component Technical Manual CTM157 15JUL05
- Claas
- Grove
- New Holland
- Komatsu
- Kubota
- John Deere
- Linde
- Bomag
- CASE
- Clark
- JCB
- Jungheinrich
- Linde
- Yale
- Yanmar
- Manitou
- Manitowoc
- CNH
- Doosan
- Fiatagri
- Fiatallis
- Fiatallis Other Manual PDF
- Flexi Coil
- Ford New Holland
- Ford New Holland Other Manual PDF
- Huyndai
- Hypac
- Hyster
- Hyster Service Manual PDF
- Isuzu
- Kobelco
- Kohler
- Krupp
- Lombardini
- Mahindra
- Nuvera
- Perkins
- Sperry New Holland
- Utilev
- Versatile
- ZF