- Claas
- Grove
- New Holland
- Komatsu
- Kubota
- John Deere
- Linde
- Bomag
- CASE
- Clark
- JCB
- Jungheinrich
- Linde
- Yale
- Yanmar
- Manitou
- Manitowoc
- CNH
- Doosan
- Fiatagri
- Fiatallis
- Fiatallis Other Manual PDF
- Flexi Coil
- Ford New Holland
- Ford New Holland Other Manual PDF
- Huyndai
- Hypac
- Hyster
- Hyster Service Manual PDF
- Isuzu
- Kobelco
- Kohler
- Krupp
- Lombardini
- Mahindra
- Nuvera
- Perkins
- Sperry New Holland
- Utilev
- Versatile
- ZF
 Combine Assembly Instruction DE 1")
 Combine Assembly Instruction DE 2")
 Combine Assembly Instruction DE 3")
 Combine Assembly Instruction DE 4")
%20Combine%20Assembly%20Instruction%20DE&url=https://automanual.net/doc/claas-lexion-560-550-montana-580-combine-assembly-instruction-de/&media=https://automanual.net/wp-content/uploads/2024/06/claas-lexion-560-550-montana-580-combine-assembly-instruction-de-1.jpg)
Claas LEXION 560-550 MONTANA (580) Combine Assembly Instruction DE
$30.00
- Model: LEXION 560-550 MONTANA (580) Combine
- Type Of Manual: Assembly Instruction
- Language: DE
- Format: PDF(s)
- Size: 5.9 MB
File List:
– 00 0293 283 1.pdf
– 00 0293 949 0.pdf
– 00 0293 951 0.pdf
– 00 0294 812 0.pdf
00 0293 283 1.pdf
Table of Content:
4 1 Introduction
4.1 1.1 General information
5 2 Safety instructions
5.1 2.1 Note
6 3 Scope of delivery
6.1 3.1 Retrofit kit 91008021 / 91010189
7 4 cultivation
8 4.1 Attachment quick stop
10 4.1.1 Putting the machine out of operation
13 (Fig. 1)
15 4.1.2 Install attachment quick stop
19 – Use special tool (V) to create negative pressure in the hydraulic oil tank (P) or drain hydraulic oil.
20 – Special tool: valve combination for generating negative pressure, spare part no. 000 181 619 1.
21 (Fig. 2)
25 – Screw on the hose line (L) from the coupling (K).
26 – Unscrew coupling (K).
27 (Fig. 3)
31 – Screw on the coupling (1) using the existing cylinder screws.
32 (Fig. 4)
36 – Screw on the brake disc (2) with screws (3). Make sure that the smooth flange surface is on the inside.
37 (Fig. 5)
41 – Screw on the support (4) and flat iron (5) with screws (6) and (7).
42 (Fig. 6
46 – Screw the screw-in socket (8) into the brake caliper (9).
47 (Fig. 7)
51 – Screw the brake caliper (9) to the support arm (T) and support (4) with screws (10).
52 – Tightening torque = 123 Nm
53 (Fig. 8)
57 – Remove plug (S).
58 – Unscrew holder (H).
59 (Fig. 9)
63 – Remove the blind plugs (B).
64 – Lightly grease connecting pieces (11).
65 – Insert connecting pieces (11) into the valve disk (12).
66 (Fig. 10)
70 – Screw on the valve disk (12) with screws (13).
71 – Tightening torque = 25 Nm
72 (Fig. 11)
76 – Screw on holder (H) with existing screws.
77 – Screw on the hose line (14).
78 Tightening torque = 35 Nm
79 – Screw on the hose line (15).
80 tightening torque = 35 Nm
81 (Fig. 12)
85 – Screw the hose line (14) to the brake caliper.
86 – Screw on the hose line (L).
87 (Fig. 13)
91 – Remove blind plug on the hydraulic pump.
92 – Screw in the screw-in socket (16).
93 – Screw on the hose line (15).
94 (Fig. 14)
98 – Insert relay (17) into position (K15).
99 (Fig. 15)
106 Bleeding brake caliper hydraulic cylinder
107 – Connect the ventilation hose (L) with the collecting vessel to the ventilation valve (M).
108 – Switch on diesel engine.
109 – Loosen vent valve (M).
110 – Mechanically actuate the electromagnetic valve quick stop attachment (Y101) and circulation valve (Y77) using an auxiliary tool.
111 Auxiliary tool: pin 2 mm
112 Hydraulic oil must come out without bubbles.
113 – After closing the vent valve (M), stop operating the solenoid valves.
114 – Switch off diesel eng and carry out a test run
118 – If necessary, carry out the following work before the test run:
119 – Tighten screw connections of all newly installed parts.
120 – Install previously removed safety devices.
121 – Check hydraulic oil level. Refill if necessary.
122 – Check transmission oil levels of installed components. Refill if necessary.
123 – Put the used tool back.
124 – Check retrofitted and/or removed electrical connections.
125 – Lubricate all newly added lubrication points.
126 – Check settings on the machine.
127 – Carry out a test run.
128 – Check hydraulic oil level. Refill if necessary.
128.1 1 Introduction
128.2 2 Safety precautions
128.3 3 Package list
129 4 Mounting
130 4.1 Front attachment quick stop
132 4.1.1 Putting the machine out of action
135 (Fig. 1)
137 4.1.2 Fitting the front attachment quick stop
141 – Using the special tool (V), create a vacuum in the hydraulic oil tank (P) or drain hydraulic oil.
142 – Special tool:Valve combination for generating a vacuum, spare part no. 000 181 619 1.
143 (Fig. 2)
147 – Unscrew hose line (L) from clutch (K).
148 – Unscrew the clutch (K).
149 (Fig. 3)
153 – Bolt on clutch (1), using the existing cheese-head screws.
154 (Fig. 4)
158 – Bolt on brake disc (2) using bolts (3). Ensure that the smooth flange face is on the inside.
159 (Fig. 5)
163 – Bolt on support (4) and flat bar (5) using bolts (6) and (7).
164 (Fig. 6)
168 – Screw the male connector (8) into brake caliper (9).
169 (Fig. 7)
173 – Bolt the brake caliper (9) down to the supporting arm (T) and support (4), using bolts (10).
174 – Tightening torque = 123 Nm
175 (Fig. 8)
179 – Disconnect plug (S).
180 – Remove bracket (H).
181 (Fig. 9)
185 – Remove the blind plugs (B).
186 – Slightly grease the connecting pieces (11).
187 – Insert the connecting pieces (11) into the hydraulic valve (12).
188 (Fig. 10)
192 – Bolt on hydraulic valve (12) using bolts (13).
193 – Tightening torque = 25 Nm
194 (Fig. 11)
198 – Bolt on bracket (H) using the existing bolts.
199 – Bolt on trousers (14).
200 Tightening torque = 35 Nm
201 – Bolt on hose (15).
202 Tightening torque = 35 Nm
203 (Fig. 12)
207 – Bolt hose (14) to the brake caliper.
208 – Bolt on trousers (L).
209 (Fig. 13)
213 – Remove blind plug from hydraulic pump.
214 – Screw in the male connector (16).
215 – Bolt on trousers (15).
216 (Fig. 14)
220 – Plug relay (17) into location (K15).
221 (Fig. 15)
228 Venting the brake caliper hydraulic cylinder
229 – Connect the vent hose (L) with a collecting container to the vent valve (M).
230 – Start the diesel engine.
231 – Slacken off the vent valve (M).
232 – Actuate the front attachment quick stop solenoid valve (Y101) and the master valve (Y77) mechanically, using an aid.
233 Aid: pin 2 mm
234 The hydraulic oil must come out without bubbles.
235 – After closing the vent valve (M), stop actuating the solenoid valves.
236 – Turn off the diesel engine.
237 (Fig. 16, 17)
239 4.1.3 Prepare and carry out a test run.
240 – Carry out the following work before the test run:
241 – Retighten the threaded joints of all newly fitted parts.
242 – Refit any safety features previously removed.
243 – Check the hydraulic oil level. Top up if necessary.
244 – Check the gearbox oil levels of fitted component. Top up if necessary.
245 – Put back the tools used.
246 – Check retrofitted and/or removed electrical connections.
247 – Grease all newly added lubrication points.
248 – Check adjustments on the machine.
249 – Carry out a test run.
250 – Check the hydraoduction
250.2 2 Security Councils
250.3 3 pieces fournies
251 4 Assembly
252 4.1 Stop rapid de l’outil frontal
254 4.1.1 Setting the machine
257 (Fig. 1)
259 4.1.2 Pose du Stop rapide de l’outil frontal
263 – Using the special tool (V), creates a sous pressure in the hydraulic oil reservoir (P) or from the hydraulic fluid.
264 – Outil special:combinaison de vannes pour crer une depression, pice de change N 000 181 619 1.
265 (Fig. 2)
269 – Dvisser la conduite flexible (L) au lev de l’a le fer plat (5) avec les vis (6) et (7).
286 (Fig. 6)
290 – Visser le manchon filet (8) sur l’trier de frein (9).
291 (Fig. 7)
295 – Visser l’trier de frein (9) sur le bras support (T) et le support (4) en utilisant les vis (10).
296 – Couple de serrage = 123 Nm
297 (Fig. 8)
301 – Dbrancher le connecteur (S).
302 – Dvisser le support (H).
303 (Fig. 9)
307 – Enlever les tampons borgnes (B).
308 – Graisser lgrement les lments d
325 (Fig. 12)
329 – Visser la conduite flexible (14) sur l’trier de frein.
330 – Visser la conduite flexible (L).
331 (Fig. 13)
335 – Enlever les tampons borgnes sur la pompe hydraulique.
336 – Visser le manchon filet (16).
337 – Visser la conduite flexible (15).
338 (Fig. 14)
342 – Insert the relay (17) on the placement (K15).
343 (Fig. 15)
350 Purger l’air du vrin hydraulique de l’trier de frein
351 – Brancher le flexible de purge d’air (L) with the bolt collector at the level of the vanne de purge (M).
352 – Start the diesel engine.
353 – Desserrer la vanne de purge d’air (M).
354 – Mechanic action for the quick start of the frontal tool (Y101) and the c
358 – Arrter diesel engine.
359 (Fig. 16, 17)
361 4.1.3 Prepare a functional test and the realiser
362 – Le cas chant, effectuer les travaux suivants avant d’effectuer le test de fonctionnement :
363 – Reserrer les raccords visss de toutes les pices venant d’tre poses.
364 – Poser les dispositifs de scurit dposs precdemment.
365 – Verifier of the level ofinstructions
5.1 2.1 Note
6 3 Scope of delivery
6.1 3.1 Retrofit kit 000 014 922 0
7 4 cultivation
7.1 4.1 Attachment of additional work lighting
8 1 Introduction
8.1 1.1 General Information
9 2 Safety precautions
9.1 2.1 Important
10 3 Package list
10.1 3.1 Retrofit kit 000 014 922 0
11 4 Mounting
11.1 4.1 Installation of additional work lights
12 1 Introduction
12.1 1.1 General Councils
13 2 Security Councils
13.1 2.1 Observer !
14 3 pieces fournies
14.1 3.1 Ultra-equipment kit 000 014 922 0
15 4 Assembly
15.1 4.1 Montage de l’clairage de travail supplmentaire
00 0293 951 0.pdf
Table of Content:
6 1 Introduction
6.1 1.1 General information
7 2 Security
7.1 2.1 Note
8 3 Scope of delivery
8.1 3.1 Telematics
9 4 Cultivation
9.1 4.1 Telematics
10 1 Introduction
10.1 1.1 General Informating
13.1 4.1 Telematics
14 1 Introduction
14.1 1.1 General Councils
15 2 Security Councils
15.1 2.1 Observer !
16 3 pieces fournies
16.1 3.1 Telematics
17 4 Assembly
17.1 4.1 Telematics
18 1 Introduction
18.1 1.1 General indications
19 2 Medidas de seguridad
19.1 2.1 Observar
20 3 Conjunto de suministro
20.1 3.1 Telematics
21 4 Montaje
21.1 4.1 Telematics


John Deere Repair Technical Manual PDF


John Deere Repair Technical Manual PDF
John Deere 18-Speed PST Repair Manual Component Technical Manual CTM168 10DEC07
John Deere Repair Technical Manual PDF


John Deere Parts Catalog PDF
John Deere Tractors 7500 Parts Catalog CPCQ26568 30 Jan 02 Portuguese


John Deere Repair Technical Manual PDF
John Deere PowerTech M 10.5 L and 12.5 L Diesel Engines COMPONENT TECHNICAL MANUAL CTM100 10MAY11
John Deere Parts Catalog PDF
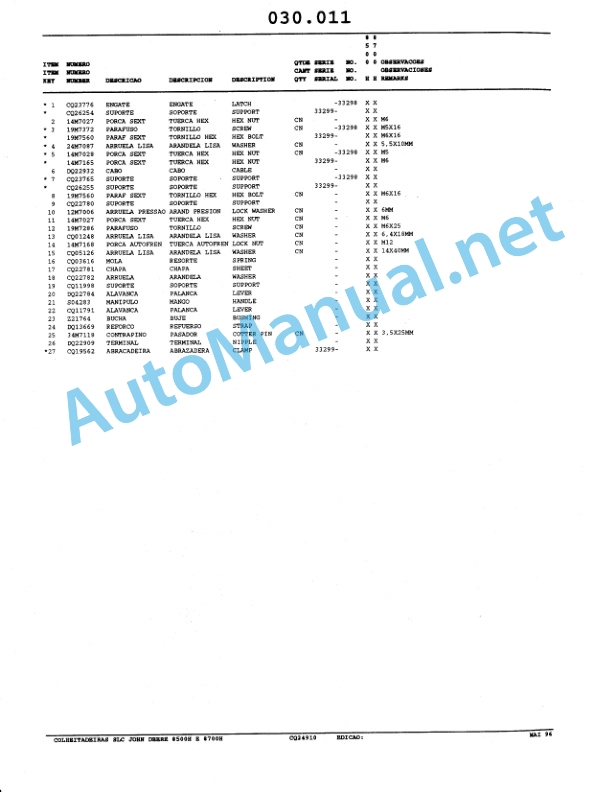
John Deere Harvesters 8500 and 8700 Parts Catalog CPCQ24910 Spanish


John Deere Repair Technical Manual PDF


John Deere Repair Technical Manual PDF


John Deere Repair Technical Manual PDF


John Deere Repair Technical Manual PDF
- Claas
- Grove
- New Holland
- Komatsu
- Kubota
- John Deere
- Linde
- Bomag
- CASE
- Clark
- JCB
- Jungheinrich
- Linde
- Yale
- Yanmar
- Manitou
- Manitowoc
- CNH
- Doosan
- Fiatagri
- Fiatallis
- Fiatallis Other Manual PDF
- Flexi Coil
- Ford New Holland
- Ford New Holland Other Manual PDF
- Huyndai
- Hypac
- Hyster
- Hyster Service Manual PDF
- Isuzu
- Kobelco
- Kohler
- Krupp
- Lombardini
- Mahindra
- Nuvera
- Perkins
- Sperry New Holland
- Utilev
- Versatile
- ZF